Take a moment to think about how many old or damaged computer motherboards you have tossed away over the years. Sure we try to repurpose everything we can, but reclaiming electronic components from complex devices can be overly time consuming if you don’t have the proper means of doing so.
Ideally, if we were to try removing components from a motherboard, an old stove or an unused toaster oven would be great. If you didn’t have either item at your disposal, you could always attack the board with a soldering iron and some braid – but who has the time for that?
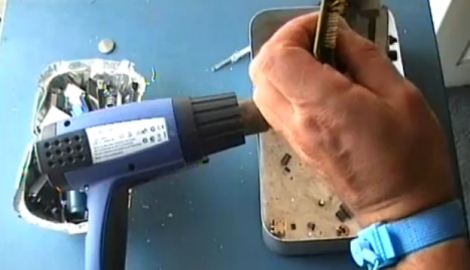
[Giorgos Lazaridis] over at PCBHeaven put together a quick video demonstrating his favorite technique for salvaging components after a motherboard has outlived its usefulness. Using a 2000W heat gun, a few hand tools, and couple of metal pans, he had the entire board stripped bare in about 30 minutes time. He talks about some of the best parts he has discovered while salvaging and points out a few hard-to-find items that can be easily obtained by tearing down a motherboard.
Sure his process might not be as easy as inverting a PCB in an oven, but his method is cheap, portable, and takes up very little space.
Keep reading to see [Giorgos’] video demonstration and don’t forget to check out some of the other cool stuff he has done in the past, such as his temperature-controlled soldering station, this acrylic bender, or this bench top function generator.
[youtube=http://www.youtube.com/watch?v=L8GTW_7GHc0&w=470]


Quick and dirty but effective. Looks like he keeps the heat to the back of the board. I wonder if there is any possibility of damage to any of the more delicate components as a result of the somewhat more intense heat than you would see vs typical reflow soldering methods?
I used to do this when I was young. Now i just buy parts. Lots of bad smells and dangerous gases used
to come off the boards I salvaged, I hope that is less the case with newer rohs stuff. I always did it outdoors.
sorry, I DO like to be generous in my posts here, but this is just a re-hash of tricks we ALL did some 20+ years ago (`cept we mostly used a blow lamp instead of a heat gun).
it`s Good that it`s still used though, and maybe some of the Newer “hackers” will benefit from this Very Old trick.
when i do this i always end up burning the boards. the smell of a cooked PCB takes days to go away in my open carport.
Old information, yet very interesting video. This could also help you to resolder those laptop motherboard that have GPU’s falling off…
Might it work with a hair drier?
@MrX,
Yes, it can, if you have one that blasts 300C+ :)
On the serious side, hair drier is not supopsed to get that hot. You can buy hot air blower at any tool store – mostly used to strip paint.
You can also find smaller units in hobby shops – used to soften some materials.
I uploaded this video for 2 reasons. First, to demonstrate this method to a reader from China (i promised him i will). And second, to point the benefits of salvaging parts. Money saving is not the point that i wanted to show. I discover parts and solutions every time i salvage a PCB.
And regarding the bad smell, if the temperature is kept stable and the PCB is not burned, then it does not smell that bad. In any case, the whole procedure must be done outdoors. I did it in front of the door with the door open wide.
Back when I was 12 or so stripping down boards in the basement I used to be pretty efficient with just my 35 watt weller iron.
I would stick part of the board with no components into a vice on my bench. Put a ball of solder onto the iron. Heat up the pins on the component I wanted out. Then…. whack the PCB with the back of a screwdriver. Solder would go flying and the component would come out with a delicate tug from some needle nose pliers.
Worked great but pissed my dad off because I always had solder embedded in my clothes. I still have bins of parts from doing this somewhere in my dad’s basement.
I don’t recommend this method unless you do it outside and wear a lab coat.
You have to be really careful not to overheat the components when using this method… not that long ago I was doing the same thing with a motherboard and one of the electrolytic caps exploded sending molten solder everywhere. A face shield, gloves, and long sleeves are a must.
Sorry for the double post… I forgot to mention that having a heat gun would have been great as a kid but when I started out I thought my 35 watt weller was the shit (was using a wood burner before that).
:)
Another thing to think about is the potential to damage parts and not know they are damaged. Debugging sure gets fun when every single component *could* be broken.
This is absolutely great for salvaging connectors and the discrete components off PCBs – I do it regularly myself. If you want to experiment with something in particular, there is also good value in hacking off still fully populated bits of PCB you are interested in.
For example the motherboard in the video had an AC97 audio chip on it which would take a good amount of research and a fair number of extra components to ever get working again. However it was situated on a well defined portion of PCB grouped together with all the supporting components. Saw that piece of board off before you start depopulating it and with a little tracing to find the power and input signals, you have a reusable high quality audio DAC.
I have been using an old propane torch and heating the back of the motherboard and then quickly slap the motherboard onto a hard surface, that makes the parts fall out, with a little practice you can heat the motherboard without it catching fire, still stinks, and you should only do this outside and with some protection for your lungs.
I’ll second the propane torch technique, been doing it for three decades after hearing about it from an electronics engineer in the 70s. I do it outside as the boards do burn occasionally, as has been said.
I heat the boards and slap them over the edge of my box trailer that sits in my yard (empty) and the solder all splats out. Except, I do it with the component side up rather than down. That way the components do not end up with solder blobs on them or their legs, but rather stay in the board where I just wiggle them out. Don’t hit too hard or the board will flex and spring, and the components fly out and go everywhere!
Yeah, I used the gas iron heat gun trick cept I over heated a cap once and it vented at my face. Stunk to high heaven and scared the crap out of me. Don’t worry, I’m ok and I’m more careful now (face protection, ventilation, etc).
i just sat in my bedroom for hours desoldering all my components one by one with a solder pen. i didn’t even think about this. a cloth iron would work to would it not?
I can just see the banner ads now…
“Digikey hates him! Hacker salvages parts from old computers a little bit every day using this one weird old tip discovered by a [your local metropolitan center here] mom! Click here!”
lol, he heats the board without removeing the battery…
i just break the board around the components, because: no heat, cutting takes forever and exposes you to dust made of ??? i tried desoldering some usb ports.. not happening.
I have to buy myself a heat gun and use this method then. I’ve been soldering stuff one-by-one using a flat-tip soldering iron and vacuum pump. It is fairly quick for discrete and DIP components but near impossible for SMD.
I have a couple of SMD brushless motor controllers which I have in few dvd/cdrom boards which I want to salvage. Looking forward to acquire my new heat gun.
barbarians ! why you just dont kick the crap out of the PCB until components fall off, since this method will cause just as much if not more damage. Chinese sell excellent desoldering station clones with temp control for 100$
i should make a video of my method
take 1 board
apply propane+energy to back of board(opposite of usable components)
cook until nice and black
smack back of board with somthing other than your hand(its HOT, a hand WILL work but it isnt recomended)
entire board desoldered in 5 min
also
small value electrolitic caps are fun to overheat, they make a nice satisfying POP
past like….. 1000 uf? they pre-cut the tops so they vent at lower pressure
also make sure to remove any delicate/valuable components(see: large transistors) by hand(a dremel works wonders) before applying a torch to the board
I just use a MAPP gas blowtorch… a little overkill, but it’s _very_ quick.
A Gas Welder is also very very very quick.
You can also use the heat gun for starting a charcoal barbeque.
Thanks for this video. The heat gun may be so better than the weller iron in this case, using the correct technic as showed in the video.
Thanks!
your english is awesome. it gave me strength to watch till the end!