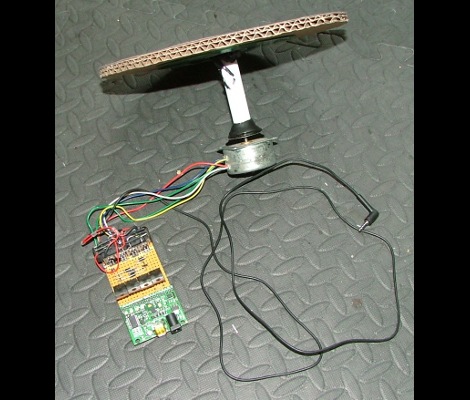
[Fergus Kendall’s] company is making development and breakout boards targeting electronic hobbyists. As with any endeavor that involves selling something, they need marketing. It sounds like [Fergus] was put in charge of getting some nice animated 360 degree images of each component. Instead of going through the drudgery of snapping frames by hand in a stop-motion-style, he whipped up a rotating platform that does the work for him.
The brain of the operation is a Boobie Board, a microcontroller breakout board that is one of their products. It controls a stepper motor attached to the cardboard platform via a quartet of power transistors. [Fergus] mentions in passing that their digital camera didn’t have a connection for a shutter trigger attachment. But they modded it to make things work. There’s no detail on that part of the hack but we’d wager that they soldered a transistor to the contacts for the shutter button.
The stepper motor has 48 steps, so the hardware is programmed to take 48 pictures which become the frames of an animated GIF – embedded after the break – to show off the product.


Confusing topic title is confusing…
Nice idea, although I usually find animated gifs more annoying than practical/nice.
If you use this to put a few stills on the product page I would think it would be sufficient.
Maybe it’s the fps but I get a little nauseated if I look at the gif too long.
@Nicco, i was about to say the same :)
They can’t be the hobbiests. Nobody is hobbier than me.
Is proofreading simply too much for you hackaday writers?
First off: the title
2nd: hobbiest->hobbyist
3rd: motor as->motor has
http://www.youtube.com/watch?v=J7E-aoXLZGY&feature=youtube_gdata_player
I literally gasped at this.
I’ve been working on something similar, after digitizing I’m making a player that shows the frames in the direction you drag and flick.
My inspiration was that iPad app “The Elements” ‘cept you gotta use the mouse
I’m going to use 143 frames but the subjects are bigger. Not for components, for fox figurines. I need to immortalize them in case they get broken!
The camera I will use is not mine, but it has an IR trigger that I have the codes for so no harm to the camera
My platform ended up more complicated, thats ok because I need more precision and weight
Nice outcome, I wish to get the lighting consistent like yours!
An excellent little hack! I see that the exposure changes slightly from frame to frame – if the camera had a manual mode, or auto exposure lock, using that would probably lead to a more consistent result.
Although admittedly if the camera doesn’t have a shutter release, it may well not have either of the above…
They should add a mouseover pause to it. that way you can get an overall look but then you can get a good look at it from one position when you mouseover.
Put the camera on MANUAL exposure!!!! The exposure differences between shots make the gif annoying to watch.
This is gimmicky and far more complicated than it needs to be, both of which are traits of an excellent hackaday project. Very cool.
[Harford Hackerspace] won the first ever Baltimore Hack-A-Thon competition building something very similar. Have a look at the build notes:
http://wiki.harfordhackerspace.org/index.php?title=RotoFoto
Here is a good image of it: http://harfordhackerspace.org/wp-content/gallery/cnc-user-group-02-13-2011/img_0166.jpg
and lastly here is the time lapse video and blog post about it:
http://harfordhackerspace.org/2010/11/haha-wins-first-place/
Slower rotation and higher frame rate would be preferable…oh, hang on, that’d be a video…
I learn from this that 7.5 degrees is much more of a jump than you’d think, which is surprising to me, I would have thought 48 steps would be plenty to give a much more smooth effect, live and learn eh.
Incidentally, it’s 2011, animated PNG would be more with the times perhaps with its higher colordepth, and it being now native to all browsers.
Did this better in 48 hours a year ago…
I made this one:
http://biosocket.com/wp-content/uploads/indiana-jones-sr-flight-1549.gif
Check my name link…
what about taking a video of it, and then converting to gif?
you might get better framerate
The video thing seems like a good idea until you try it. Getting a seamless loop is difficult as the frames never seem to line up. And most video cameras don’t have as much control over exposure, etc. that is necessary to get these to look right. Also, when doing small stuff, lighting is paramount. Still cameras have flash. If you were using video, you’d need a entire light rig and really nice camera to make it look right. An $80 point-and-shoot does a good job when using stills.
You know, I’d have to use two of those boards, just to say my project has BOOBIES! :)
BOOBIES FTW!
I did the same kind of thing years ago. Here is a 64 shot example, with manual exposure & focus (and 1 glitch):
…
Okay, no html. Here is a direct link:
http://www3.telus.net/ksoft/bear11.gif
FYI, if you have one of the supported Canon cameras, there are commands that CHDK has to trigger LED’s and detect USB power. What I used for my set up was to manually turn it, and use a motion detection script to take a shot as soon as the figurine was in the new position and I had moved out of the shot.
I wonder if you could do one range of shots then nudge the platform half a step and then do another run and then interleave to get a 2×48=96 frame animation, and I wonder if that would look smoother.
You could put the rotating platform on a simple platform that needs only to to rotate a very small bit to and fro, maybe with a servo.
It’s probably me but the jerkiness irks me a bit.
@Whatnot: You can just add another gear to change the ratio of servo RPM to platform RPM, therefore changing the angle change between shots.
Dunno, the manual drag-to-rotate method used eg. on gsmarena in their reviews always seemed to work pretty well to me. I’m sure it wouldn’t be hard to find some free embeddable thingy that can do that once you’ve got the pictures…
My similar project, Packshotnik (it was here), uses a modified servo and shoots IR trigger commands to the camera.
This is a nice project. Yes you can shoot HD video these days, but this method gives blurless results. This project can be improved by making the platform independent of the motor and adding a reducing transmission. It could be something simple, like a small rubber wheel that touches the platform on the side (remember old cheap LP record players?)
@Picture Critic; Then it wouldnt be a GIF. It would be a script controlling multiple images.
I could actually use one of these. Was thinking of shooting videos on a record player, but this is nicer. It has officially earned a spot on my to-do list. :)
FYI, creating an animated GIF from an ordered series of pictures can be as simple as installing ImageMagick, then issuing the command ‘convert *.jpg animation.gif’. (My full script to do it was a *lot* more complicated, as I used exposure bracketing, an oscillating option, etc.)
Just over a year ago, I built something similar.
The inspiration came from a friend, who built the interface for viewing it and took a panoramic photo of his office by hand.
My stepper driver was built on a breadboard with a pair of discrete transistor H-bridges, a circuit that surprisingly enough didn’t ever catch fire.
Driven by my Arduino (yeah, bring it on with the hating.) with host software written in Python, which handled uploading to my site too.
If there’s enough interest, I might upload it someday.
Enough talk, here’s a link: http://nathan7.eu/stuff/360/
–Nathan
The camera used for my version was a webcam – the host software sent a step command, waited for it to complete (plus a little longer) and took a picture with the webcam. Rinse and repeat, 50 more times.
Hmmm… It occurred to me that you could do this with automatically with *very* basic electronics:
1. Create a rotating platform with a lazy susan/(w/e) with a circumference that is an easy multiplier of 3/8/10/etc (60cm/24″ is a good value, as it will give you a platform that is ~20cm/~7 1/2″ wide.), and an edge that is an inch or so high.
2. Place a vertical staple (Or more if necessary at each mark on the edge.
3. Anchor 2 stiff wires so that they will brush against the staples to create a circuit.
4. Connect the brush wires to one side of a relay, so that when the brush circuit is closed, the other circuit on the relay is disconnected.
4. Connect the brush wires to a trigger for your camera.
5. Connect the other side of the relay from power to a motor that rotates the platform.
6. Connect a separate circuit with a photo sensor (?) to the motor.
7. Connect a power switch to the power source.
When the brush isn’t touching the staples, the platform rotates. As soon as it does, the motor stops rotating the platform, and camera is triggered. As soon as the shot is taken, the motor begins rotating again.
Sound workable?
Animated PNG sounds like a good idea, until you realize that it’s really a kind of a hack and the support for it is really patchy, and PNG is not that great for photographic content. Having a 48 frame animation means that you’re going to download something like a 10 megabyte file.
But hey, if you didn’t complain when dialups took two minutes to download a jpeg, you’ll be just fine.
@Dax I know the files get bigger if you use more colordepth, but most all browsers support png so for webposts the support is sufficient (and I have 100Mbit download so I’m not too worried :P)
But yeah if you have a budget hosting package and land on reddit for instance it can go foul, and on many sites if you upload a png in a comment section or forum they for some reason alter it to a single image file yet do not do that with animated gif, which is pretty sad and backwards IMO.
@DeadlyDad (and others) true a gear or reduction wheel to increase the number of shots would work and be better probably, but in my suggested setup you can leave the previous build unaltered so it seems more conducive to being implemented since the builder doesn’t have to start over and you can just try it and easily go back if you don’t think it’s worth it after all.
You can now get the prototyping board this was made with from their website http://www.archonixtech.com/ I’ve got one and it’s a really nice bit of kit