A custom LEGO throne for Dune's Baron Harkonnen.

A Throne For LEGO Baron Harkonnen

If you’re both a LEGO and a Dune fan, unless you’ve been living in a cave on Mars with your eyes shut and fingers in your ears, you’re probably aware that LEGO released a set for the royal Atreides ornithopter. The blades flap and everything. Anyway, it comes with several minifigures, including one that doesn’t quite fit with the others — a full-length Baron Harkonnen.

The inner workings of the Baron throne, showing the Baron affixed to his stepper motor. Given that, [gorkyver] decided to create a throne for the Baron that he could rise from, just like in the movie, while delivering the iconic line. With no reference materials available other than pausing the movie, [gorkyver] created a throne from scratch in BrickLink Studio, which made it easy to generate both a parts list and step-by-step instructions.

At the heart of this build is an Arduino Nano, which takes input from the momentary push button and starts the show. The Baron slowly rises on a rack and spur gear connected to a stepper motor, and a DF Player Mini runs the audio through a 75 mm speaker.

Rather than just buying a big box store display case off of eBay, [gorkyver] recreated the skeleton in Fusion 360 and used a hairdryer to bend a sheet of PET-G around to enclose it. A couple of sweet adhesive graphics later, and it totally looks like a real set on display. Don’t miss the demo/build video after the break.

Did you hear? The European Space Agency printed some bricks out of meteorite dust, and there might be one on display near you.

Continue reading “A Throne For LEGO Baron Harkonnen”

Putting Some Numbers On Your NEMAs

It’s official: [Engineer Bo] wins the internet with a video titled “Finding NEMA 17,” wherein he builds a dynamometer to find the best stepper motor in the popular NEMA 17 frame size.

Like a lot of subjective questions, the only correct answer to which stepper is best is, “It depends,” and [Bo] certainly has that in mind while gathering the data needed to construct torque-speed curves for five samples of NEMA 17 motors using his homebrew dyno. The dyno itself is pretty cool, with a bicycle disc brake to provide drag, a load cell to measure braking force, and an optical encoder to measure the rotation of the motor under test. The selected motors represent a cross-section of what’s commonly available today, some of which appear in big-name 3D printers and other common applications.

[Bo] tested each motor with two different drivers: the TMC2209 silent driver to start with, and because he released the Magic Smoke from those, the higher current TB6600 module. The difference between the two drivers was striking, with lower torque and top speeds for the same settings on each motor using the TB6600, as well as more variability in the data. Motors did better across the board with the TBC6600 at 24 volts, showing improved torque at higher speeds, and slightly higher top speeds. He also tested the effect of microstepping on torque using the TBC6600 and found that using full steps resulted in higher torque across a greater speed range.

At the end of the day, it seems as if these tests say more about the driver than they do about any of the motors tested. Perhaps the lesson here is to match the motor to the driver in light of what the application will be. Regardless, it’s a nice piece of work, and we really appreciate the dyno design to boot — reminds us of a scaled-down version of the one [Jeremey Fielding] demonstrated a few years back.

Continue reading “Putting Some Numbers On Your NEMAs”

This Robot Picks Locks, If You’re Very Patient

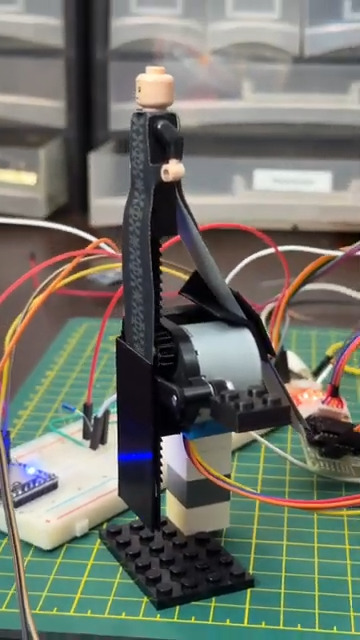
We all know the Hollywood trope of picking a lock with a paperclip, and while it certainly is doable, most reputable locks require slightly more sophisticated tools to pick effectively. That’s not to say that wire is off the table for locksports, though, as this cool lock-picking robot demonstrates.

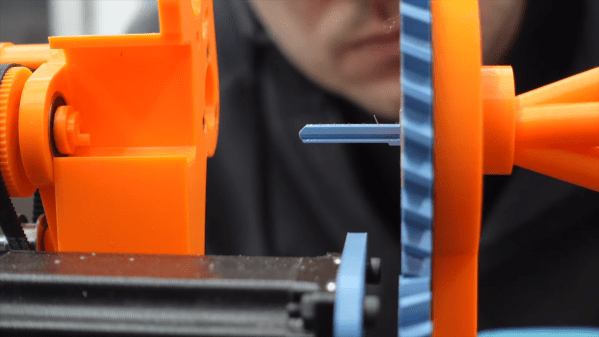
The basics behind [Sparks and Code]’s design are pretty simple. Locks are picked by pushing pins up inside the cylinder until they line up with the shear plane, allowing the cylinder to turn. Normally this is done a pin at a time with a specialized tool and with a slight bit of torque on the cylinder. Here, tough, thin, stiff wires passing through tiny holes in a blade shaped to fit the keyway are used to push all the pins up at once, eliminating the need to keep tension on the cylinder to hold pins in place.

Sounds simple, but in practice, this looks like it was a nightmare. Getting five wires to fit into the keyway and guiding them to each pin wasn’t easy, nor was powering the linear actuators that slide the wires in and out. Applying torque to the lock was a chore too; even though tension isn’t needed to retain picked pins, the cylinder still needs to rotate, which means moving the whole picking assembly. But the biggest problem by far seems to be the fragility of the blade that goes into the keyway. SLA might not be the best choice here; perhaps the blade could be made from two thin pieces of aluminum with channels milled on their faces and then assembled face-to-face.

The robot works, albeit very slowly. This isn’t [Sparks and Code]’s first foray into robot lock picking. His previous version attempted to mimic how a human would pick a lock, so this is really thinking outside the box.

Continue reading “This Robot Picks Locks, If You’re Very Patient”

A small gauge showing power generated by a house's solar panels.

Cute Solar Power Gauge Brightens The Day

What’s the first thing you want after installing solar? All the sunshine you can get, of course. Especially if you did it in the wintertime. And what would be more fun than monitoring your power generation, especially leading up to the equinox, or start of spring? Probably not much, especially if you built a cute solar power gauge like [Ben] did to keep him from obsessively checking his phone.

At the heart of this build is the affordable Seeed Xiao ESP32C3, which controls an equally cost-effective automotive stepper via an L293D H-bridge driver. Then it was just a matter of hooking it into Home Assistant. As power is generated by the solar system, the cute little sun on the gauge rises and shows the kilowattage gained.

Unfortunately there’s no real data sheet for the stepper, so [Ben] opted to use the 5 V from the USB that’s powering the ESP32. However, it seems like this might not be enough power because the gauge appears to drift a bit. To fix this, [Ben] runs the stepper_init script twice a day, which cranks the dials all the way forward then all the way backward before settling on the last known value.

Are you interested in solar? Here’s how you can build a small power system.

Tactical Build Makes Machining Splined Shaft A Snap

Quick, what’s 360 divided by 23? It’s easy enough to get the answer, of course, but if you need to machine a feature every 15.652 degrees around a shaft, how exactly would you accomplish that? There are a number of ways, but they all involve some degree of machining wizardry. Or, you can just make the problem go away with a little automation.

The story behind [Tony Goacher]’s Rotary Table Buddy begins with some ATV tracks he got off AliExpress. His idea is to build a specialty electric vehicle for next year’s EMF Camp. The tracks require a splined shaft to drive them, which would need to be custom-made on a milling machine. A rotary table with a dividing plate — not as fancy as this one, of course –is usually the answer, but [Tony] was a little worried about getting everything set up correctly, so he embarked on a tactical automation solution to the problem.

An RP2040 provided the brains of the project, while a NEMA 23 stepper provides the brawn. [Tony] whipped up a quick PCB and 3D printed a case for the microcontroller, a stepper driver, an LCD display, and a few buttons. He 3D printed an adapter and a shaft coupler to mount the stepper motor to a rotary table. From there it was just a matter of coming up with a bit of code to run everything.

There’s a brief video in [Tony]’s blog post that shows Rotary Table Buddy in action, indexing to the next position after cutting one of the 23 splines. He says it took about ten minutes to cut each spline using this setup, which probably makes to total cutting time far less than the amount of time invested in the tool. But that’s hardly the point, and besides, now he’s set up for all kinds of machining operations in the future.

And we sure hope we hear about the EMF Camp build, too.

Fixing A Reflow Oven’s Conveyer Belt With An NE555 And Stepper Motors

Some design choices on manufacturing equipment really leave you scratching your head for a while, as recently happened to [Chris Cecil] when the belt on a reflow oven’s conveyer snapped. Although the solution seems simple enough, getting a new belt on the thing would involve essentially taking the entire machine apart, before reassembling it again. Thus the frayed belt went through the oven over and over until during a recent production run of Smoothieboard controller boards until [Chris] heard a funny noise and the conveyer ground to a halt.

Moving the conveyer by hand kind of worked, but with a more permanent fix urgently needed to finish the production run, two stepper motors took the place of the belt, which just left driving these steppers to keep the conveyer moving in sync. Lacking a simple Arduino board to toss at it, and with a Smoothieboard being absolute overkill, [Chris] figured that a humble NE555 timer IC ought to do the job just as well.

Using a project on Hackaday.io by [KushagraK7] as the starting point, and a 1992-vintage NE555 IC harvested from an old project, [Chris] managed to put together a basic stepper driver that uses the NE555 to provide the timing signal. In addition to restoring basic functionality like starting and stopping the conveyer belt, [Chris] added a new feature with the reversing of the conveyer direction. Along with some cobbled together components to physically rotate the conveyer’s two rollers, it restored the reflow oven to working condition.

And one day the prototyped driver board will be updated to a proper PCB. It’s only temporary, after all :)

Continue reading “Fixing A Reflow Oven’s Conveyer Belt With An NE555 And Stepper Motors”

An Atomic Pendulum Clock Accurate Enough For CERN

That big grandfather clock in the library might be an impressive piece of mechanical ingenuity, and an even better example of fine cabinetry, but we’d expect that the accuracy of a pendulum timepiece would be limited to a sizable fraction of a minute per day. Unless, of course, you work at CERN and built  “the most accurate pendulum clock on the planet.”

While we’re in no position to judge [Daniel Valuch]’s claim, we’re certainly inclined to believe him, mainly because the 1950s-era Czechoslovakian pendulum clock his project was based on, the Elektročas HH3, was built specifically as a master clock for labs, power plants, and broadcast use. The pendulum of this mid-century beauty is made of the alloy invar, selected for its exceptionally low coefficient of thermal expansion. This ensures the pendulum doesn’t change length with temperature, but it still only brings the clock into the 0.1 second/day range.

Clearly that’s not good enough for a clock at CERN, the European Laboratory for Nuclear Research, where [Daniel] works as an RF engineer. With access to a 10-MHz timebase from a cesium fountain atomic clock — no less a clock than the one that’s used to define the SI second, by the way — [Daniel] looked for ways to sync the clock up to it. Now, we know what you’re thinking — he must have used some kind of PLL to give an electromagnetic “kick” to the bob to trim the pendulum’s period. Good guess on the PLL, but the trimming method is a little cruder — [Daniel] uses a stepper motor attached to the clock’s frame to pay out or retract a length of fine chain into a cardboard dish attached to the pendulum’s rod. The change in mass changes the pendulum’s center of gravity, which changes its effective length, and allows the clock to be tuned a couple of seconds per day.

It seems like [Daniel] is claiming that his chain-corrected clock won’t drift more than a second from the cesium clock for 158 million years. Again, we’ll take his word for it, but it’s a wonderfully ad hoc approach to tuning the clock, and we appreciate its simplicity.