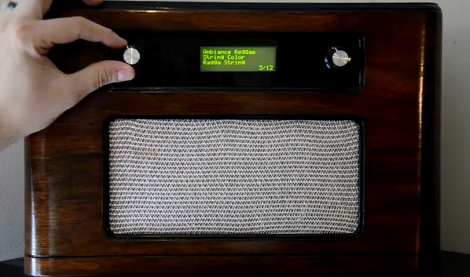
[Jay Collett] likes listening to Internet radio stations and decided to build his own standalone hardware that lets him listen without being at his computer. But he wasn’t starting from square one on this project. [Jay] built on the epic instruction set that [Mighty Ohm] published when he first built his own WiFi radio.
Both of these radios used the same method of getting onto the internet; a hacked router. We kind of like this because it means you should be able to use the radio as a bridge for wired Ethernet devices. But we digress. [Jay] departs from the instructions by using an Arduino and its IDE to interface an LCD screen with a different line/column orientation than the original, and to implement a different control scheme. This makes the project a bit more approachable if you prefer not to roll your own electronics.
Take a look at the video after the break. The router takes quite a while to boot, but once it does it seems that the controls are both intuitive and responsive.
[youtube=http://www.youtube.com/watch?v=RzRpLWX_Lw4&w=470]


this is a cool build. Thanks
I love that it takes a minute to boot. This actually more closely emulates the behavior of the older tube style radios that had to “warm up”. Pretty sweet project. Nice job Mike!
Tweeks
Nice choice for the lcd color, too! Somehow has the look and feel of a magic eye tube. Now just hook up some PWM output to the backlight to let it grow brighter while booting ;)
I think an older android phone plus an arduino running the android development kit could make this pretty awesome, and very inexpensive.
android phones are certainly powerful enough for this, and much more, and you can control it from the arduino, allowing a custom physical button interface.
Awesome! I love lordicewind’s idea about the backlight while booting too. You need some retro knobs to go with that case though! Maybe these? http://alturl.com/w7rdd And don’t forget the washers! http://alturl.com/sauhu. You might find better than those elsewhere… that was just a quick check of one site that I know.
@jeremiah
I think the main point to the project was a retro look. No matter what kind of skin you use, nothing will ever beat being able to turn a knob to change a setting, volume, station, etc.
Awesome radio.
Is there any way to get FM or AM radio broadcasts via internet if the station isn’t live streaming from their site? I just feel ridiculous having to go out and buy a cheap FM radio to get local stations.
@abbott: With the hardware I described, you can do just that. Android phone with an attached arduino to handle the buttons & knobs.
@that1guy: not without FM tuning hardware.
@that1guy: You could add on the FM shield from sparkfun to give you FM/AM and streaming audio from the internet, not a bad idea actually, may try this myself…
http://www.sparkfun.com/products/10342
I have a very ancient valve radio at home somewhere which could be hacked in this way.
Wonder if its possible to use one of those WiFi miniPCI notebook cards in some way, this would reduce the cost a bit and they have relatively large pads compared with your average IC, so anyone can build it.
Have the micro detect card at startup so that it knows which card is connected and voila.
@ bothersaidpooh: Don’t go and kill old radios. that’s a shame. it’s most likely the only piece of electronics you own that may survive a nuclear electromagnetic pulse.
You should replace the screen with a colour phone screen that has a “radio dial” screen saver after a few seconds to look completly authentic, besides that great!
@ Jan: From the 90’s on the chinese have made cheap “Old Timey” radios that look pretty good for what they are but have just cheap chinese radio guts, if you find one cheap on Craigslist that would be prefect for a project like this.
Not to nit-pick a well-done project, but… did you mean to put the waves in the speaker cloth? It would drive me crazy looking at that. :P
I can’t wait until e-paper is as cheap and plentiful as character LCDs (seems like it’s taking forever, doesn’t it?). They’d make lots of cool “cloaked” displays possible. Imagine a nice d’Arsonval meter or tuning dial with e-paper for the scale! It would look like an original part most of the time (including your choice of font, logo, etc.) and still be a useful display like the LCD in this project.
if anyone is interested in mightohm’s setup: just on tuesday, newegg had the 520gu for $25 after rebate. add a usb soundcard from dx for about $2 and piggy back your avr/arduino or pic to control lcd and buttons. (newegg does price alerts)
if you want ethernet, wireless, serial, and usb the 520gu is probably the cheapest way to go.
right now, you could also get the 330ge for $22 after rebate. – not for this project however, it lacks the usb port. but i love the size: a full blown router the size of an add-on board (a shield in **duino lingo)