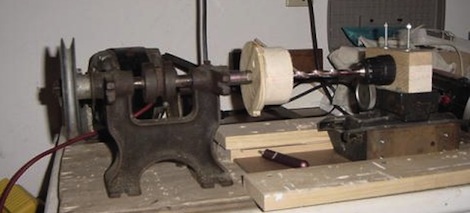
[McKGyver] needed a few parts manufactured. Instead of going the normal route – finding friends with machine tools or paying a machine shop, he improvised a rudimentary metal lathe.
As much as we love 3D printers, they’re not the be-all, end-all solution for everything. Sometimes, you need to get a little dirty and do it the old-fashioned way. [McKGyver] needed a way to produce aluminum shaft couplers to join stepper motors to lead screws. A 1940s grinding wheel was used for the headstock. Since [McKGyver] only needed couplers of one size, he made a jig out of wood to attach the aluminum blanks to the spindle. A drill and a focuser from a photographic enlarger makes up the tailstock of the improvised lathe. The use of a camera focuser is pretty clever. Unless the equipment has been damaged, it’s guaranteed to move in a straight line. A small laser was used to align the drill.
The finished couplers were concentric to 0.005″. A ‘passable precision’ for his application, and a clever build that doesn’t involve moving a thousand pound South Bend lathe.


Instead of drilling two different holes in the coupler and still end up with a rigid coupling, he could have drilled the needed hole right into the lead screw. Attach with epoxy (after cleaning out the cutting oil) or with a regular grub-screw and hole. you need much less room for your steppers that way, which makes it easy to keep them inside the enclosure.
Rigid coupling to the leadscrew is bad for motor’s bearings and thus is not recommended. Pretty much all of the commercial couplers are flexible in directions other than the axis of rotation.
Very nice! A good project for making something badly needed from scrounged stuff.
Look around you– can you construct some sort of rudimentary lathe?
+1000 MST3Ks to you, sir.
+1 Galaxy Quest reference
Excellent, that’s even farther back than mine! Wow, I forgot about that game, good call.
That was awesome :)
Also, cool project.
I’d rather have the thousand-pounder..
Has anybody tried turning steel on a wood lathe with hand-held tools?
In Alexander Weyger’s book, The Complete Modern Blacksmith, he mentions that his father turned parts this way….hss tools, slow speeds….
It’s great to see this fellow found a work-around but sometimes I think it’s far easier to just farm it out.
This is incredibly conveniently timed. I was just brainstorming how to do this the other day. My project involves taking an already machined part down a few mm, but it has to be exactly flat all the way across. (modifying camera lens flange focal distance to mount on different camera body). I thought about buying cheap lathe chuck and throwing it in the drill press with the part attached to that. Any suggestions? I might try this, but am worried about the alignment. Although .005″ should be plenty accurate for the lens I’m using. :P
this is so rad i just trash picked that exact 1940’s grinder and had the same idea to use it in a multi tool lathe my gand papi made lathes and drill presses out of old stuff like that
Bravo.
MacGuyver would be proud.
Hey thanks for featuring my work Hackaday! It was fun to see my hacked together lathe appear on my newsfeed today.
@ Cameron
I have tried the wood lathe technique for turning metal parts. Surprisingly it works like a charm for quick stuff if you can constrain the tools solidly. In fact, when I rebuilt my first wood lathe , I bolted the replacement motor to the lathe bed and turned down the motor spindle in place (see images here http://mckgyver.pbworks.com/w/page/20654161/LatheRebuild ).
@ Brian Benchoff
The name is McKGyver.
This reminds me of the Gingery series, where you need a lathe in order to build parts for your lathe, so he shows how to improvise one that’s good enough to get a proper lathe going, though Gingery’s improv was a little different from this.
Refreshingly elegant.
I don’t see anything resembling anything even remotely photographic related in the pictures… I see an old grinder and a drill chuck for the tailstock. He also mentions a laser shone across the piece but I don’t see that either.
I’m really intrigued by this setup but neither the writeup nor pictures seems to give much in the way of detail to a lathe-newb like me.