[Victor] may be onto something when it comes to project enclosures. He’s using a picture frame to house his electronics projects. This is made especially easy by the variety of sizes you can find at Ikea. Possibly the most important dimension is to have enough frame thickness to sandwich your components between the glass and the back plate of the frame.
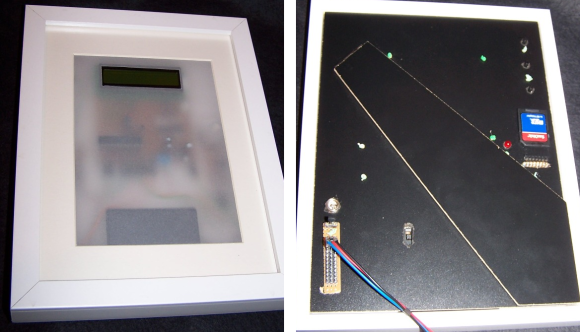
The project seen here is a temperature data logger. The frosted diffuser covering everything but the LCD screen and gives you a glimpse of what’s mounted to the back panel. He connected the four different protoboard components, along with a battery pack, to each other use right angle pin headers. They were then strapped to the back plate of the frame by drilling some holes through which a bit of wire was threaded. He even cut a hole to get at the socket for the temperature sensor and to attach the power input. So that he doesn’t need to open the frame to get at the data, the SD card slot is also accessible. His depth adjustment was made by adding standoffs at each corner of the frame, and replacing the metal wedges that hold the back in place.
You don’t need to limit yourself with just one. This UV exposure rig uses three Ikea frames.


That’s a great idea. Enclosures are such a pain in the ass.
Great idea even if from Ikea. Oh the toiletic whiteness! One could get an old ornate picture frame and go steampunk. Or go to a framer for any style. Craft stores sell 3D frames for such as dried flower “paintings” and shadowbox displays. Could hold a slice of pi and and such. Then there was the photocube, a foam stuffed plastic home for those old square format pics.
I can remember as a little child being scolded for touching framed pictures after they had fallen down in a mess with grandma going down behind the piano. Smash! Seeing such bastard design as a child perturbed me. Even Ikea uses those quasi-stable one side-legged props. Please hack a pair of legs to hold it up if not hung on wall.
It doesn’t seem that pratical after all… at least i would look for something with a full front panel to cut out to get something more presentable.
Personally i’m considering to get a laser cutter and cut/engrave my boxes when i need them and possibly other stuff. Unfortunately they cost money. There are some cheap ones on ebay but quality is mediocre and the software probably sucks.
In my country we have a ponoko-like business but it’s a bit pricey too and it would take some tests before getting the box pieces just right.
Hak5 did something similar with a server a while ago
Hello! I (Victor) sent this tip in, I saw it on Ikeahackers.net. I don’t know what the name of the guy / girl is whose blog is linked, but credit to whom credit is due…….
The ikeahackers page you mention links to the HAD link near the bottom.
Hi Victor
Thanks a lot for sending it
I own Tinkerprojects Blog
I’ve choosen a picture frame because I wanted to show not only the LCD but also (even if blurry) the electronics
And I also wanted to experiment with sewing boards instead of using nuts and bolts or hot glue
I heard the news today…
Caution! These could possibly contain horse meat! LOL…