LED Marquee Uses Discrete Through-hole Lights

through-hole-led-marquee

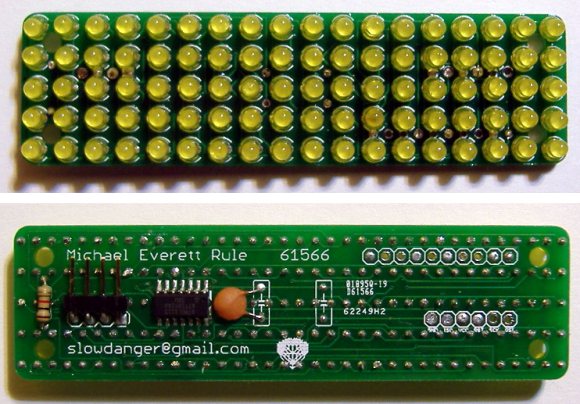
[Michael] built his own LED marquee using individual diodes. Despite his choice to forego the 8×8 or 5×7 modules we often see in these projects, his decision to spin a dedicated PCB saved him a lot of trouble during assembly. Sure, he still had to solder 180 leads on the 9×18 grid of lights, but at least he didn’t have to deal with wiring up the complex display layout.

The chip driving the display is an ATtiny24. You can see that it’s an SMD package and spans one row of the through hole LED footprint. There are way too few pins to drive a multiplexed display of this size. Instead of adding a separate driver IC he decided to design the display to use Charlieplexing. We didn’t see a schematic for the project, but judging from the board images all of the I/O pins are used by either the display itself, or the serial connection provided by that right angle pin header.

Self-waking Computer For DIY Cloud Storage

self-waking-cloud-storage

[Dominic] decided to take control of his cloud storage by switching to OwnCloud. Unlike most cloud storage solutions, this isn’t a company offering you free space. It’s an open source software package which your run on your own machine. [Dom] didn’t want to leave his box running 24/7 as it would be unused the majority of the time. So he hacked this router to switch on the computer whenever he tries to access the storage.

Obviously this is a Wake-On-Lan type of situation, but the hardware he has chosen to use doesn’t include those features. Since he already had this TP-Link 703n on hand he decided to use it as a controller for the computer. His method is quite clever. The router is running a script that monitors the computer and the bandwidth it’s using. When traffic from the network stops, the router will issue a shutdown command within just a few minutes. It then assigns itself the computer’s IP address so that it can listen for incoming requests and use the relay on that breadboard to turn the box back on. Obviously running the embedded system is much more efficient than having an entire computer turned on all the time, and it’s WiFi capabilities mean no cords to run to the home network.

Laser Spirograph

laser-spirograph

Here’s a weekend junk bin project if we’ve ever seen one. [Pat] used a quartet of computer fans to make his laser Spirograph. Deciding to try this simple build for yourself will run you through a lot of basics when it comes to interfacing hardware with a microcontroller. In this case it’s the Arduino Nano.

The Spirograph works by bouncing a laser off of mirrors which are attached to the PC fans. When the fans spin the slight alignment changes cause the laser dot to bob and weave in visually pleasing ways. You can catch twenty minutes of the light show in the clip after the break.

Three of the fans have mirrors attached, the housing of the fourth is used to host the laser diode and make assembly easier. A TC4469 motor driver is used to connect the fans to the Arduino. The light show can be manually controlled by turning the trio of potentiometers which are read using the Arduino’s ADC.

If you manage your way through this build perhaps you’ll move on to a setup that throws laser light all over the room.

Continue reading “Laser Spirograph”

Bit Banging Through A USB Parallel Port Adapter

If you’ve ever looked into low-level parallel port access you may have learned that it only works with actual parallel port hardware, and not with USB parallel port adapters. But here’s a solution that will change your thinking. It borrows from the way printers communicate to allow USB to parallel port bit banging without a microcontroller (dead link, try Internet Archive).

Sure, adding a microcontroller would make this dead simple. All you need to do is program the chip to emulate the printer’s end of the communications scheme. But that’s not the approach taken here. Instead the USB to RS232 (serial) converter also pictured above is used as a reset signal. The strobe pin on the parallel port drives an inverter which triggers a thyristor connected to the busy pin. Thyristors are bistable switches so this solution alone will never clear the busy pin. That’s where the serial connection comes into play. By alternating the data transmitted from the computer between the bit-bang values sent to LP0 and 0xF0 sent to the serial connector the eight parallel data bits become fully addressable. See the project in action in the clip after the break.

Framing Up Your Electronics Projects

framing-up-your-projects

[Victor] may be onto something when it comes to project enclosures. He’s using a picture frame to house his electronics projects. This is made especially easy by the variety of sizes you can find at Ikea. Possibly the most important dimension is to have enough frame thickness to sandwich your components between the glass and the back plate of the frame.

The project seen here is a temperature data logger. The frosted diffuser covering everything but the LCD screen and gives you a glimpse of what’s mounted to the back panel. He connected the four different protoboard components, along with a battery pack, to each other use right angle pin headers. They were then strapped to the back plate of the frame by drilling some holes through which a bit of wire was threaded. He even cut a hole to get at the socket for the temperature sensor and to attach the power input. So that he doesn’t need to open the frame to get at the data, the SD card slot is also accessible. His depth adjustment was made by adding standoffs at each corner of the frame, and replacing the metal wedges that hold the back in place.

You don’t need to limit yourself with just one. This UV exposure rig uses three Ikea frames.

Retro Gaming Just In-case

retro-gaming-just-in-case

You can look and look, but you won’t find a Super Nintendo inside of this retro gaming rig. [Webrow] is giving his vintage hardware a rest, and taking this all-in-one game emulator suitcase wherever he goes.

The machine at the heart of his build is of course a Raspberry Pi. You really can’t beat the ubiquitous board for cost, power, and hardware extensibility. An LCD panel from a broken laptop comes along for the ride having been mounted in the lid. For a long time there was no hope for reusing these panels, but [Webrow] found an adapter board (for nearly the same price as the RPi) which converts the DVI from the Pi to the LVDS needed by the screen. The connections and mounting scheme for the screen were where most of the project work was done. Connecting the controllers simply involved soldering some SNES controller sockets to an RPi breakout connector. We do have to compliment him on the red bezel which hides all of the power cords and other unsightly bits. The case look sturdy and ready to play!

Swiss Army Keys

swiss-army-keys

This isn’t a hack that shows you how to start a car without the keys. It’s a way to ditch the bulky keyring for a set of fold-out keys. [Colonel Crunch] removed the blades from the pocket knife and replaced them with the two keys for his car (one is ignition and door locks, the other opens the trunk). He didn’t take pictures of the process, but he did link to this unrelated guide on how it’s done.

About one minute into the video after the break we see each step in the build process. First the plastic trim is removed from either side of the knife. The blades are basically riveted on; there’s a pin which holds them in and either side of it has been pressed to that it can no longer move through the holes in the frame. To get around this one side is ground off with a rotary tool, and the pin is then tapped out with a hammer. The removed blade/scissors/tool is used as a template to cut the body of the key down to size and shape.  The pin is then hammered back into place before putting the plastic trim back on.

Continue reading “Swiss Army Keys”