If you’re thinking of trying the acetone-vapor polishing process to smooth your 3D printed objects you simply must check out [Christopher’s] experiments with the process. He found out about the process from our feature a few days ago and decided to perform a series of experiments on different printed models.
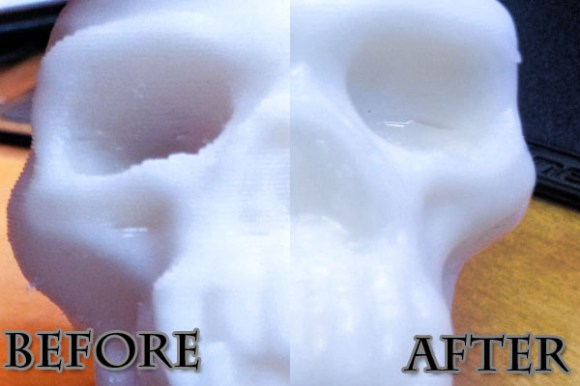
The results were mixed. He performed the process in much the same way as the original offering. The skull seen above does a nice job of demonstrating what can be achieved with the process. There is a smooth glossy finish and [Christopher] thinks there is no loss of detail. But one of the three models he tested wasn’t really affected by the vapor. He thinks it became a bit shinier, but not nearly as much as the skull even after sending it through the process twice. We’d love to hear some discussion as to why.
There is about eight minutes of video to go along with the project post. You’ll find it after the jump.


Ought to give this a go with methylene chloride. More toxic, but works faster.
Don’t you mean methyl ethyl ketone?
I think he means methylene chloride, also known as dichloromethane. It’s the main component of paint stripper and plastic solvent welding mixtures.
I know what it is. I get the feeling it would just melt your ABS model. Hence my suggestion for MEK.
Ill tell you one thing – use acetone and not diluted acetone.
Nail polish remover Wont cut it. It will start the chemical process but I think in the case of this experiment youll need full on hardware store acetone.
Looks nice, but it would be much nicer with some focus in the video.
Is it possible to get a few pictures of the models as they are now?
Yup… Click the first link, he has a ton of pictures.
Dont quote me no this but I have heard that the pro smoothing machines use Methyl Ethyl Ketone
… which is the same thing as Acetone
Sorry, not exactly the same. Acetone is dimethyl ketone. But I doubt it would make any difference in performance.
No.
MEK (butanone) is not acetone (propanone).
Are there any risks (in terms of air quality) if using acetone this way frequently? Is extra ventilation adviced or is there simply no such risk here?
No everythings fine, just real fine, you might get busted for impaired driving for up to about 10 hours afterwards, and stairs can be difficult, but as long as you have a cozy couch or something to curl up on and plenty of munchies and water, it’s all good until the spinning stops.
Maybe you should use pure aceton like medical type? Think the remover have some extra stuff inside! oil?
On his sie there is a closeup of the nail polish remover stating the contents as: Acetone, water, perfume and color. (http://www.trenchphysics.com/?attachment_id=53)
I was contemplating the same thing. The label doesn’t state what concentration the nail polish remover is at…
I would definitely try with pure acetone. I just checked the stuff I have – ingerdients: Acetone. shouldn’t be hard to come by.
I use 100% acetone – not fingernail polish remover – I think I paid $3.00 for a large can of it. The fingernail polish I found at home was only 20-40% acetone. Could be why he had the mixed results.
OT: It’s Polish REMOVER used here – of course it doesn’t work as well :-)
Haha!
Yea if you want pure acetone, you need to go to the hardware store, or a beauty supply. Both sell 100% acetone.
Something else to keep in mind…the vapor may not have been up to temperature. IR thermometers can’t read glass or shiny surfaces properly, you’re better off taping a small piece of packing tape or something to the jar and taking your reading off that.
This is 100% true. I can’t be completely sure that this is what caused the problems (personally, I think the fact that he used polish remover instead of pure acetone is probably the real problem) but I can vouch for the accuracy of this comment. My previous jobs was working for a major safety testing lab. We weren’t allowed to use IR thermometers for generating actual test data because there is so much that has to be taken into account in order to get accurate measurements (emissivity of the material being measured; ambient atmospheric conditions; etc.). There is no way in hell you should assume you’re going to get an accurate temperature value swinging it around like that (not that most people, like this guy, have any reason to know that before buying a cheap IR thermometer).
The same goes for those fancy IR heat cameras from companies like Fluke. They’re great for giving a general idea of the broad temperature variations between materials in a scene but, without a lot more info about the ambient conditions and materials themselves, never assume they are even close to accurate.
You just need a REAL IR thermometer…
Like this… http://img97.imageshack.us/img97/2879/irtherm001.jpg
Yah, no stinkin’ tiny laser diode, a real He-Ne laser tube with a beamsplitter so it’s coaxial with IR sensor, and a thumbwheel on the arse end to set emissivity.
I had it working, but it leaked smoke, was powering it off the bench supply and snagged a range switch… can probably fix it, it has nicads in, and I think the charging circuit took the hit.
Uh, yea but you still need to know the specific emissivity of every different material you want to get a reading for…
Yes, if only someone had compiled tables of that sort of stuff…
http://www.omega.ca/literature/transactions/volume1/emissivity.html
http://www.engineeringtoolbox.com/emissivity-coefficients-d_447.html
But trying to get emissivity off glassware or clear solvents is a bit daft.
Ummm, trying to get reliable temperature readings off IR emission of glassware and clear solvents is a bit daft… shouldn’t post during ante meridial hypocaffeinea..
The glass jar will always be cooler at the top and is not important so why not just put a thermometer at the bottom of the jar where the acetone is.
I use this method as it takes about 30 seconds and then ~30mins of drying time afterwards. It has been the best of every acetone smoothing method that I have tried.
http://solidoodletips.wordpress.com/2012/11/10/presto-part-finisher/
some examples using this method:
http://www.soliforum.com/topic/628/acetone-vapor-finishing-pics/
http://www.soliforum.com/topic/448/diy-smoothing-station-ii/
for those wanting to get into this you may want to look at
http://en.wikipedia.org/wiki/Acetone#Safety
I may have to try this instead of flame polishing
Interesting indeed.
I wonder if this method would work for unmucking scratched CDs?
(disclaimer:- would probably warp the disk badly, best done on non-rare CDs or something which everyone has a copy of first)
I used a similar process years ago to fix key scratches on the LCD of a BlackBerry, before they started including hard plastic screen protectors over the LCDs. Acetone (nail polish remover) was first used which a rough surface, then Formax Emery Cake buffing compound, and then MAAS polish. All polishing was done by hand, and only to the effected area of the screen. This left part of the screen which I worked with a high gloss finish and the rest being matte; but at least I could see what was on the screen again. If you ran your finger over the screen, you could feel the dip where a fair amount of material had been removed. I’m assuming you could do the same for CDs.
*which left a rough surface
What I’m thinking now, is that it would be good to spec the process, for time temperature acetone strength, and do some test runs for varying time temp , and scan the model after with a 3d laser scanner, then you can compare that model to the model. that was printed… then you work out a print filter to apply to models such that with a given spec of the process, they turn out to exact dimensions or surface finish required. i.e. account for shrinkage.
Another thought is, that you don’t wanna have a “cold” print in there, otherwise you’d get condensation and puddling of the solvent.
I tired it myself, but you may not print hollow objekts. It has to be printed solid, without filling structures. Otherwise the acetone will throw bubbles. At least that was my experience with 3 layers thick wall.
That video.. worst thing I expect to see this year, the movement and never-reaching-focus combined with the music which seemed picked to enhance those effects.. I need to lay down for a bit to get over watching that.
Yup, why do people assume we all share their terrible taste in music? I don’t force guests in my house to listen to my favourite music, so why put it on a video aimed at the public? Don’t do it! Just assume a viewer can survive those 5 minutes without your musical influence! It’s ok, I have my own MP3 player on standby in case I start getting withdrawal symptoms.
I used to do acetone vapor polishing at an old job. A few pointers would be to use hot water to create your vapor. Flames or heating elements around acetone is really, really, really dangerous. What we did was hang the parts in an enclosure above a pool of acetone, then run very hot water through pipes immersed in the acetone. This creates a heavy vapor cloud that smooths the parts and keeps any source of heat safely away from the acetone. Another tip is to use absolutely pure acetone. Nail polish remover often has oils added to it to keep it from drying your skin out. (Pure acetone dries your skin almost instantly.) These oils and diluting agents interfere with the process. Lastly, wear gloves at all times. Acetone can be absorbed through your skin and kills your liver.
For DIY, using a stock pot sitting in a larger basin that you can pour hot water into does the job more simply, especially if you keep the pot raised a little so the hot water can go under it. I also used a fountain pump to run ice water through copper tubing at the top to create a zone of cool air to condense the vapor before it could escape. It was linked in an earlier comment.
Have the same printer, slightly smaller jar, used nail polish remover, just didnt come out great. I thought i wasnt getting the bed up to temp, but im going to try with plain acetone from menards and see if i have better luck. May try on a hot plate to see if i can get a more consistent temp across the bottom of the jar. Will post results.
Personally I think the jar has to be much taller to get consistent results. If the top of the part is within a couple of inches of the condensation level then there will obviously be trouble
Very good point. Will try that.