VFD Tube Clock Built Using Protoboard And Free-formed PSU

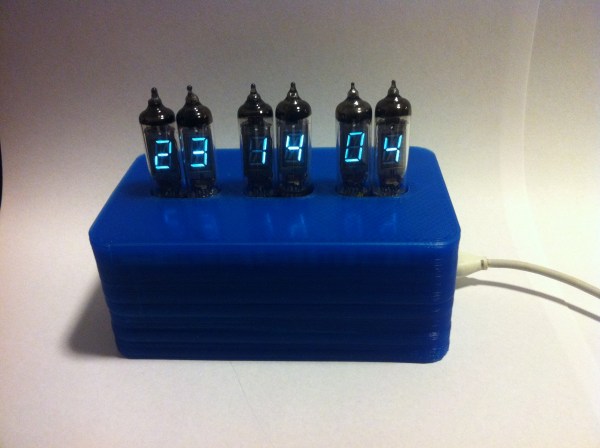
[James Glanville] wrote in to show of his latest tube project. It’s a clock using six IV-3 VFD tubes. In addition to the tube displays the project prominently features a blue 3D printed case which hides away all the guts of the build including the Stellaris Launchpad which drives the clock.

Speaking of guts, you’ll want to look through a few of [James’] other posts on the project. His first write-up on this clock shows off the protoboard and point-to-point soldering that makes the tubes work. To help simplify things he went with a MAX6921 VFD driver chip. He mounted it dead-bug style on its own piece of protoboard and then soldered all of the necessary connections to the larger hunk hosting the tubes. There’s also an interesting post that details the switch mode power supply which ramps the USB 5V power all the way up to the 50V used to drive the displays.

If you like this you should check out the first VFD clock he built. We featured it a while back in a links post.

Virtual Archery Game Makes Practicing Convenient, Safe, And Inexpensive

Virtual-Archery

Inspired by playing The Legend of Zelda video game series, Cornell University students [Mohamed Abdellatif] and [Michael Ross] created a Virtual Archery game as their ECE 4760 Final Project.   The game consists of a bow equipped with virtual arrows and a target placed about 20 ft away. The player has three rounds to get as high of a score as possible. A small display monitor shows the instructions, and an image of where the shot actually hit on the target.

Pressing a button on the front of the bow readies a virtual arrow. A stretch sensor communicates with a  microcontroller to determine when the bow string has been drawn and released.  When the bow is drawn, a line of LEDs lights up to simulate a notched arrow. The player aims, and factors in for gravity. An accelerometer calculates the orientation of the bow when fired. The calculated shot is then shown on the display monitor along with your score.

This immediately makes me think of Laser Tag, and feels like a product that could easily be mass marketed. I’m surprised it hasn’t been already. Good work guys.

[via Hackedgadgets]

Check out the video demonstration after the break:

Continue reading “Virtual Archery Game Makes Practicing Convenient, Safe, And Inexpensive”

More Acetone-vapor Polishing Experiments

acetone-vapor-polishing-experiments

If you’re thinking of trying the acetone-vapor polishing process to smooth your 3D printed objects you simply must check out [Christopher’s] experiments with the process. He found out about the process from our feature a few days ago and decided to perform a series of experiments on different printed models.

The results were mixed. He performed the process in much the same way as the original offering. The skull seen above does a nice job of demonstrating what can be achieved with the process. There is a smooth glossy finish and [Christopher] thinks there is no loss of detail. But one of the three models he tested wasn’t really affected by the vapor. He thinks it became a bit shinier, but not nearly as much as the skull even after sending it through the process twice. We’d love to hear some discussion as to why.

There is about eight minutes of video to go along with the project post. You’ll find it after the jump.

Continue reading “More Acetone-vapor Polishing Experiments”

24-port GPIO On A PCI Card

btgpio

So you’ve got a project running on an x86 board and you’d like some GPIO pins. Whether you want to read a few buttons, light up a few LEDs, put an accelerometer in your computer or whatever, you’ve got a problem. Luckily there’s an easy way to get 24 GPIO pins on an x86 board using a PCI card for just a few bucks.

The key component of the build is a PCI TV Tuner card made by Hauppague under the WinTV brand. If you’ve got one of these cards with either a Brooktree bt848, bt849, bt878 or bt879 video capture chip, having 24 GPIO pins is just a spool of magnet wire, a soldering iron, and a steady hand away.

It’s a great build if you’d like some GPIO action without going through the usual parallel port mess, and especially useful since these WinTV capture cards can be had from the usual Internet suppliers for just a few bucks. You’ll need a driver, of course, but the relevant Linux kernel driver – bt8xxgpio – should be included any reasonably modern distro.

Special thanks to [Dex Hamilton] for notifying us of this build.

Building A Touchscreen XBMC Setup With The Raspberry Pi

rapsberry-pi-based-touchscreen-xbmc-tablet

[Andrei Istodorescu] has been hard at work building a 7″ touch-screen rig which runs XBMC. It may be upside-down, but the Raspberry Pi board which is front and center is still easily recognizable. There’s a lot of stuff connected to it in order to pull this off, and even more software configuration. But as you can see in the clip after the break he did get it working!

The screen is an eGalaxy 7″ touch sensitive module he picked up on eBay. It sounds like it was meant for a backup camera in the dashboard of a car. He compiled his own Linux kernel to add support for the screen. It uses HDMI for the video interface with the driver board, and the touchscreen connects to one of the USB ports. The rest of the setup involves compiling XBMC with touchscreen support and calibrating the screen to accurately sense input.

Continue reading “Building A Touchscreen XBMC Setup With The Raspberry Pi”

Laser Etching An IPhone 5

Laser Etched iPhone 5

CrashBangLabs in Regina recently got their hands on a laser cutter. The Full Spectrum cutter was donated by a local company, who were upgrading to a larger machine.

With no laser cutting experience, [Brett] decided that his first project would be laser engraving his iPhone 5. This is a bit of an ambitious first project, since the power and speed would have to be set correctly to get a good contrast level, and you only have one try to get it right. Also, using too much power might have turn the phone into a laser etched brick.

[Brett] used an older aluminium iPod for testing. Once the laser speed and power was dialed in, he loaded up the artwork for the real thing. The cutter did a pretty good job at etching the art, but as the etching started it became clear that an alignment error had occurred. Fortunately [Brett] decided to not interrupt the cutter, and ended up with a good looking phone, with a slight alignment issue.

After the break, check out a time lapse of the laser cutter doing its thing.

Continue reading “Laser Etching An IPhone 5”