SMD components may be a little challenging for the home builder – even though the’re inordinately practical for homebrew PCBs – but if you play around with electronics and solder long enough, you’re eventually going to run into the horrors of BGA parts. Instead of convenient pins, BGA parts have tiny metallic balls on which solder is applied, a board is thrown through a reflow oven, and hopefully at the end, everything works. Sometimes these balls corrode or otherwise need to be reflowed. This isn’t an easy process, so [Edmar] came up with his own BGA rework station that costs much less than commercial offerings.
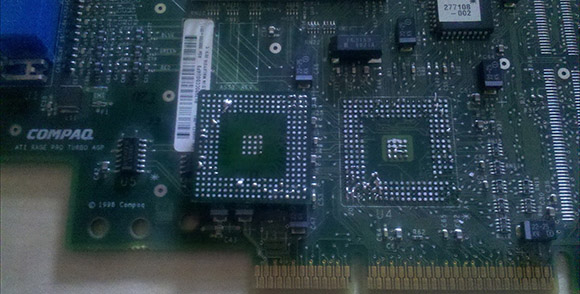
[Edmar]’s build began when he wanted to repair a graphics card. A common error on his Amilo XI2428 graphics card is having the small balls on the underside of the chip corrode, leaving the user with a non-functional graphics card. Towel trick notwithstanding, the easiest way to fix this error is to heat up the card to above the melting point of solder, removing the chip, and resoldering it with careful application of solder paste.
[Edmar]’s reflow station is made of an electric skillet for the bottom of the board, an infrared lamp for the top side of the board, and control circuitry constructed from an ATMega128, temperature sensors, and a huge power supply. The temperature is controlled via USB by a computer, allowing [Edmar] to set a temperature profile as recommended by the BGA chip’s data sheet.
Right now, removing a BGA chip works great, but [Edmar] is still working on the tech necessary to replace a BGA chip on a board.


http://www.youtube.com/watch?v=MqRT6KaMubk
I was skeptical until seeing this. very nice.
Ah! That’s what a BGA stencil is! The guys who assembled some boards for me years ago had to get a custom stencil but I never saw what it was. Now I know! THX!!!
BGA Remove and Replace Process Overview:
J-STD-033 Bake: BGAs usually have an MSL rating. The part may be damaged by moisture in the component (and surrounding) if processed without this pre-bake. Typical MSL3@Thickness 1.4 to 2.0mm, 27 hour @ 125C
BGA Removal – Preheat PWB, Typical 90-130C, Reflow component Sn63/Pb37 183C reflow, 220C targeted Peak (at ball/joint temp) SAC305(common ROHS) 210C reflow with 230C targeted peak – Note, This process is typically done via Radiant heat from below and hot gas nozzle near or slightly larger then the component from above.
Site Clean – Solder Wick, Flux, Time. Do not drag the wick, do not stay on a pad or location too long. Once solder is relatively flat clean the site, this method is dependant on flux used.
Reball – There are Paste/Stencil, Paper&Ball or Stencil&Ball methods. FYI Solder Spheres can be purchased, tacky flux can hold the balls while the solder goes through reflow. 1mm pitch BGAs usually use 0.025″ diam spheres. Make sure component is clean of all flux after reballing. Note – New component is the preferred method, reballing may be reinstalling a degraded or damaged part.
Installation – Follows same path as removal. See above.
Clean – Clean as required to remove all flux from below the BGA.
-This is provided as an overview without Proprietary information. For further specifications see J-STD-001, 7.6.14 for end requirements, J-STD-033 for MSL precautions and exposure limits, IPC-7530 for profile development guidelines, IPC-7711, 5.7.1 to 5.7.3 Rework of BGAs, and one other IPC document regarding BGA profile development that I cant remember. Best of luck.
Looks like a reallll clean removal. Highly doubt it”l still work if he managed to reattach.
I’m wondering what’s the best way to clean up the board before reassembly?
Solder braid or ‘wick’, lots of flux. Get rid of every minute amount of solder on both the pcb and chip before reballing.
There is a reason why reballing and reflow equipment has a high price tag to it, and every penny is worth it.
I’ve known of quite a few people who have tried similar methods for reflows and they end up failing hard. This is one of those types of businesses that if you don’t have the right tools then you have no business working on some one elses property.
Hi,
this was a very first attempt if the machine could possibly work. I don’t think that the chip would still work – but of course that was not the target board… it was just an old ati rage agp card i had lying around somewhere…
regards
Edmar
Ouch. It looks like some of the solder pads were ripped off in that image. I have PLENTY of experience with BGA reflows, and I have to say that it is the repair work that I hate the most when it is a larger BGA chip. If it is 15mm x 15mm then it isn’t bad, but when it’s 40mm x 40mm, thats when you can run into problems without the proper tools.
being ale to head pcb and chip evenly is half the battle
I lol just thinking what his face expression will be when he discovers modern BGAs are glued at the corners with nastiest of epoxies :) removing that epoxy sometimes takes as much time as reflowing solder.
^^^^being able to heat
Agreed @ the epoxy stuff. Had a guy bring me a motherboard nearly in tears. Poor bastard had melted pads up and mangled the whole thing pretty good trying to get the power jack out. 10 seconds with the deburrer later on the corner of the block and boop, came right off. It is soooo frustrating though to take all that time and care to remove solder and gently wiggle mill by mill and then realize that ya lost 4 hours when the epoxy gently lifts the first layer off the board with a few smd components lol. Rough stuff and can bring a grown man to tears.
Do you have any tricks for dealing with the dreaded blob of epoxy?
His web page describes a 12V, 100W “IR Lamp”. Anyone have a link for one of these? I’ve never heard of them before.
3rd link
http://lmgtfy.com/?q=IR+heat+Lamp
Hi
Is a good start but need a more powerful lamp like 24V 250W.
http://nclaite.en.alibaba.com/product/568119657-200542530/Halogen_lamps_24V150W_GZ6_35_for_infrared_BGA_rework_station.html
Sorry duble post.
Cheap Mini DIY Rework Station for Reflow / Reballing
http://www.podchip.com/2012/12/my-mini-diy-rework-machine/
While the general idea of constructing the rework machine is pretty great, there are some issues that should be addressed
Appropriate wattage, heating area and even spread of heating are crucial in proper reworking as such this article explains it a bit better http://www.thebgareworkmachine.com/bga-repair-smt-repair/
Now while the machine constructed does allow BGA chips to be removed i would not recommend it unless the device is considered trash, if it is an expensive pcb a proper repair is needed or else the improper repair could render the chip and or pcb unrepairable by any professional
For SMT it will probably do fine, but a proper profile is needed
about the solid epoxy, which is sometimes red and other colors, I see it as no longer a problem, I saw a guy removing it in youtube and I perfected his method, which is quite simple, small (like 3mm small) hot air tip in my kada 862D++ , some 200 degrees celsius of preheat, and a very sharp flat and tiny screwdriver, attacking one side by one side, the epoxy just jumps away, after proper and gentle movements (like cutting it) but being carefull not to scrach the board or anything around just maybe the chip itself and mostly the epoxy/chip junction, the red glue gets softer and changes its hardness with heat, it becomes kinda flexible. so I have been doing it hundreds of times and never got any issues, anyway that red demon was my worst nightmare until I learned how to handle it. good luck , y’all, from argentina.
Awesome post on BGA Rework. This really helps me to remove errors which occurred on BGA chips. Also, the video nicely describe how easy the Solder paste reballing can be done. Thanks for the informative post.