LED-Guided Piano Instruction

LEDpianoGuide

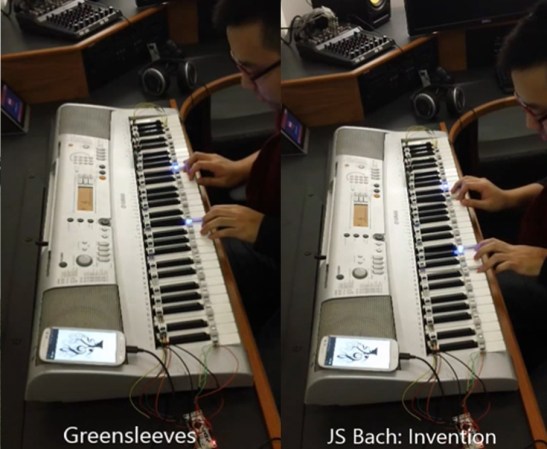
[Kay Choe] can’t play the piano. Rather, he couldn’t, until he converted his keyboard to include LED-guided instruction. [Kay] is a microbial engineering graduate student, and the last thing a grad student can afford is private music lessons. With $70 in components and a cell phone, however, he may have found a temporary alternative.

The build works like a slimmed-down, real-world Guitar Hero, lighting up each note in turn. We’ve seen a project like this before, with the LEDs mounted above the keys. [Kay]’s design, however, is much easier to interpret. He embedded the LEDs directly into the keys, including ones above each black key to indicate the sharps/flats. An Android app takes a MIDI file of your choice and parses the data, sending the resulting bits into an IOIO board via USB OTG. A collection of shift registers then drives the LEDs.

For a complete novice, [Kay] seems to benefit from these lights. We are unsure whether the LEDs give any indication of which note to anticipate, however, as it seems he is pressing the keys after each one lights up. Take a look at his video demonstration below and help us speculate as to what the red lights signify. If you’re an electronics savant who wants to make music without practicing a day in your life, we recommend that you check out [Vladimir’s] Robot Guitar.

Continue reading “LED-Guided Piano Instruction”

Halloween Doorknocker Decoration Hack

halloweenDoorHack

If you’re new to hacking, Halloween is a great excuse to get started, and [Chuck] has put together an inexpensive animated Halloween decoration that you can show off on your front door. After scoring a $5 plastic Halloween doorknocker from Wal-Mart, [Chuck] gathered together a small pile of components and then set about breathing some life (death?) into its scary but motionless face.

Though he opted to use a Digispark, you should be able to use any Arduino that is small enough to stuff inside the plastic head. [Chuck] cut some holes in the eyeballs and glued in two RGB LEDs, then cobbled together a quick-and-dirty mount in the mouth area to hold a small servo. The lights and the servo are wired to the Digispark, which turns the lights on and instructs the servo to slam the ring against the door. It’s is battery powered and currently has only two settings: on or off. This should be good enough to scare the kids for this year, but [Chuck] has plans to add a much-needed motion sensor and sound via a Bluetooth connection. 

As simple as this build is, it could be just the thing to get you in the holiday spirit, or to introduce the young hacker in your home to the world of electronics and coding. Check out the short video of the doorknocker after the break, then swing by [Chuck’s] website for detailed build instructions and his Github for the source code. If you’re having trouble finding this doorknocker at Wal-Mart, [Chuck] recommends a similar one on Amazon. Don’t stop now! Make some Flickering Pumpkins too, or if you want a challenge, hack together your very own Pepper’s Ghost illusion.

Continue reading “Halloween Doorknocker Decoration Hack”