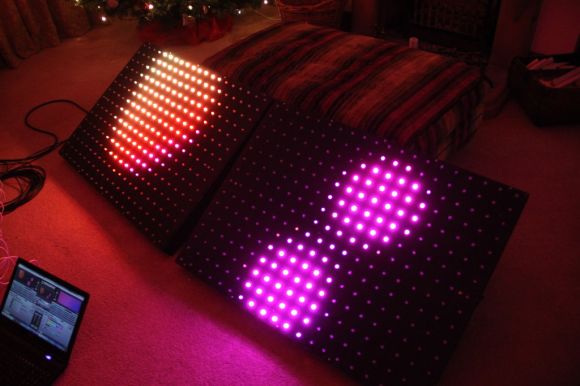
[George] has gone pro with his latest RGB LED panel. We’ve chronicled [George’s] journey toward the elusive land of LED nirvana for a couple of years now. He started with an 8×8 rainbow board of many ping-pong balls. When that wasn’t enough, he upped the ante to a 32×16 array of ping-pong balls. Still not satisfied, [George] has now increased the size to two 20×15 panels, for a total of 600 LEDs. While this is only a modest size increase from the previous incarnation, the major changes here have been in the design and construction of the array.
[George] found himself using his LED panels in some professional settings. The stresses of moving and rigging the panels revealed several design weaknesses. The point to point discrete LED design tended to short, leading to troubleshooting by poking at wires in a dark club. The control code was also a mixed bag of solderlab’s code, [George’s] code, and various scripts. Even the trademark ping-pong ball light diffusers were a problem, as they created a fire hazard. [George] took all the lessons from the first and second LED arrays and started a new design – the MX3. The panel frames were constructed by a professional metal shop. Starting with a square steel tube backbone, and aluminum panel shell was welded into place. The steel tube provides a hardpoint mount for any number of rigging options. The front panels are medium-density fibreboard, treated with a fire-retardant paint.
The electronics have also changed. Gone are the individual RGB LEDs. [George] has switched over to the common WS2812 LED strings. Panel mounted Raspberry Pis control the LED strings. Communication is via Art-Net, an Ethernet implementation of the common DMX512 protocol commonly used in stage lighting. The final result looks great. We’re impressed with how much [George] has accomplished at such a young age (He was 16 last June).
http://www.youtube.com/watch?v=ql9tu1-xCWI
[Thanks Terry!]


So, how much did this cost to build? And how is he funding all of these panels?
Being able to assemble this at 16 is mildly impressive, figuring out how to fund may have been the real hack.
He had some sponsors, including Madrix, who supplied the front-end software. It’d be neat to see a compilation of resources or some information on how to find companies to help with projects, or something. I’m sure the idea of outside funding doesn’t even occur to a lot of people.
This project actually cost quite a bit, as I had custom WS2801 pixels made in a batch run in China (improvements on brightness, colour uniformity, and other little practical things)
Madrix supplied the front end software, but everything else came from me doing commissions.
In a way HaD allowed me to be supported by madrix, in that they generated the hits to my blog from the previous projects that convinced them it was worth their effort :-) Thanks :-D
Well the most expensive part would have been the Madrix software (Over $1000), but he got that for free.
That’s huge. It’s not until I noticed the laptop in the bottom left hand corner that I could appreciate the scale.
Cool. At once appear one idea – it is possible to try to connect flexible lightguides to these diodes and to assemble from (square in section) lightguides the color screen with rather high resolution (as the light guide exit is thinner, as the permission is higher), and to lay diodes in something like a box.
I don’t know what this device could have a practical application (probably it has no sense at all), but it would be the color monitor with good resolution at which if necessary it would be possible to repair each pixel %)