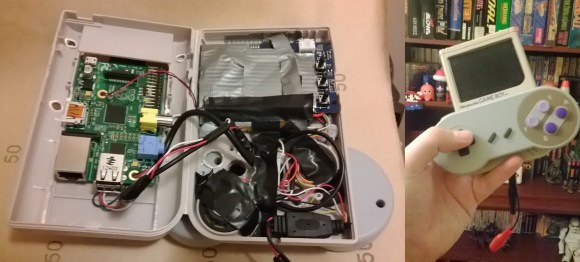
What do you do with a broken Gameboy, a 3″ LCD, a pile of wires, a USB SNES controller, a 32gb SD card, and a Raspberry Pi? You make a pocket emulator, of course!
[Anton] decided he wanted to build an emulator awhile ago. He had a few specific goals in mind: it had to be hand-held, portable, child safe, and usable without a keyboard. He started by stripping the broken Gameboy down to its external shell, then removing all of the internal plastic mounting features with a hot soldering iron. Next was the challenge of fitting everything into the case and powering it. Because his 3″ LCD runs off 12V, [Anton] needed a way to get 5V to the Pi. Lucky for him, it turned out that his LCD’s controller board had a 5V test point/expansion pin-out!
From there it was just a matter of reusing the original Gameboy’s speaker, closing up the case, and loading the emulator! As always, there’s a demo video after the break.
http://www.youtube.com/watch?v=4g_dsTWL8EA
Looking for other Raspberry Pi-based emulators? How about kicking it old school with an Atari 2600? Too old? Okay, how about a rather normal looking SNES with its slot sealed shut?


This is cool. Got a lot of gameboys I want to get in and try some hacks on and just got a megamanX2 and X3 for SNES for christmas. Need to fix my original NES; but going to be very careful…classic electronics! Also got a broken original Xbox, going to tear that piece of crap up! lol
Hey dude, give this a try…
http://en.wikipedia.org/wiki/UnleashX
xbmc4xbox is far superior to unleashx
Might be just me, but doesnt the piboy bear resemblance to a certain male bodypart? (or maybe its my mind being in a dark place due to just commenting on the my little pony cord exit point)
A very short one, totally korean or japanese.
Dude, if that reminds you of a piece of your anatomy you need to really see a doctor.
Im rather old, so therefore also made of more blocky graphics ;-)
Maybe if you don’t pronounce pi:”pai”, but like “pee” – then yes :)
It does a little! noticed it early on but on a quick project like this looks are second to functionality. maybe I should have named it ‘the little chap’ instead!
It was not meant in a bad way, i quite like what you did. It even looks pretty ergonomical (but i guess nintendo did put some thought into the individual part’s ergonomity(is that a word?))
I had a quick flash in my head with a person playing a game in his lap… well, i will let your own imagination decide how bad that looks :-) After that it was too late, couldnt unsee the mental image. Like a song stuck in my head.
How does the PI’s video output to the 3″ LCD does it have S-Video in ?
The only information regarding the video output that i can find is “The [USB] controller lead was cut, shortened and soldered directly to the Pi, as was the AV output.”. All that tape makes it pretty hard to try to follow where leads go (and i dont own any of these devices to actually check where what is on the boards).
The last picture at step 2 shows cables attached to the underside of the composite output.
Yes, its simply attached to the underside of the video socket.
with the composite video output i would guess.
“then removing all of the internal plastic mounting features with a hot soldering iron.”
Plastic and soldering iron in the same sentence always gives me the creeps :S
Gotta love the smell of cancer in the morning.
Smoke while you’re soldering, the filter tip will block any harmful fumes.
Dremmel cut some LEDs yesterday, got to breathe the particles and fumes – i made a huge mistake.
I have a soldering iron modified to have an exacto blade at the tip. works awesome for this kind of stuff to have a 400 degree razor blade to trim away pesky standoffs and other parts.
I never remove plastic with a soldering iron. Thats what I have my trusty dremel for..
My version looks like this :D
http://circlesoftrust.blogspot.be/2013/06/do-it-yourself-portable-computer.html