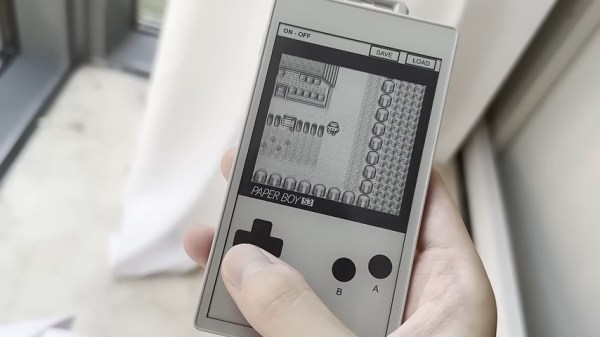
An EInk, ESP32-based Game Boy

This is one of those projects that was both inspired and made possible by the absolute embarrassment of dev boards available to the modern hacker. In this case, the dev board was the M5Stack PaperS3, which as the name implies combines an ESP32-S3 with an e-ink panel. [Wenting Zhang] picked one up and was immediately inspired to try and make an e-ink Game Boy.

The M5Stack PaperS3 made this project possible by exposing the display with row/column control — parallel, some would call it, as opposed to the usual serial interface of SPI. That allowed [Wenting] to work some of the same e-ink magic he perfected on his Modos monitors to allow partial refresh at up to 60 Hz. That the ESP32-S3 is capable of emulating a Game Boy while driving the screen should surprise no one, since it can emulate an MSX while outputting VGA or even Windows 95 on a 386. In this case, he’s basing the actual Game Boy emulation on Crank Boy.

Of course the e-ink screen on the M5Stack is far larger and has a much higher resolution than what the Game Boy shipped with, which lets him implement touch controls and scale the image up 3X so he can fake a couple of shades of grayscale while actually outputting black and white. Even better, if he was actually playing this thing on the regular, once the high-refresh portion of the screen starts to wear out, he can flip the orientation and keep gaming on the virtually-unrefreshed control portion of the screen — doubling the lifetime of the system, something many of you raised as a concern when we last looked at a his e-ink monitor project.

The only real shortcoming of this hack is the sound. With one-bit beeps coming out of the M5Stack buzzer, it’s got nothing on Nintendo’s hardware. Of course, that’s partially down to using the hardware as-is. With the addition of an I2S sound chip like the one used in the MOD player project we featured recently, you’d just need to squeeze out enough processor cycles to make this sound as good as it looks.
Continue reading “An EInk, ESP32-based Game Boy”

Fixing A Nintendo Game Boy Clone That Runs Too Fast

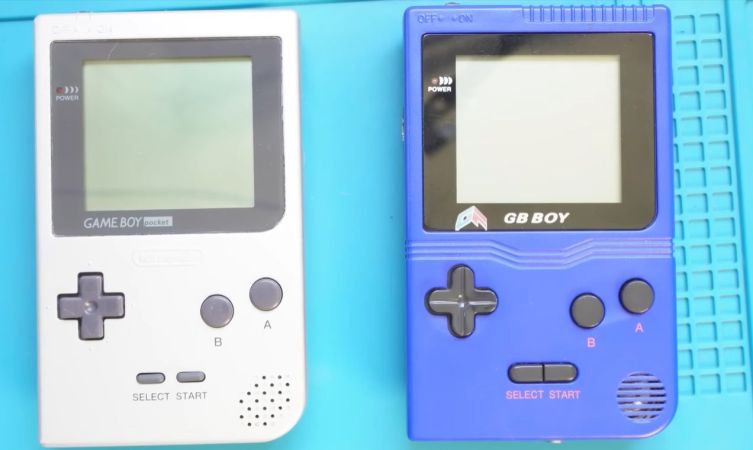
There’s no shortage of cloned Nintendo hardware out there, and most of it is pretty poor. A few are actually pretty interesting though, such as the GB Boy by Gangfeng, which takes real cartridges and thus in many ways should provide the original Game Boy Pocket experience with modern hardware. But as you might imagine, even the best of the clones comes with various technical issues at no additional charge — with this particular unit having a habit of running the game too fast. It’s an issue that [Sharopolis] addresses in a recent video with a partial fix.

As can be seen in the demonstration, it runs games just too fast to make it very usable or fun, hence why it sat in a drawer for a few years after purchasing off AliExpress. This raises the question of what’s wrong with these units, as others report similar issues with this and other ‘GB Boy’ variants.

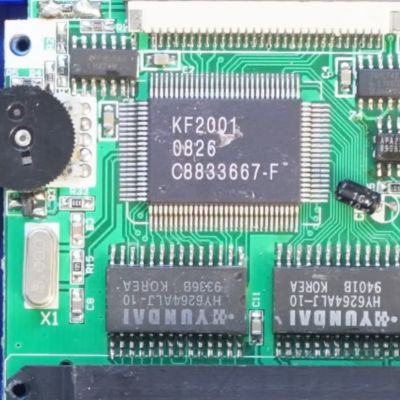
Fortunately the unit is easy to open, revealing the PCB with a couple of chips on it, one marked KF2001 being the brains of the operation alongside two memory chips. The crystal resonator marked X1 for the main IC is rated for 5 MHz, whereas a quick look inside the Game Boy Pocket shows that its crystal resonator runs at 4.1943 MHz, which is a bit of a difference.

Because of how buying components and pricing works, [Sharopolis] ended up with a reel of 100 of replacement resonators with the right parameters for a drop-in replacement. After swapping the resonator, the GB Boy now does indeed run games at the right speed, but a new issue has now cropped up in the form of flicker on the display.

In the comments it’s suggested that replacing the cheap capacitors on the GB Boy’s board can help here, but it highlights just how these clone systems keep managing to snatch defeat from the jaws of victory by pairing what looks to be a pretty good IC with either the wrong or sub-par components.

Continue reading “Fixing A Nintendo Game Boy Clone That Runs Too Fast”

Open Graphics Card Powers Cyberpunk “Laptop”

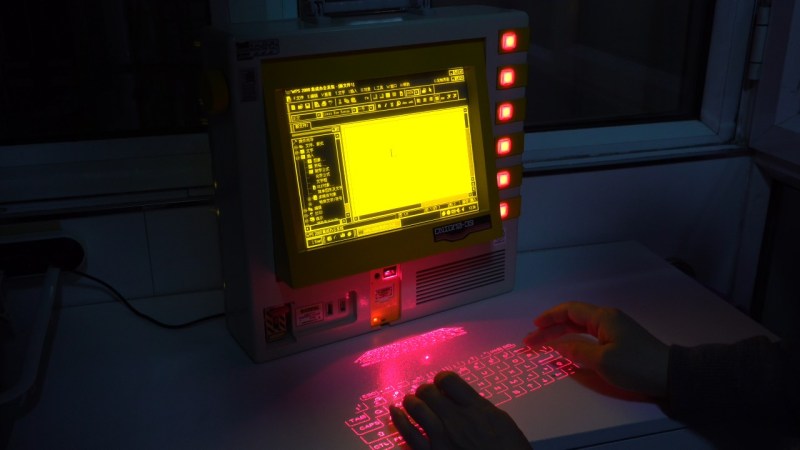
For once, we can avoid debating in the comments what constitutes a “cyberdeck”, because [LCLDIY] does not refer to his cyberpunk masterpiece as such — he calls it a laptop. Considering the form factor is more like an all-in-one with a built-in laser projection keyboard, that’s arguably an even more controversial label to use, but as stylish this build is, it’s what’s inside it that interests us most.

This would be much easier than the original for our old eyes, especially in the dark.

No, not the cash-register motherboard that serves as the brain, though that has got to be worth some hacker cred. No, it’s the graphics card [LCLDIY] designed to drive 10″ electroluminescent (EL) displays that really has us interested. EL screens have a unique and beautiful glow that many find captivating, but we don’t see them all that often for two reasons. One is price: if you can’t find them surplus, they’re not cheap. The other is driving them, which [LCLDIY]’s project helps with, because the graphics card is open source.

The card is PCI, so you’ll need an adapter to plug it into a modern PCIe slot, or you’d have to redesign the thing. Since this isn’t elegant-engineering-a-day, we know which we’d do. The card is based on the CHIPS65548/5 chip, which means you should be able to find driver support under Linux and Windows. [LCLDIY] seems to be using Windows 2000, but that might just be because it’s all been downhill since then.

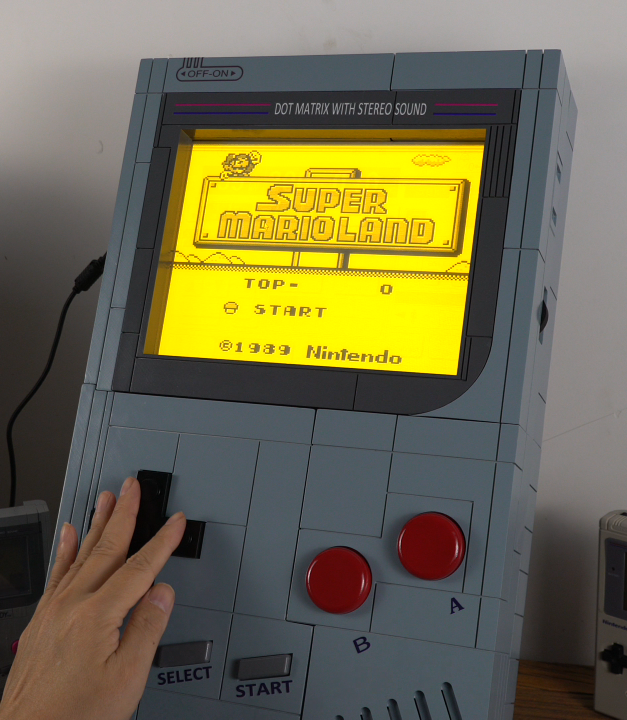
If the cyberpunk laptop wasn’t enough inspiration, [LCLDIY] also created a giant-scale Game Boy using the same 10″ screen and DIY graphics card. The soft glow of the EL display is particularly suited to the low-res nature of the retro games, as it’s not entirely unlike a CRT. You can see it in action–both builds!– in videos embedded below.

The last time somebody posted an EL display here, they had to build the driver board for it, too. Continue reading “Open Graphics Card Powers Cyberpunk “Laptop””

A Candle-Powered Game Boy For Post-Apocalyptic Tetris

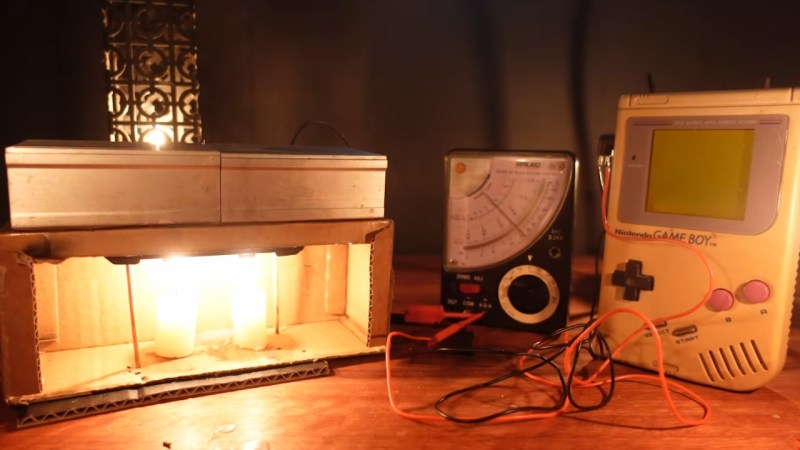
We’re not exactly worried about Armageddon here at Hackaday, but should we end up facing the end of the world as we know it, having something to pass the time would be nice. That’s why we were intrigued by [Janus Cycle]’s latest video where he both plays and powers a Game Boy by candlelight.

You’ve probably figured out the trick already: he’s using a Peltier module as a thermoelectric generator. Candles, after all, release a lot more energy as heat than light, and all that high-quality heat is just begging to be put to use somehow. It’s hardly a new idea; [Janus] references space-age radioisotope thermoelectric generators (RTGs) in the video, but back in the day the Soviets had a thermoelectric collar that fit around a kerosene lantern to power their tube radios.

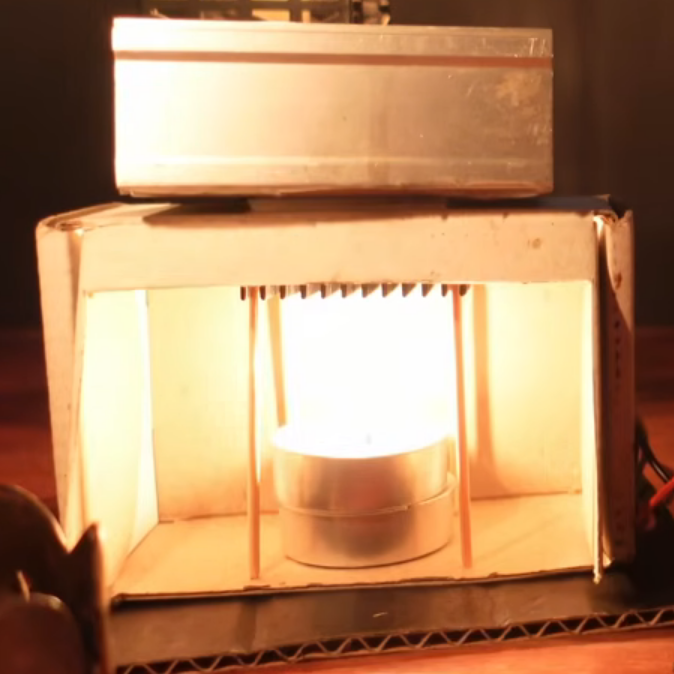
In [Janus]’s case, he’s using a commercial module sandwiched between two heatsinks with the rather-questionable choice of a cardboard box reinforced with wooden skewers to hold it over the candle. Sure, as long as the flame doesn’t touch the cardboard, it should be fine, but you will not be at all surprised to see the contraption catch fire in the video’s intro. For all that, he doesn’t get enough power for the Game Boy — one module gets him only 2 V with tea light, but he has a second module and a second candle.

Doubling the energy more than doubles the fun, since a working Game Boy is way more than twice as fun as an un-powered one. But one candle should be more than enough power, so [Janus] goes back and optimizes his single-Peltier setup with a tall candle and actual thermal grease, and gets the Game Boy going again. Any fire marshals in the audience should look away, though, as he never gives up on keeping a candle in a cardboard box.

The “power something with a Peltier module” project is probably a right of passage for electronics enthusiasts, but most are more likely to play with the irony of candle-powered LEDs, or fans to cool the cold-side heatsink. We did see a phone charger one time, and that didn’t even involve open flames, which seems much safer than this. Remember — no matter how much you want to game after the end of the world, it’s not worth burning down your fallout shelter.

Continue reading “A Candle-Powered Game Boy For Post-Apocalyptic Tetris

Exploring Homebrew For The Pokémon Mini

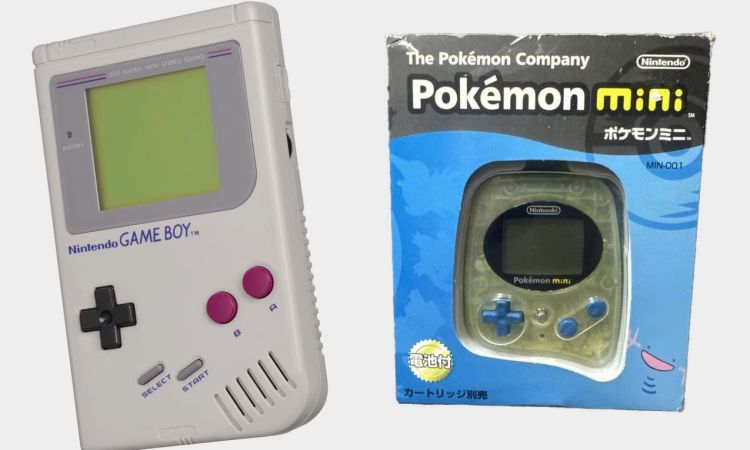
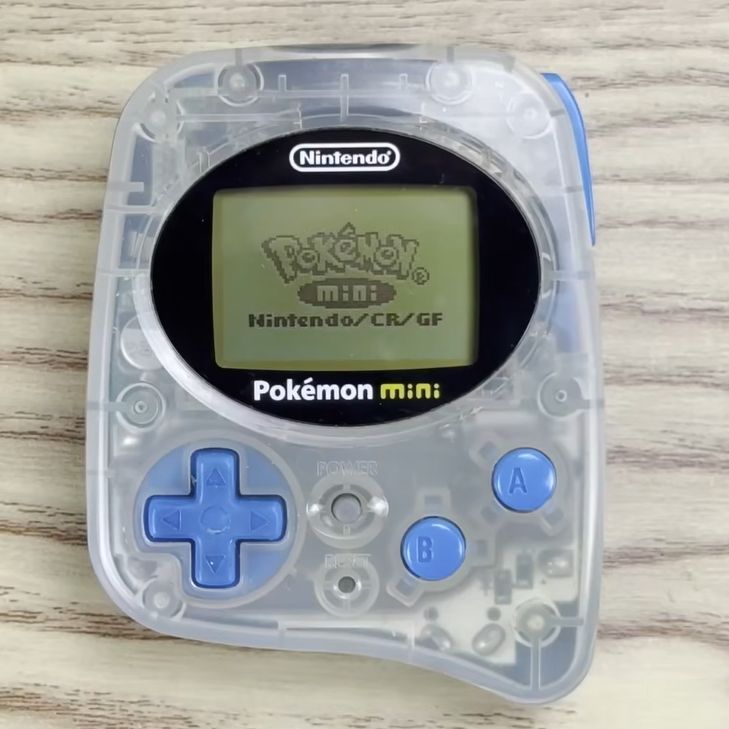
Originally only sold at the Pokémon Center New York in late 2001 for (inflation adjusted) $80, the Pokémon Mini would go on to see a release in Japan and Europe, but never had more than ten games produced for it. Rather than Game Boy-like titles, these were distinct mini games that came on similarly diminutive cartridges. These days it’s barely remembered, but it can readily be used for homebrew titles, as [Inkbox] demonstrates in a recent video.

Inside the device is an Epson-manufactured 16-bit S1C88 processor that runs at 4 MHz and handles basically everything, including video output to the monochrome 96×64 pixel display. System RAM is 4 kB of SRAM, which is enough for the basic games that it was designed for.

The little handheld system offered up some capabilities that even the full-sized Game Boy couldn’t match, such as a basic motion sensor in the form of a reed relay. There’s also 2 MB of ROM space directly addressable without banking.

Programming the device is quite straightforward, not only because of the very accessible ISA, but also the readily available documentation and toolchain. This enables development in C, but in the video assembly is used for the added challenge.

Making the screen tiles can be done in an online editor that [Inkbox] also made, and the game tested in an emulator prior to creating a custom cartridge that uses an RP2040-based board to play the game on real hardware. Although a fairly obscure gaming handheld, it seems like a delightful little system to tinker with and make more games for.

Continue reading “Exploring Homebrew For The Pokémon Mini”

Learn Computing? Head For MonTana!

We’ve often thought that it must be harder than ever to learn about computers. Every year, there’s more to learn, so instead of making the gentle slope from college mainframe, to Commodore 64, to IBM PC, to NVidia supercomputer, you have to start at the end. But, really, you don’t. You can always emulate computers from simpler times, and even if you don’t need to, it can be a lot of fun.

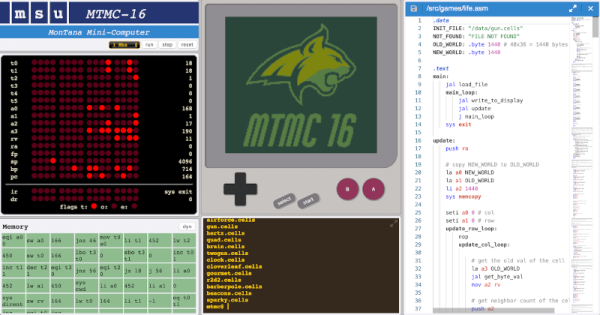
That’s the idea behind the MonTana mini-computer. It combines “…ideas from the PDP-11, MIPS, Scott CPU, Game Boy, and JVM to make a relatively simple 16-bit computer…”

The computer runs on Java, so you can try it nearly anywhere. The console is accessed through a web browser and displays views of memory, registers, and even something that resembles a Game Boy screen. You’ll need to use assembly language until you write your own high-level language (we’d suggest Forth). There is, however, a simple operating system, MTOS.

This is clearly made for use in a classroom, and we’d love to teach a class around a computer like this. The whole thing reminds us of a 16-bit computer like the PDP-11 where everything is a two-byte word. There are only 4K bytes of memory (so 2K words). However, you can accomplish a great deal in that limited space. Thanks to the MTOS API, you don’t have to worry about writing text to the screen and other trivia.

It looks like fun. Let us know what you’ll use it for. If you want to go down a level, try CARDIAC. Or skip ahead a little, and teach kids QBasic.

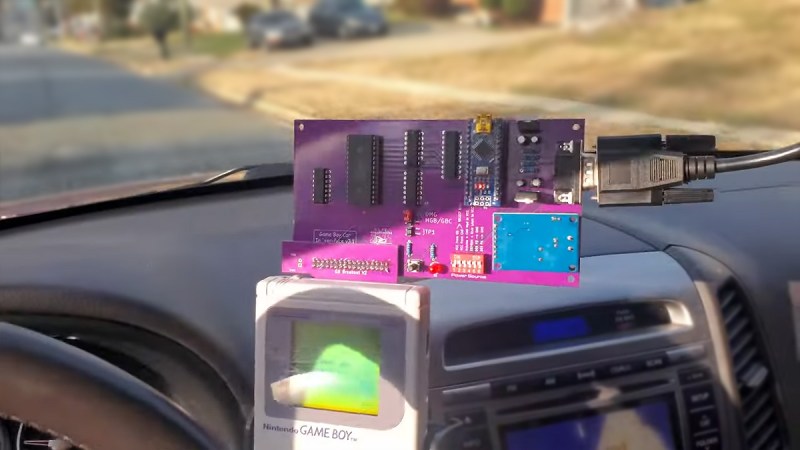
Game boy with custom cartridge mounted on car dashboard

A Game Boy Speedometer, Just Because You Can

From a practical standpoint, [John] may be correct that his recent creation is the “world’s worst digital dash”, but we’re still oddly enamored with the idea of using a Nintendo Game Boy as a digital speedometer. Pulling it off meant interfacing the handheld with the vehicle’s CAN bus system, so whether you’re into retro gaming or car hacking, this project has something to offer.

Showing real-time vehicle speed on the Game Boy sounds like it should be relatively easy, but the iconic game system wasn’t exactly built for such a task. Its 2 MHz CPU and 160×144 pixel dot-matrix screen were every kid’s dream in 1989, but using it as a car dashboard is pushing it. To bridge that gap, [John] designed two custom circuit boards. One interfaces with the Game Boy, intercepting its memory requests and feeding it data from a microcontroller. The other processes the CAN bus signals, translating speed information into a form the Game Boy can display. [John] used inexpensive tools and software to read the CAN bus data, and used GBDK-2020 to write the software in C. His video goes in great detail on how to do this.

Months of work have gone into decoding the Game Boy’s data bus and creating a schematic for the interface board. Tricking the Game Boy into thinking it was loading a game, while actually displaying incoming speed data. The screen’s low resolution and slow refresh rate rendered it barely readable in a moving vehicle. But [John]’s goal wasn’t practicality — it was just proving it could be done.

Want to dive deep into the Game Boy?  Have you seen the Ultimate Game Boy talk?

Continue reading “A Game Boy Speedometer, Just Because You Can”