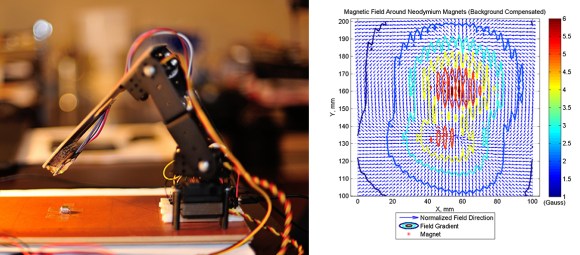
Learning how magnets and magnetic fields work is one thing, but actually being able to measure and see a magnetic field is another thing entirely! [Stanley’s] latest project uses a magnetometer attached to a robotic arm with 3 degrees of freedom to measure magnetic fields.
Using servos and aluminium mounting hardware purchased from eBay, [Stanley] build a simple robot arm. He then hooked an HMC5883L magnetometer to the robotic arm. [Stanley] used an Atmega32u4 and the LUFA USB library to interface with this sensor since it has a high data rate. For those of you unfamiliar with LUFA, it is a Lightweight USB Framework for AVRs (formerly known as MyUSB). The results were plotted in MATLAB (Octave is free MATLAB alternative), a very powerful mathematical based scripting language. The plots almost perfectly match the field patterns learned in introductory classes on magnetism. Be sure to watching the robot arm take the measurements in the video after the break, it is very cool!
[Stanley] has graciously provided both the AVR code and the MATLAB script for his project at the end of his write-up. It would be very cool to see what other sensors could be used in this fashion! What other natural phenomena would be interesting to map in three dimensions?


Wow, great application for this sort of robotic arm. It would be cool to see the fields around different types of magnets too.
What about an RF sensor to map out the space around some of our consumer electronics? This could be a really neat way to visualize where the various antennae are tucked away
I Love This. I almost did a similar thing but using a small CNC mill instead – the idea was to use the mill’s spindle control output to trigger a PIC to take a measurement from the hall sensor, then spit it out over the serial port to a logging terminal.
Light intensity would be another use – e.g. the emission pattern of an LED.
Look at those sawtooth-like patterns…
I think this is mainly because the vibrating motion of the robotic arm. Slowing the motion, or maybe builind a more robust one could solve the issue.
This is how product testing labs measure EM radiation for product standards certification, except it’s done with a much more sophisticated robot arm in an anechoic chamber lined with ferrite tiles.
I’d love to see a pattern of sound radiation from a speaker. What a great hack!
Very neat! I was thinking about doing this with a gantry-based CNC just last week!
Superb project!
This makes me wonder what the radiated magnetic field of various types/sizes of inductors look like…and how things change based on what kind of current (and how much) is going though them.
hmm, how about the 3d light emission pattern of an led?
I’d love to see an arm mapping the contour of a banana.
Amazing what you made. I would like to build a robot lijk this. It would be my first experiment of this type. I don’t have any Arduino components yet. I wonder if you could send me the shopping list for the components.
For those interested in this topic, the “Thuban Lodestar” app available on the Play Store might be worth checking out. It offers a portable solution for magnetic field measurements, compatible with various sensors, and features a user-friendly interface for data visualization. This could be a valuable tool for similar projects. Give it a look to see how it might enhance your magnetic field measurement endeavors.
https://play.google.com/store/apps/details?id=com.lugatek.thubanlodestar