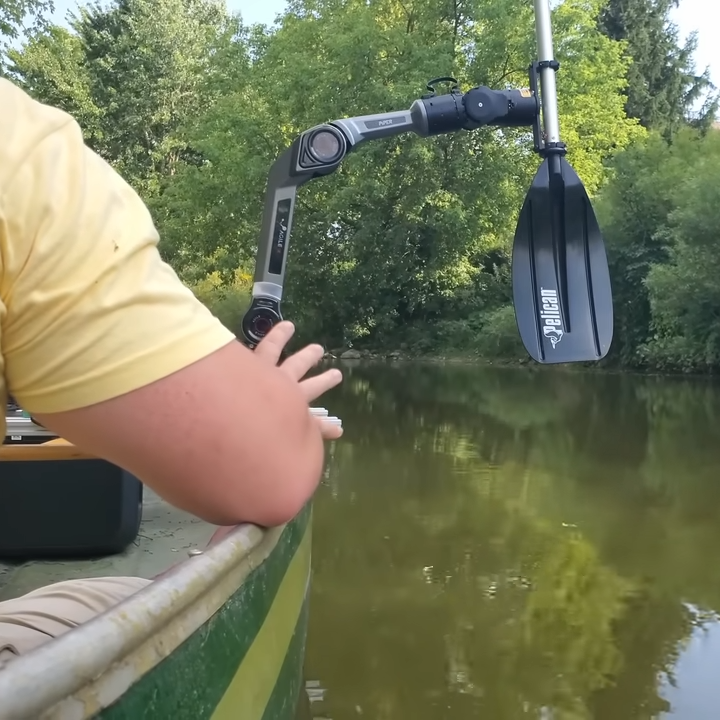
Feeding The Fire By Robot

It might seem a little bit counterintuitive, but one of the more carbon-neutral ways of heating one’s home is by burning wood. Since the carbon for the trees came out of the air a geologically insignificant amount of time ago, it’s in effect solar energy with extra steps. And with modern stoves and well-seasoned wood, air pollution is minimized as well. The only downside is needing to feed the fire frequently, which [Anders] solved by building a robot.

[Anders]’ system is centered around a boiler, a system which typically sits in a utility area like a basement and directs its heat to the home via another system, usually hot water. An Arduino Mega controls the system of old boat winches and various motors, with a grabber arm mounted at the end. The arm pinches each log from end to end, allowing it to grab the uneven logs one at a time. The robot also opens the boiler door and closes it again when the log is added, and then the system waits for the correct set of temperature conditions before grabbing another log and adding it. And everything can be monitored remotely with the help of an ESP32.

The robot is reportedly low-maintenance as well, thanks to its low speed and relatively low need for precision. The low speed also makes it fairly safe to work around, which was an important consideration because wood still needs to be added to a series of channels every so often to feed the robot, but this is much less often than one would have to feed logs into a boiler if doing this chore manually. It also improves on other automated wood-burning systems like pellet stoves, since you can skip the pellet-producing middleman step. It also eliminates the need to heat your home by burning fossil fuels, much like this semi-automated wood stove.

Continue reading “Feeding The Fire By Robot”

Gesture-Controlled Robot Arm Is A Nifty Educational Build

Traditionally, robot arms have been controlled either by joysticks, buttons, or very carefully programmed routines. However, for [Narongporn Laosrisin’s] homebrew build, they decided to go with gesture control instead.

The MeArm robotic arm is built using laser cut acrylic parts, and can be had in a kit if so desired. It features four servo motors, charged with rotating the arm’s base, pushing the arm forwards and backwards, up and down, and actuating its gripper. The servos are under the command of a micro:bit microcontroller board, which itself receives signals from a second micro:bit which is strapped to the human wishing to control the arm. The second micro:bit detects gestures with its accelerometer, and then sends the relevant commands to the robotic arm’s micro:bit over its built-in radio link. The arm controller then commands the servos to execute the maneuver.

It may be a small robotic arm that doesn’t have the capacity to lift much, but that’s not the point. This project is a great way to teach students how to program microcontrollers, work with sensor inputs, and just generally how to solve engineering puzzles. To that end, it looks like [Narongporn] has a great project on hand for teaching their students. Video after the break.

Continue reading “Gesture-Controlled Robot Arm Is A Nifty Educational Build”

Robot 3D Prints Giant Metal Parts With Induction Heat

While our desktop machines are largely limited to various types of plastic, 3D printing in other materials offers unique benefits. For example, printing with concrete makes it possible to quickly build houses, and we’ve even seen things like sugar laid down layer by layer into edible prints. Metals are often challenging to print with due to its high melting temperatures, though, and while this has often been solved with lasers a new method uses induction heating to deposit the metals instead.

A company in Arizona called Rosotics has developed a large-scale printer based on this this method that they’re calling the Mantis. It uses three robotic arms to lay down metal prints of remarkable size, around eight meters wide and six meters tall. It can churn through about 50 kg of metal per hour, and can be run off of a standard 240 V outlet. The company is focusing on aerospace applications, with rendered rocket components that remind us of what Relativity Space is working on.

Nothing inspires confidence like a low-quality render.

The induction heating method for the feedstock not only means they can avoid using power-hungry and complex lasers to sinter powdered metal, a material expensive in its own right, but they can use more common metal wire feedstock instead. In addition to being cheaper and easier to work with, wire is also safer. Rosotics points out that some materials used in traditional laser sintering, such as powdered titanium, are actually explosive.

Of course, the elephant in the room is that Relativity recently launched a 33 meter (110 foot) tall 3D printed rocket over the Kármán line — while Rosotics hasn’t even provided a picture of what a component printed with their technology looks like. Rather than being open about their position in the market, the quotes from CEO Christian LaRosa make it seem like he’s blissfully unaware his fledgling company is already on the back foot.

If you’ve got some rocket propellant tanks you’d like printed, the company says they’ll start taking orders in October. Though you’ll need to come up with a $95,000 deposit before they’ll start the work. If you’re looking for something a little more affordable, it’s possible to convert a MIG welder into a rudimentary metal 3D printer instead.

Rolling Sphere Robotic Arm Seems Serpentine

Hinge joints are usually the simplest to use for robotic applications, but if you want motion that looks more organic, rolling joint (or rolling contact) mechanisms are worth a look. [Skyentific] is experimenting with this mechanism and built a 6-degree-of-freedom robotic arm with it.

The mechanism doesn’t necessarily need the physical surfaces to roll across each other to work, and you can get to two degrees of freedom with the virtual rolling sphere mechanism. [Skyentific] demonstrates how these work with both cardboard cutouts and 3D printed models. Stacking three of these mechanisms on top of each other, with each stage driven by three Dynamixel servos, the motion seems almost serpentine.

Since the servos are driving the small bottom linkages of each stage, they are operating at a significant mechanical disadvantage. The arm can just barely keep itself upright on top of the table, so [Skyentific] mounted it upside down to the bottom of the table to reduce the load of its weight. With the front stage removed, the load is significantly reduced, and it doesn’t struggle as much.

An interesting advantage of this mechanism is that there is always a straight path down the center for cabling. The length of this line between the two plates remains the same throughout the entire range of motion, so it can also be used to route a rigid drive shaft. This is actually what was done on the LIMS2-AMBIDEX robot to rotate its hand, and is also where saw this mechanism for the first time. Interestingly, that implementation didn’t drive the linkages themselves, but used tension cables around the mechanism. We also see this in a very similar tentacle robot, so it might be a better option.

Continue reading “Rolling Sphere Robotic Arm Seems Serpentine”

Robotic Hand Uses Old CD-ROM Parts

Robotic arms and actuators are compelling things to watch, and as popular among the maker set as they are crucial to modern industry. [kthod2000] built a design of their own, which relies on parts salvaged from old CD-ROM drives. 

The arm itself is constructed of many components which appear to be 3D printed, with three main motors visible along its length. These look to be the eject motors harvested from several optical drives, which usefully come with a threaded screw on the output shaft that makes them perfect for a linear-drive application. Run by a TMC2208 driver via a microcontroller, the eject motors control the motion of several stages of the robot arm as it moves up and down.

The intention seems to be that one of these three-tiered assemblies could act as a single finger. Ganged up multiple times, this could allow the creation of something akin to a full five-digit robot hand. [kthod2000] has also done plenty of work on the software side of things that handles controlling the arm. The kinematics can all be simulated on screen in concert with the real motion of the arm.

We’ve seen similar builds before, too, like this plotter built out of scrap DVD drives. They’re a great source of quality electromechanical components for small projects, so it’s no surprise to see them put to work here. Video after the break.

Continue reading “Robotic Hand Uses Old CD-ROM Parts”

The modified servo being calibrated on the left half of the screen, with some graphs of its operation being shown on the right half.

Servo Surgery Teaches Us DIY Encoder Implants

Today, we shall talk about how [Adam Bäckström] took a DS3225 servo and rebuilt it to improve its accuracy, then built a high-precision robot arm with those modified servos to show just how much of an improvement he’s got – up to 36 times better positional accuracy. If this brings a déjà vu feeling, that’s because we’ve covered his servo modifications before, but now, there’s more. In a year’s time since the last video came out, [Adam] has taken it to the next level, showing us how the modification is made, and how we ourselves can do it, in a newly released video embedded below.

After ordering replacement controller PCBs designed by [Adam] (assembled by your PCBA service of choice), you disassemble the servo, carefully setting the gearbox aside for now. Gutting the stock control board is the obvious next step, but from there, you don’t just drop the new PCB in – there’s more to getting a perfect servo than this, you have to add extra sensing, too. First, you have to print a spacer and a cover for the control board, as well as a new base for the motor. You also have to print (or perhaps, laser-cut) two flat encoder disks, one black and one white, the white one being eccentric. It only escalates from here!

Continue reading “Servo Surgery Teaches Us DIY Encoder Implants”

Dummy The Robot Arm Is Not So Dumb

[Zhihui Jun] is a name you’re going to want to remember because this Chinese maker has created quite probably one of the most complete open-source robot arms (video in Chinese with subtitles, embedded below) we’ve ever seen. This project has to be seen to be believed. Every aspect of the design from concept, mechanical CAD, electronics design and software covering embedded, 3D GUI, and so on, is the work of one maker, in just their spare time! Sound like we’re talking it up too much? Just watch the video and try to keep up!

After an initial review of toy robots versus more industrial units, it was quickly decided that servos weren’t going to cut it – too little torque and lacking in precision. BLDC motors offer great precision and torque when paired with a good controller, but they are tricky to make small enough, so an off-the-shelf compact harmonic drive was selected and paired with a stepper motor to get the required performance. This was multiplied by six and dropped into some slick CNC machined aluminum parts to complete the mechanics. A custom closed-loop stepper controller mounts directly to the rear of each motor. That’s really nice too.

Stepper controller mounts on the motor rear – smart!

Control electronics are based around the STM32 using an ESP32 for Wi-Fi connectivity, but the pace of the video is so fast it’s hard to keep up with how much of the design operates. There is a brief mention that the controller runs the LiteOS kernel for Harmony OS, but no details we can find. The project GitHub has many of the gory details to pore over perhaps a bit light in places but the promise is made to expand that. For remote control, there’s a BLE-connected teaching device (called ‘Peak’) with a touch screen, again details pending. Oh, did we mention there’s a force-feedback (a PS5 Adaptive Trigger had to die for the cause) remote control unit that uses binocular cameras to track motion, with an AHRS setup giving orientation and that all this is powered by a Huawei Atlas edge AI processing system? This was greatly glossed over in the video like it was just some side-note not worth talking about. We hope details of that get made public soon!

Threading a needle through a grape by remote control

The dedicated GUI, written in what looks like Unity, allows robot programming and motion planning, but since those harmonic drives are back-drivable, the robot can be moved by hand and record movements for replaying later. Some work with AR has been started, but that looks like early in the process, the features just keep on coming!

Quite frankly there is so much happening that it’s hard to summarise here and do the project any sort of justice, so to that end we suggest popping over to YT and taking a look for yourselves.

We love robots ’round these parts, especially robot arms, here’s a big one by [Jeremy Fielding],  and if you think stepper motors aren’t necessary, because servo motors can be made to work just fine, you may be right.

Continue reading “Dummy The Robot Arm Is Not So Dumb”