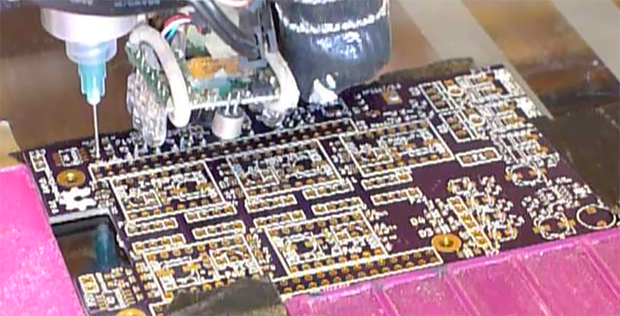
There’s a strange middle ground in PCB production when it comes to making a few boards. Dispensing solder paste onto one board is easy enough with a syringe or toothpick, but when pasting up even a handful of boards, this method gets tiresome. Solder paste stencils speed up the process when you’re doing dozens or hundreds of boards, but making a stencil for just a few boards is a waste. The solution for this strange middle ground is, of course, to retrofit a 3D printer to dispense solder paste.
This project was a collaboration between [Jake] and [hzeller] to transform KiCAD files to G Code for dispensing solder paste directly onto a board. The machine they used was a Type A Machines printer with a solder paste dispenser in place of an extruder. The dispenser is hooked up to the fan output of the controller board, and from the looks of the video, they’re getting pretty good results for something that’s still very experimental.
All the code to turn KiCAD files into G Code are up on [hzeller]’s github. If you’re wondering, the board they’re pasting up is a stepper driver board for the BeagleBone named Bumps.
Videos below.


Seems to work well, cool :)
Next challenge:
Combine it with a computer controlled pick&place machine.
Neat idea, it could be possible to retrofit a 3D printer with a little vacuum that can be rotated using a little stepper motor (40 steps should be enough). The hardest part is to place your components that will be place and tell the 3D printer where to get them… But since it’s a 3D printer, you could also print support for the components.
Seen this in a bachelor thesis ten years ago. :)
If you have a laser engraver available to you (maybe a local maker space? Build one of DVD drives?), cutting a stencil with thin mylar works very well for low quantity projects.
This is neat though.
Can a laser be used to reflow the joints after paste and smd placement?
See further down the discussion. The answer is yes, for very expensive values of “laser”.
Is a DVD laser powerful enough for that?
I think it might be, it’ll cut paper. If not, it would also be an easy upgrade to a more powerful laser.
would it be possible to add solder paste as above, then pick and place, then laser solder the parts?!
Too shiny for visible lasers nor is it good for hidden solder joints like BGA etc.
Why spend all that money when a toaster oven can do the whole board at once instead of a solder joint at a time even if you have the right laser.
Agreed there are cheaper ways. Just musing about the idea of never moving the board until one side is finished. Also every thing should involve lasers!
I wonder if a heated bed could be modified to get hot enough to melt a low-temp solder paste? We’d still have to put the components in by hand, but the process would be simpler.
This could also conceivably be used to lay traces directly on a blank board, instead of milling/etching copper traces. I don’t know what the issues would be with solder balling up, but it might be an option for simple boards that can tolerate the higher resistance of solder traces.
A standard thickness FR4 board is a pretty good insulator, before bottom heat gets to melting solder on the top the board will be brown :/
I agree that there is nothing like an oven for simplicity but I wonder about how to solder SMDs on both sides of a board. Instead of an oven, I’m thinking about hot air soldering with a CNC. It’s not a laser but it’s still pretty cool. Maybe an induction heater on a 0.4mm printer nozzle?
You forgot the first step: CNC mill the PCB.
Plated thru-holes and vias are tricky
I can’t watch the video at work, but will be interested in seeing it in action. The concept is simple enough, but last time I looked into this it seemed that consistently extruding the right quantity of paste was very difficult.
I must admit I never tried it myself. I tend to do mylar stencils even for small quantities, but that just an excuse to get more use out of my cheap eBay (40W CO2) laser.
@Grovenstein – IN theory “yes”, but laser soldering needs expensive Nd:YAG lasers. The wavelength of CO2 and DVD diode lasers means the energy is reflected rather than absorbed.
Ill just get my YAG out!
So mix some carbon black with the paste?
I’m still using green soldermask. I think black solder might be a bit too trendy for me.
I think the problem they had was with the syringe. Resistance would build, either due to a clump in the solder or the syringe wall resistance, and when that was pushed through the stored pressure pushed out too much.
My suggestion is to use a smaller syringe. Smaller syringes have a higher pressure per linear travel and would be easier to control.
I remember seeing Dave Jones touring some type of fast prototyping facility that had a CNC solder paste machine. The paste they used was very special (extremely uniform micro balls) and kept at a specific temperature to ensure the best performance. That may be the issue here.
I agree, that’s one solution.
Another option (inclusive of decreasing the syringe size) would be to increase the inner diameter of the needle (increase gauge size).
Having a uniform and easily extruded solder paste is the best option but also the most expensive. Are there any ideas out there on how to make your own solder paste?
I don’t remember seeing any plausible way of doing this. There are a few posts out there regarding DIY solder paste production. But my understanding is that the paste performs best if it contains microscopic solder balls that are as uniform as possible. I would be interested in seeing a home technique for producing this type of uniformity but I have zero clue in how that would be done.
Ball milling wouldn’t work since the solder is malleable. Solder balls up when it’s heated. My guess would be to boil the solder and have it condense on a cold iron or stainless surface, scrape it off and repeat. Higher the temp, the bigger the solder balls?? (My guess) You’d get a bunch of little tiny solder balls, but the paste would have to be a flux, maybe borate?
I’m thinking some kind of atomizer spraying molten solder into a stainless steel cannister (with a HEPA or water bubbler for the outgoing air… or just do it outdoors and stand up-wind ;)
Ballmill lead and mix with flux.
I think the better way is to use auger valves. Syringe is connected to the valve (no needles) and precisely dispensed by the valve. Can’t find a link atm but I guess that’s how professional dispenser machines work.
@RandyKC
Your approach could only yield pure lead balls. Ball milling solder can be done. Lead balls are used as media for milling black powder and other pyrotechnic materials and they do exhibit loss. Although to get very find particle sizes, doing it within a volatile liquid bath of some sort might be necessary to keep it from welding back together. Limiting the weight of the grinding media might be wise too.
Not to take away from the work the poster has done, but one can buy laser cut stainless stencils for little money… anywhere from $10 to $20 plus shipping. So for about $50 and a 4-5 days turn around, one can use a stencil which would be a lot faster to use.
Do you have a name of reputable suppliers of inexpensive stainless stencils?
I have been using sitopway.com (e-mail sales at sitopway.com) and have been quite impressed. I recently ordered two unframed Stainless Laser cut stencils (15cm x 25cm) for $40 USD ($20 each) + $20 US shipping via DHL.. paid via PayPal. Framing adds another $5 to $10 I believe. I was really impressed with the quality and turn around time.
*blink* *blink*
“4-5 days turn around” Faster to use? How long does it take your 3D printer to print?
$50 a stencil versus purchasing just one 3D printer that you can use for another purpose?
Not really on board with that being a better option.
I do not know about you, but usually to get your PCBs take more than 4-5 days when once factors in the shipping time and so the time to acquire the stencil is not usually an issue.
As for purchasing a 3D printer… well I think that you can purchase a number of stencils for the price of a single 3D printer.
As for speed… one can stencil boards must faster than waiting for a 3D printer to place the paste. If 3D printers, etc were faster, better, etc then they would be using them in a commercial PCB assembly houses…
At one time stencils were pricey, etc and so options like what the poster presented made better sense, however, that is now not the case. That being said, do as you see fit.
I usually use a service called Ohararp LLC (http://ohararp.com) 25 bucks gets you a laser cut kapton stencil up to 8.5×11 + postage, they work well for most parts, hold up pretty darn good, and He is in the united states, so usually a day to make, and a couple days postage.
Not really sure how best to give suggestions to the project creators, so I’ll just do it here, and other comments as well.
First, they should consider using better quality tips, and much, much shorter ones. Less backpressure. They might also want to consider trying plastic conical tips as well.
Second – Zephpaste, while very high quality, is not optimal for this (it’s also very expensive). They need Type 5 paste – smaller balls, more uniform. I’m surprised that they got Zeph through a 23ga tip (which I’m guessing is what’s shown in the video), much less the 27ga tip they mention in their readme. I’m a big fan of ChipQuick Low Temp Lead Free T5 – it dispenses really well, and it’s really easy to get to reflow without burning boards or components.
I’d also love to know which pneumatic dispenser that they’re using (or if they cooked one up themselves). Some of them are pretty good, some not so much.
Lastly – for the folks talking about using a laser for reflow – there are colored pastes out there, and I’d guess that having any manufacturer add colorant as a custom order would be easily doable, if the order was big enough.