There are hundreds – perhaps thousands – of builds out there on the Internet that put a Raspberry Pi in an enclosure with buttons meant solely for running emulators for old games. This one is unlike any other. Yes, it’s still basically a RetroPi emulator, but this Game Boy Pocket casemod goes beyond any remotely comparable build.
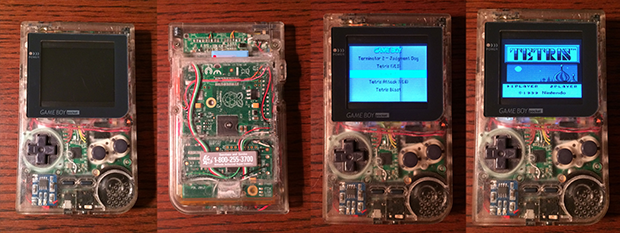
The Game Boy Pocket is incredibly small, but after sanding down the bosses on the inside of the case, gluing the battery door shut, and installing a bit of plastic over the cartridge slot, [WarriorRocker] was able to fit a Raspi inside. The buttons use the same PCB as the stock Game Boy, connected to a Teensy 2.0 board that simulates a USB keyboard.
With the two largest components taken care of, [Warrior] turned his attention to the sound, video and power. The display is a 2.5″ composite LCD that actually fits quite nicely behind the screen bezel. Audio is taken care of by a $3 audio amplifier, a new, smaller speaker, and a side-mounted pot stolen from the original Game Boy guts. There’s no chance on running this with the same 2xAAA cells the original Game Boy Pocket had, so [Warrior] somehow found space for a 2600mAh Li-Poly battery, a step-up regulator, and a charge circuit.
The result is a full-color RetroPi build capable of running for three hours before needing a recharge. All the classic Game Boy games are loaded onto the SD card along with select titles for other systems. The result is one of the best portabalized Raspi builds we’ve ever seen. Video below.


Christ, talk about overkill. Why not hook up the existing buttons via GPIO pins and actually drive the original LCD? Oh, right, because that would involve more technical expertise than just recompiling an emulator. Yep.
A ‘simple’ hack is still a hack. Performs as intended. Well executed. Not requiring much technical expertise. Easily repeatable. Raises awareness. Inspires further investigation.
Excellent!
I wouldn’t go so far with my complaints. However using a model B raspi seems like a bit of a waste when he then proceeds to remove the ethernet and only use one usb port. The model A exists and would’ve saved a few bucks.
I agree on the buttons. Everything else: RetroPi can emulate much more than the gameboy, and forcing everything to lowest-res black-and-white wouldn’t be that great.
original lcd is black and white. by replacing the lcd u get color and higer resolution. so u can also play different games. and as for the buttons. sometimes not needing to write linux drivers by adding 1 chip to convert buttonspresses to usb seems more reasonable.
So show us your better version.
Compiling emulators is easy… But not as easy as saying something is rubbish, without better examples.
well said sir!
Yarr: did you actually look at the site? The build was a hack of some note and your comment reeks of dickishness
make it happen
Probably because the screens in Gameboys are dying due to their age and dead pixels are common. Not to mention the mess that is the logic for forcing data onto these screens or the mess that is the fragility of the Gameboy Pocket’s ribbon cable which drives the screen. The top modders and hardware designers in the Gameboy chiptune scene have just finally gotten working screen replacement prototypes that rely heavily on exterior processing. The Sharp screens used in the Gameboy (Pocket) are based on old calculator screens Sharp never released and documentation and replacement parts are literally nonexistent. Maybe do some research instead of assuming things. :p
tl;dr no one has been able to force images onto the screen and it’s not worth the effort.
Don’t suppose you know, but is there info anywhere on CCSTN, color-coded STN, LCD screens? There’s just about nothing on the web I’ve been able to find so far.
They’re a different kind of colour LCD, they don’t use RGB. The LCD cells themselves change colour, don’t need a backlight. They only tend to do 4 colours, generally blue, red, green and “off”. A few scientific calculators and personal organisers of the early 1990s used them. I’m just curious cos it’s such a strange technology, that seemed to disappear.
To be frank, I know nothing about them except that they were an interesting tangent in LCD technology. Wish I could help you :/
The title should be “The Game Boy Pocket Raspi Mod Puts All Others To Shame” The “s” in “Raspi” is missing.
The Model B was chosen for the additional RAM also I wanted to shoot for more features than made it into the final project. The Teensy made sense as it is already designed to fully simulate a usb keyboard but can also act as a mouse when hitting the other key combo (select + up arrow). This mode isn’t shown since the LCD is of sufficiently low resolution that running the desktop UI is not desirable. There is also as I understand it a small performance hit to polling so many pins on the Raspi GPIO. The Teensy draws almost no power, performs a treat, and could be programmed in less than an hour. Also its only 4 wires to connect now to the PI instead of 9-10 wires. Some can call that overkill but I call that efficiency.
Great build!! Not everyone is going to agree with your design decisions, especially from the outside. Even if you had designed the whole PCB from scratch, someone would have complained that you could have designed your own silicon processor to only do what you needed it to do to be more “efficient”. In the end, it looks great, and functions great, so I think you made great design decisions!
This is so awesome! I am dying to build one of these portable all-games emulators and I love how much information you’ve put into your build log. How did you program the Teensy?
I programmed the Teensy on my laptop using a small cable wired up to connect to the same interface that connects the board to the Raspi. It is definitely possible to program the Teensy from Linux just with the small screen it was easier to write on another machine.
Great build. How long does the battery last. I have done a similar build and am planning to install batteries. My calculation says that 2600mAh Battery may run for an hour max.
The article summary said three hours, which is pretty impressive.
How dare you destroy Game Boy?!
Game Boy dead. I make go!
Yeah, but still… seeing Game Boy being treated as scrap metal bring a tear in my eye.
GameBoy raised from death, to walk among living.
Read the blog post…
Surprise!
Why did he name Link Zelda?
nub. link is context specific, but this has been an easter egg of sorts in a few of the ‘Zelda’ games.
http://zelda.wikia.com/wiki/The_Legend_of_Zelda:_Link's_Awakening_Secrets#Secret_Song
How dare you use off the shelf parts to simplify a complicated project. I’m appalled that you have ended up with a brilliant new use for a GBP instead of just talking about doing it.
soooo… can I get a copy of your programming? And a parts list? :)
#1 Awesome Sauce
#2 Awesome Sauce
#4 ???
#4 Sell for Profit?
Given the time and parts involved, these would probably have to sell for $300+ easily to make any money at all from it.
BTW, anyone heard about OpenPandora lately? Still costs too much for the hardware offered?
Last I looked they hadn’t changed their prices at all, so yes far too much.
They’re currently working on the second itteration, the DragonBox Pyra, it should be cheaper and more powerful.
OP is running a rebate now, celebrating the publication of schematics, BoM, case and PCB design files. If you think something inherently inferior at the task at hand is better for handheld gaming just because it has faster parts, then build it yourself. Otherwise stop being wrong. Even if you don’t value fun as a preposition of time, it means you have to go back in time and do it. Meanwhile I’m enjoying my pandora.
Talking from personal experience [I made the Pi-Boy] this really is a great example of how to pull off this mod. Puts mine and many others to shame! Bravo!
Thanks for the great praise, I definitely looked to your mod as a source of inspiration for this project. I would like to try making a Pi-Pocket Sr. using the DMG shell since you could fit way more inside there.
Sweet, it has less battery life than the 20 year old tech.
Oh look, another raspberry pi project. I’d congratulate on your success, but the “hacker”‘s media always has its ongoing diaherria flush of retropi stuff. I can’t wait for boards to get more smaller form factor. the Raspberry pi should be in the hands of poor school-chilldren, not someone who owns more than 1 big display screen in their household.
I think if there was some proper effort to give it a suite of educational applications, both standard computer stuff, as well as electronics, it might be more popular. Then again there are those Android TV things for about the same price. Though they don’t drive old TVs through composite like the Pi can. That might make a difference.
Minecraft and Python aren’t in great demand from the world’s educators. You need something that teachers who know nothing about computers themselves can use to teach students.
As an option, perhaps a kit with a breadboard and some components, and maybe even something to control mains relays. So smart kids could start automating their classroom lights or whatever.
I think the solution we used last time might still work. Put some great, cheap, games on it, then get kids to tell their parents it’s “for their homework”. Give them a couple of hours in front of the family TV with it. I’m imagining all this for kids in poor countries where people have TVs and fairly constant mains electricity. Although of course it could run from any voltage with the right tinkering, with switch-mode power supplies especially.
Teachers could even motivate kids by copying new games to their SD cards as a reward. Ideally something like STOS / AMOS would be available to let kids write their own games, if anything of that power and easiness still exists. Maybe Javascript?
Oh, also, of course, everyone who buys a Pi keeps the company going, which makes it feasible for them to sell computers for such a cheap price, which makes it possible for poor people to buy them. There’s no shortage of ARM+media chips (HA!), so there’s still enough for everyone.
This is actually a lot like the one I’ve been planning, except I’ve been wanting to do mine in a DMG.
I’ve been planning on depopulating most of the ports and perhaps utilizing the original link cable port as a USB port, and of course, reusing the original buttons on that, but it’s still pretty similar, despite the cases. Pretty cool (and inspiring) to see this done, though.
nice work dude project looking really sexy.
hmm, a slightly smaller battery could perhaps have been fitted into an old gameboy cartridge to save a littlebit of space in the casing. could also make it easy to quickly swap batteries if you had a few of them.
This is what I enjoy seeing in the comments: an actual useful suggestion.
Seems this site has become trolls-all-day lately.