
[psgarcha] took a year-old Arduino Uno on an international trip and upon returning found something was wrong. Every time he would try to upload, he would get the dreaded avrdude error, ‘stk500_getsync(): not in sync resp=0x00’. The Rx light would blink a few times during the attempted upload, but the tx light did not. Somehow, something was terribly wrong with the ‘duino, and [psgarcha] dug deep to figure out why.
To test the quality of the Arduino’s serial connection, [psgarcha] performed a loopback test; basically a wire plugged into the Tx and Rx pins of the Arduino. Sending a short message through the serial port showed the problem wasn’t the USB cable, the ATmega16u2 on the ‘duino, or any traces on the board. This would require more thought.
The main reason for the error would then be no communication between the computer and the ‘duino, the wrong COM port selected, the wrong board selected in the Arduino text editor, or timing errors or a corrupt bootloader. The first three errors were now out of the question, leaving timing errors and a corrupt bootloader. Troubleshooting then moved on to ordering a new programmer, and still this didn’t work with the broken Uno.
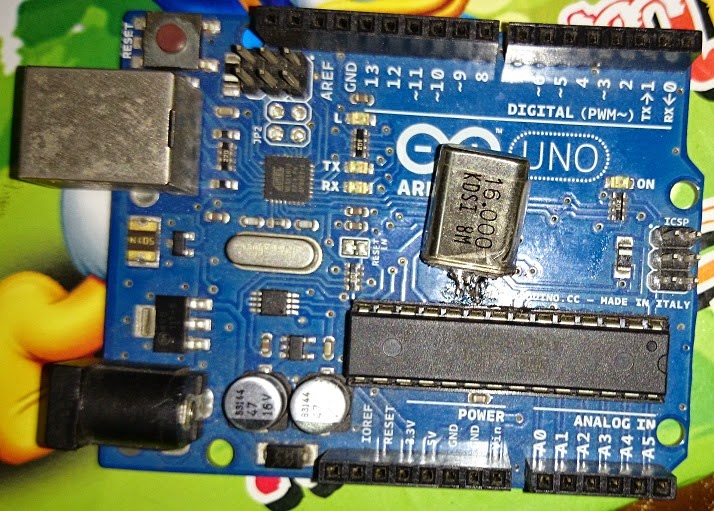
Frustrated with one of the greatest failures to become an Arduino tinkerer, [psgarcha] took a good, long look at the Uno board. He glanced over to an Arduino Mega board. Something looked different. On the Uno, the resonator had blown off. Problem found, at least.
Replacing the blown part with a hilariously large can crystal oscillator, [psgarcha] was back in business. This isn’t how you would fix 99% of getsync() errors, and it’s difficult imagining a situation where a this part would randomly blow, but if you’re ever looking at a nearly intractable problem, you need to start looking at what really shouldn’t fail.
Awesome rework, though.


Scanned through the link. Looks like a detailed, step-by-step diagnosis. I love those, and will have to read it shortly. But before I do, I gotta ask:
HOW exactly does the lid get blown off a resonator? JUST the resonator? Without damage to other components In an otherwise working PCB? That boggles my mind, and I’d really suspect other, more serious issues. (Which he may have found, and I missed in my quick scan; but if not…)
^^ Came here to ask this. Does a bad power event cause the cap to come shooting off or something?
I imagine air pressure changes in the aircraft could cause an air pocket in the resonator to ‘explosively decompress’ as it were, removing the can of the component.
I’d agree this is the most likely cause, but think about the implications here.
That resonator is a fairly standard part that’s found in all sorts of electronics and probably some kinds of avionics. Even if this were a one in a million failure, there would be a media uproar over airlines killing electronics and planes dropping from the sky all the time.
I can’t figure it out.
It isn’t rated for avionics and is probably a crummy part.
Beyond that, it’s a resonator. Most nice stuff uses crystals for everything (you think avionics would skimp and use a resonator for something that doesn’t “need” a resonator — eg. not a rf filter stackup?)
These sorts of parts are most certainly NOT used in avionics or military.
The metal lid can come off due to mechanical shock or chemical attack as it is just glued onto the ceramic. That shock won’t do the ceramic material much good either. The lid itself isn’t actually an essential part of the resonator. It is just there to protect the fragile ceramic underneath. In psgarcha’s case, it’ll be mechanical shock or possibly a manufacturing defect.
I expect that whatever knocked off the metal lid also damaged the ceramic enough that it didn’t resonate correctly. The damage may not be visible to the naked eye. Microfractures in the ceramic material can cause frequency changes and changes in electrical properties.
My thoughts as well, IF its the only failure then its likely something inside the oscillator failed. Since a crystal oscillator is usually a physical piece of quartz or lead zirconium titanate inside its very possible that a bad piece of crystal made its way into this particular part and subsequently failed. It worked long enough to pass tests but failed under more constant use implying possibly a thermal related issue since its a vibrating part that would imply that it does get warm over time. Factor in a rainy day (low pressure system) and a higher then average temperature, the entire idea of “explosive decompression” is totally viable. Some also have an internal capacitor and that part of the system could easily be responsible depending on its construction.
I would be curious to know if the Arduino traveled in a checked bag or in a carry-on bag. The air pressure in the cabin is regulated, so if it was in his carry-on bag, then that would rule out this possibility. If it was in the luggage compartment, however, then it would certainly have been subjected to low air pressure and this could indeed be the cause
I have a perfectly reasonable explanation: This is a FAKE Arduino! It is not a genuine article but a cheap Chinese-made knockoff. Sure, it uses the same components/layout as a regular Uno but a normal Uno doesn’t have a big red button or headers that are slightly off-kilter. A genuine Uno also doesn’t have a crystal so poorly made that merely getting on a plane results in the top popping off :D
BTW: The other dead giveaway is the color; official boards a more of a teal blue than this dark blue.
I recognized this fake Uno right away because I received the same exact board from an Amazon seller who was supposed to send me a Pro Micro (not even remotely the same, thing, hah). My fake Uno stopped working a few weeks ago for what I assumed was “no reason” so I threw it away. I didn’t have any money invested in it so I didn’t bother to troubleshoot (the seller refunded me and told me to keep it =). Wish I saw this post sooner though because I have plenty of crystals I could have used to replace it.
No. It looks exactly like an genuine Arduino Uno R3 including the red button. Look at https://www.adafruit.com/product/50 and compare with the photo. The board in this photo is just a little beat up and dirty. The difference in PCB colour is due to the camera + flash. Whatever camera was used has significant distortion in the lens as the straight edges of the PCB are all bowed out.
It is a genuine board or licensed clone. Fake boards almost universally use a green 501k resistor next to the USB port, whereas the genuine ones use the black and gold ones.
I believe that it was not just a cap, but the resonator itself. The only thing remaining was the base where it can be soldered to a PCB. The cap itself, I believe, contains the resonator. Hence whatever was left was the base. The reason, I reckon, was most probably mechanical shock (you know how they handle luggage at airports) as my Uno was not in the original box it came with. Funny how not losing the original box would have helped in keeping it safe. I wanted to make it a point in the post that people should keep their Arduinos safe in the boxes where it cannot move much. So I make this point here: Keep your Arduinos in boxes, people! Boxes where only the Arduino can be.
I’m betting against air pressure. Even assuming the arduino was in unpressurized space, you’re talking a maximum of 14 psi and a maximum pocket size of roughly 1/100 sq in, which would be a force on the order of 2 oz. aka 0.5 newton. Which is next to nothing for most packaging. In addition, the temp rise during soldering would cause a roughly similar increase in internal pressure, so manufacturers would want to avoid that.
That’s a crystal, not a crystal oscillator.
ditto. They are NOT the same.
I am surprised that this worked.
The atMEGA has about four oscillator modes that are used for different frequency ranges and oscillator configs.
From memory they are –
1) RC mode for low frequencies with a resistor and capacitor.
2) Resonator mode for the intermediate frequency range but not the highest frequencies.
3) Low power crystal mode for about the same frequency range as resonator.
4) High power crystal mode for the highest frequencies.
The mode is set when the bootloader is originally programmed into the chip.
I have a atMega664 (‘duino) which had a 16 MHz crystal in it. When I changed the crystal to 20 MHz it wouldn’t run so I assumed the bootloader is set for low power crystal mode and I would need to change that to high power crystal mode for 20 MHz to work (or use an active oscillator).
For those who are interested, the atMega’s can be substantially overclocked but to do so with a crystal you need to use the high power crystal mode. This will get you same way but at higher frequencies the internal crystal driver will fail even though the rest of the chip can go faster. To get even higher overclocking you need you use an active crystal that has it’s own crystal driver built in.
I have seen these overclocked to 32MHz on the interwebs. If you want to use the Arduino IDE for an overclocked chip you have to make a new board config in the boards file.
PS: If you use an active crystal oscillator then you don’t need to worry about the internally configured oscillator mode.
Pro tip: If you set the fuses incorrectly–trying to use an external crystal when you really meant to use the internal or vice versa–you can still reprogram the chip! *It is not dead*! You just need a “high voltage” programmer the likes of which can be had for $20: http://mightyohm.com/blog/products/hv-rescue-shield-2-x/
NOTE: I am not affiliated with mightyohm.com in anyway but I *do* have the original HV rescue shield and have had to use it more than once =)
I tried wiring up my (admittedly, already suspect) Dragon to do this when I bricked a dev board that I was prototyping, by incorrectly setting the clock fuses.
After much swearing and frustration with the Dragon, I found it much easier to just inject an external clock into the XTAL1 pin of the ‘328 in question. If you’ve got a signal generator, it can be a much easier fix for this specific problem.
An active oscillator (for example http://media.digikey.com/pdf/Data%20Sheets/Epson%20PDFs/SG-8002D(B,C)%20Series.pdf) can be a much cheaper solution (that model is ~£2.60), the output of which can be wired to a “pogo” test-pin. This has given me a quick and easy way to get bricked chips ticking over long enough to reset the fuses.
He took the Arduino on an airplane. How was it packed? It could have been damaged by rough handling in the baggage area.
For real the ardunino uno uses a resonator. I’ve have 5 dollar Chinese ardunino clones that have an actual crystal. Did I transport into some sort of parallel universe, where a knock off is better than the original. You can’t use VUSB with a resonator and the built in serial produces far more errors with a resonator. You got to be kidding, this must be a prank, the ardunino uno uses a resonator? What do you save by using a resonator 10 cents max?
I have needed to do the same on an Uno, although I used a lower profile (HC-49 ?) SMD crystal, with its legs bent apart. Not because it was broken, only because the resonator wasn’t good enough for my application (had to measure frequencies accurately). Really crummy design choice to save a few cents…
That’s why it’s always better to take your wife/so on international trips.
Thanks for the info, this fix worked great on a broke Sainsmart Uno my son has.
Wow, this gives me flashbacks. Had the same problem with a Mini Pro; however, in my case it was a damaged TX pad.
I had this same error last week and again this week. Was using lubuntu, did updates and it fixed it both times