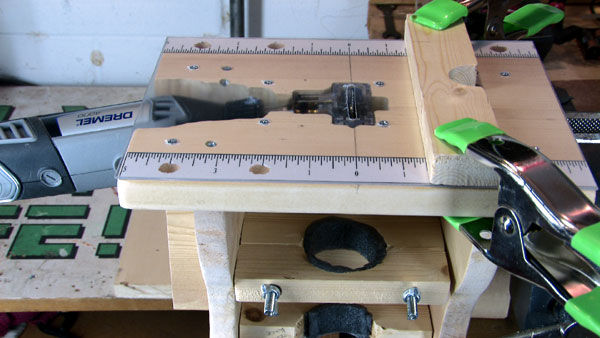
Little jobs require little tools and you can’t get much more littler than a Dremel. For his tiny tasks, [sdudley] has built a Dremel-powered base station that features a table saw, drum sander and router table. Overall, it is about one cubic foot in size and is almost entirely made from ‘1 by’ dimensional lumber. The Dremel power plant was actually used to make the base, specifically slowly removing material at the clamping points that hold the rotary tool secure to the base. The Dremel is held in an upright position and pokes out through the center of the table for both the drum sander and router configurations. To use this as a table saw, the Dremel is mounted almost horizontally on the base. A Mini Saw attachment has to be purchased for the table saw configuration but it does a great job at holding a vertically spinning saw blade.
After the break there’s a nice video of this tool’s use and assembly (it’s even worth watching just for the musical accompaniment that takes you on a wild ride through several genres of music). For those who want to make one for themselves, [sdudley] has made his part templates and assembly guide available in PDF format on his Instructables page. If you’re looking for something a little larger, check out this circular saw converted to a table saw.


That as a router table looks like it’s better than Dremel’s own router table attachment.
Cute! A Barbie table saw.
I have to wonder how many extra Barbie parts you are going to have scattered around your house. 8^|
All it’s missing is a miniature Norm Abrham to do the work for you.
“So let’s take a moment to talk about shop safety. Be sure to read, understand, and follow all safety guidelines. And there is no more important safety rule than to wear these safety glasses.”
Check on page 19 for the optional beard and mustache printouts. If your plans are missing page 19, then you didn’t download the plans in Movember.
I like that he uses only the dremal in the video to create this jig, as many who duplicate it have only a dremal (which is why they would build it). Is it a “Hack”, no. Is it useful? Yes.
This completely at home on HAD. You would be able to use this to do any number of hacking related things.
Please tell us what makes a hack? If taking a hand tool and converting it into a multipurpose bench tool doesn’t qualify…. then what does?
It is a pretty sweet hack :) I agree with some others that I like this better than Dremel’s own setup. And at a fraction of the cost….
Given the undesirable angle of the dremmel in table saw configuration (not perpendicular) I have to give this a less than stellar review.. It might work a lot better if it was designed around the flexible shaft rather than direct drive as he has done here. The inclusion of height adjustment would be rad.
The Saw attachment has an input at an angle so that you can keep the body of the dremel off of the plane you’re cutting through. He hasn’t cut a corner to do this. That’s a design by Dremel. Take a closer look.
now that’s a cool attachment… ’bout time.
Interesting. I wasn’t aware of that.. So all in alll pretty cool! Thanks for correcting me Daniel.
I’m sure everyone appreciates the sage advice, but that is the designed angle of the saw attachment. (A bit of research would have shown you this.) – But great review….
IF you want a tiny table saw they do make them.
http://www.harborfreight.com/4-mighty-mite-table-saw-68829.html
Cheaper to buy than build and ungodly handy. IF you do any custom enclosure work these are fantastic. I use them to make plastic enclosures as you cut a kerf in the plastic and heat gun bend. works great.
Nice. I didn’t know one like that was offered, other than from niche shops like Micromark.
And the Harbor Freight one is cheaper by a factor of ten over the Micromark one (though my Micromark one is still going strong ten years later.) Nice to see a working alternative. Looks like it may take the same blades, might mean another good cheap local source.
How well does this little table saw work? The reviews on HF’s suggest it’s severely underpowered. I’ve considered picking it up for light plywood/acrylic work, but the reviews suggest it might not do the trick.
If it’s underpowered then… well, this *is* Hackaday after all.
We can fix that :)
Hmm, the reviews are worrying, especially as one of its marketed uses is tile cutting – it looks like it includes a tile cutting saw anyway.
I’m interested though, I’ll have to look at one to see if at least the frame is usable for patching in a better motor.
Hold on. I cannot in good conscience let anyone link to that harbor freight mini tablesaw without saying something.
I have that exact same model. It is a piece of trash. The bed is somehow not level, which is sort of impressive seeing as how it’s about six inches in its longest dimension. The bed is warped, and covered with a really, really thick paint. No, I don’t understand it either.
The motor is underpowered and can’t cut through 1/4″ plywood without stalling. Cutting copper clad board (my intended use) is out of the question.
It is, without question, the worst tool I have ever bought. If you have a project where you need to make straight cuts in thin pieces of material, literally any other tool would be more suitable for the job. A wrench would be more suitable.
There are no redeeming factors that make that harbor freight mini saw worth the money.
Edit: upon closer inspection, the above review applies to this saw: http://www.harborfreight.com/4-in-Mighty-Mite-Table-Saw-61608.html. I cannot speak about the quality of the one linked above, but if the my link is even remotely applicable, you would be much better served buying an anchor.
Search results for “cutting with a wrench” turned up 2.7 million google results, and 4 million Bing results. Oddly enough, no results had the crappy table saw you linked. I think that’s a good thing. However, searching for “crappy table saw” turned up enough links to people wearing band-aids. That’s a little troubling.
1/8th HP vs 1/12th HP, the latter is the model you have.
A few of the reviews for the 1/8HP model talk about using it specifically for cutting PCB.
A fellow I worked with was very excited to get his mini-tablesaw from Horrible Fright. Upon opening the box and turning it on, there was so much wobble in the blade that it was clearly visible to the naked eye. I told him to put it back in the box and return it.
It might be chaper to buy one but, the satisfaction of making something usefull is priceless.
The Harbor freight saw is very crude at best. Blade height adjustment is poor, getting a square cut is non-existent. It is a waste of money.
If you need more power I suggest you scale up the plans and build something similar for a full size electric power drill with speed controller. These are far more powerful than the dremel (and often a darned sight cheaper).
Don’t forget your safety specs however and bear in mind that a 300+W power drill with circular saw blade attachment will chop your fingers off very neatly, so always use a push stick. Then again a drill press will send a 200g bathroom tap (faucet for all of our US readers) flying across the room at high speed and take a chunk out of the plasterboard wall, with very little effort, as I found out yesterday, so I may not be the best person to turn to for safety advice.
Some useful table saw advice… https://www.youtube.com/watch?v=uU-4p-X8AOg … and dont forget, always count your fingers when you have finished the job.
If you have to count your fingers after you are finished, perhaps those same people need to write down how many they had to start with. No good getting to the end saying you have 6 fingers and panicking, if you started with the same. And if you end up with more fingers than you started, do you apologize to your assistant(s)? Does this count only include attached fingers, or as long as they still add up (attached or loose), is the job still a success? You can pick your friends, and you can pick your nose, but does an accident mean yes, you can now pick your friend’s nose? Somebody please finger this out!
Nope, but you can use your friend’s finger to pick your nose.
oddly enough I was picking my nose exactly at the very moment I read your comment. And yes, It was a nice big one.
More like Hack-your-finger-off-a-day. Better add an Arduino to make it safer.
Maybe add safety parts that would cost $80 to replace if you touch the blade with damp wood.
This is sweet. I was just about to start building something like this for dicing small surface mount circuit boards. It makes it easier to solder paste a panel of small boards, then populate, then re-flow, then dice them apart.
Saying ” ‘1 by’ dimensional lumber.” is incorrect. Dimensional lumber is is same size as quoted. a 2×4 dim plank is actually 2 inches by 4 inches. When we say 1×4, it’s actually 0.75″ by 3.5″, and a 2×4 is actually 1.5″ x 3.5″. Generally accepted reason for this is that when we add 1/2″ sheet rock / drywall to a stud, it dresses out to 4″ thick. Really important when you screw a inch long screw into a 1×4 and wonder why it’s now screwed down to your work surface.
Almost right, it has nothing to do with drywall though, remember 1/2″ drywall wasn’t common place when the “standard lumber dimensions” came to be (lathe and plaster was in use but still not common and also not 1/2″ in thikness).
The final dimensions come from the process that happens after the wood was rough cut to dimension. The finish cut (made twice per side) with an 1/8″ kerf blade generally loosing 1/4″ on each side. That brought any dimensional lumber down by 1/2″. For thinner woods (say a 1x) it was only finish cut once loosing 1/4″ total. Even thinker woods (say your common 2×12) would take an additional pass through the mill and loose yet another 1/4″ it was up to the saw master to select where these cuts came from to ensure minimal weaknesses (think knots) in the final product.
There is a long story behind the standard of 1/8″ for Kerf, but basically comes down to repeat-ability by man or machine.
Source: I grew up in construction, was a carpenter, and worked at a saw mill before I decided I liked computers more than labor. Had to learn the history to pass your tests.
In the time before it was decided that framing lumber all had to have smooth and pretty surfaces, it was rough cut to full dimension. Then when all sides planing was instituted the mills didn’t increase the cut dimensions so the planed lumber would be full dimension. But why plane off 1/4″ off all four sides? The band or circular saws didn’t do that rough of a cut.
The huge circular saws used in some mills cut a thicker kerf than the huge band saws because the disc has to be thicker so it won’t warp from cutting stresses and heat. They also have removable insert teeth so instead of resharpening the blade the cutting tips are swapped out. Time is money and swapping expensive teeth costs less than the time it would take to sharpen the blade in place or dismount the blade to swap with a freshly sharpened one.
A bandsaw mill can get slightly more lumber from a log, but the mills still plane 1/4″ off all sides.
It makes working on old frame buildings difficult. One either has to special order full dimension rough cut lumber or buy extra nominal dimension lumber and saw spacers off it to attach to one or two faces of the fancy, smooth, sub-dimension wood.
All those extra shavings from the planing either get made into wood pellets, sold as animal bedding, or burned at the mill to fire the drying kilns.
BTW, wood pellets make better animal bedding than shavings. They are far more absorbent, have much less fine bits and cleanup is easier and less wasteful because it’s harder for a horse to muck up the entire stall with one load of crap like they’ll do with straw or shavings.
You passed the test! You caught me slacking on the true answer (didn’t have the energy or caffeine left to write the whole reason) a better description of the process than I could have written. And I have always wondered why 1-by only lost 1/4″. Thanks!
A Dremel (rotary) is a rotary tool, not all rotary tools are Dremel. Pedant, I know, but it’s like calling all MP3 players iPod.
And not all Dremels are rotary tools. But the story clearly shows Dremel’s rotary tools.
Reminds me of one of my old Christmas presents. A hand cranked saw, sander, chop and punch.
http://vintagetoyarchive.tumblr.com/post/40381806028/mattel-1978-the-power-shop
Or this one, but the “real” power shop version.
http://www.samstoybox.com/toys/PowerShop.html
The blue nail gives something away about the difficulty building this dremel accessory
This would come in real handing for someone building custom models, say for a model railroad.
Apparently I can’t edit comments for spelling… “handy” not “handing”
This would be sooo handy for me. lovely hack !
I really liked the presentation and finish of the final tool – and the videos were really well done; for that matter, so was the instructable and PDF.
One other thing that this could be used for (though not shown in the video or otherwise) would be to use the spiral blade (which he used to cut out some of the parts) in the router/shaper mode of the table – it would give you the ability to free-form cuts; the only downside would be the greater potential for injury – but then again, if you are using any tool like this, you really need to be aware of what you are doing at all times.
I had initially thought that maybe using just the spiral blade, and not even worry about the table saw attachment for straight cuts would suffice; ultimately, it could – but at the cost of a wider kerf (the table saw has a much narrower kerf than the spiral bit).
great. I liked this idea
Wonderful, ingenious! Thank you so much.