There are certainly battery hungry devices out there on the market and, unless you do some serious research before the purchase of said device, you really don’t know how it will perform. Needless to say, some of us get stuck with power hog device, and it seriously sucks because changing out batteries often is expensive and just plain annoying.
If you couldn’t tell, I am speaking from experience, my old Sony DSC-H5 camera works great with the exception of needing new batteries every hour. And if you get cheap batteries, the camera won’t even turn on! There’s a USB connector on the camera but it is only for transferring data and there is also no DC input jack. The entire situation is a totally bummer.
I’m happy (or disappointed) that I am not alone in the world. [Phil] wrote into the HaD tip line to tell us about his solution to this very problem. He has a Canon SD1000 camera and although the battery works fine he needs it to work at an altitude of 15km in order to take some sunrise photos. Cold weather testing (in the fridge freezer) showed that the battery isn’t going to cut the mustard for the hour-long flight. The rest of the balloon-lifted unit already has a battery pack and the plan would be to tap into that to power the camera. Unfortunately his camera, like mine, doesn’t have a DC input jack and can not be powered off the USB port.
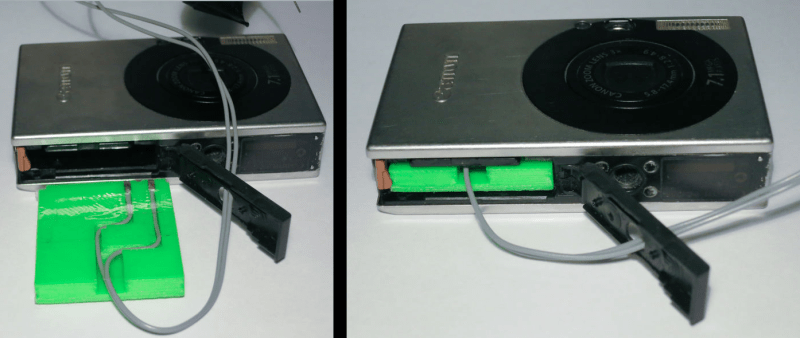
[Phil] decided to make a 3D printed battery emulator. It sits in place of the stock battery and holds bare wire where the batteries terminals normally are. The other end of the wires are run out of the camera to a voltage regulator that converts the battery pack’s 6 volts down to the 3.9 that the camera needs.
[Phil]’s project inspired me so much that I decided to make my own battery emulator! [Phil]’s 3D model is available for download but unfortunately my camera takes standard AA cells. No biggy though, I do have the capability to model my own. Measuring the AA batteries made for a quick modeling of an emulator. One thing I had to keep in mind is that the 2 batteries are close to each other but they are not touching. I had to account for that in the design since I wanted my emulator to be one piece, rather than two separate AA cells. Instead of making the bare wire contact the battery terminals in the camera, I used 3mm pan head screws for no other reason than that I had them kicking around and they reminded me of the button on a AA cell. A little flux helped the solder stick to the screws and some post-photoshoot hot glue will keep things insulated and provide strain relief. To power the camera I just used an old 3.2vdc wall wart. Yes, my camera is not mobile anymore but I can once again use it for shots around the shop.
AA Battery Emulator STL File Link
[Phil] hasn’t launched his camera yet but we are definitely looking forward to checking out his high-altitude sunrise photos.


I did more or less the same thing with some rolled up cardboard and custom-bent iron wire. Works a treat.
I would love to see a bunch of people contribute a bunch of these models to a “Thingiverse” like library of nothing but battery “dummies”. I’ve got a few old cameras and one decent “HD” camera that the original 4 batteries I bought over a decade ago have discharged themselves into oblivion. The cameras all still work, so why should I trash them simply because of a lack of (working) battery? Thankfully some newer cameras take “standard” size Canon batteries, so getting a cross section of those would handle a good chunk of the market.
Yea, a library of “dummies” would be a great idea, also @Rich Bremer, you’ve got a 3D printed why not just print an external portable power supply, hell 2 D batteries should do it.
Brilliant solutions in both instances.
I keep thinking that I should replace my nearly decade-old Canon S3-IS. Then I see articles like this and remember that I can take literally hundreds of photos on a single set of 4 AA NiMH batteries. I think I’ll hold on to it for now.
And the great thing about those is they all come in the same diameter and length :) A simple model that touches at least the two pins that matter inside the camera (+ and – for the whole pack) and you could run it off of anything regulated to the right voltage. Hell, with a camera that uses 4 NiMH, you could use a LiPo and a boost circuit to 5V-5.2V assuming it supplies enough surge current (usually for the flash and the lenses), and many inexpensive 5V USB chargers are actually 5.2-5.5V (which I wouldn’t go higher than 5.5V which should be 4×1.4V hot-off-the-charger NiMH cells).
Good ideas, but as long as AA NiMH cells stay cheap and easy to use I have no reason to try other power solutions with my camera. I can usually get a few years out of a single set of no-name brand NiMHs before they start getting weak.
Unfortunately, Canon has switched almost exclusively to making cameras with expensive battery packs. One more reason to keep my S3-IS going as long as possible.
Best thing about AAs is they’re easy to get in a pinch from any service centre or supermarket.
I made mine of a single piece of wood. Works fine, I guess that additional silicone rubber door in Canon PowerShot A810 was for the cable anyway :)
FYI, those rubber flaps on the battery doors of Canon cameras are definately there to accomodate a power adapter. It was a plastic slug, battery shaped, with appropriate contacts on top, and a 2-3mm DC jack on the bottom so you could use an external power pack/wall wart/whatever. I have one for an old SD400, and it would have fit several others in that line.
And you can get those Canon power adapter blocks dirt cheap on eBay. I had a Canon Digital Elph but gave it to my sister when I got a Nikon Coolpix S6200.
The Canon was a nice camera, with the exception of having to take the battery out and put it into a charger because the USB connection didn’t charge it in the camera.
One thing a simple dummy AA cell is good for is some 12 volt equipment that runs off either 10 rechargeables or 8 Alkalines. You do not want to load it up with 10 Alkalines. I had a 40 channel handheld CB radio someone did that to. Magic smoke, out! Got it repaired and got some cheap yet high mah capacity NiMH cells. They’d hold charge for over a year. The radio had two power ports. One to operate it and one for charging if NiCd or NiMH cells were installed.
I was going to say the same thing… many a battery pack has been made from scrap wood! Guess I’m just old-school. lol
Last time I needed something like this, I bought a few of these: http://www.amazon.com/Bluecell-Battery-Holder-Converter-Adaptor/dp/B0064IQ49I and hacked wires into them.
Ok, not as cool to talk about as “I made it on my 3D printer”, but easy, cheap, and it works.
For the digital camera I use that has just slightly better optics than my phone, and a more friendly (for camera functions), I use a 14450 lithium ion cell and a dummy I made from a 1/4in bolt and a blob of shapelock. I just used a dremmel to shorten the bolt slightly to fit.
Have you tried a single LiFeP and a spacer?
Some devices can handle the extra voltage of a LiPo or LiMn. AA size is 14500. That is what I use in my GPS.
That’s what I am using – LiFePO4 (14500 without protection circuits is just the same size as AA) + a dummy. The discharge limit for LiFePO4 is 2.0V while my camera undervoltage cutoff is around 2.3V and also have a PTC built-in.
The dummy is a dead AA NiMH that was completely shorted. I soldered the terminals together to get lower resistance.
The capacity is a bit on the low side, but its discharge voltage curve matches my old camera better than NiMH. They also have lower self discharge rate.
Do they pay based on how much filler text one can use to turn a little square of plastic into a noteworthy hack? Because I’ve done the same using styrofoam and a hot-wire cutter fashioned from a soldering gun, and before that with carton and tape, and neither time did it seem worth even mentioning anywhere, let alone writing a lengthy hackaday post about.
3D printers have been around for a rather long time now. We’ve all seen them, and the novelty has faded – little slabs of 3D-printed plastic aren’t significant anymore.
Wow, that’s a lot to write about some content that was provided for you to read at your leisure, free of charge. It’s like you care, or something. :P
Your idea of “a lot to write” is very different from mine.
And yeah, I do care about the general feel of the website, being a long-time follower. It depresses me when it’s a slow day and rather than saying “well, we ain’t got nothin’ for you today” they dig up these trivialities, or decade-old articles that are presented as new.
I can see this idea working on a bigger scale for old cordless drills. The shell battery could house newer batteries that could be charged with an external charger.
“battery emulator”
Seems somewhat trivial to be honest.
Perhaps, yes, it is simple. But at least he bothered to write it up and publish it on his site, so anyone can reproduce and adapt. This is what open source hardware is all about, and you have to start somewhere.
This has been a thing I wish more research would be done on this.
Ive been wanting to make a panoramic time lapse camera with a Sony CyberShot DSC-W570, an external power source would be required for this particular build for long durations of use.
Ive tried taking a battery apart (not recommended with this style of camera) to get the board that would talk to the camera, and sadly I still have not had any luck.
Only reason I would try to use the board from the battery, Sony has had the habit of locking down their devices in so many ways, famous one I have come across is the Sony PSP back in the day and using the pin 0 lift on the battery and letting the device boot into a mode that would allow you to install custom firmware.
So in this case of this particular device, I would expect no less of such douche-baggery. If I can find a way to make a dummy battery that works, this camera DOES have a little side hole made for a little cable to slide out. I found out this was for when they would install a camera in a Wal*Mart display stand, and thought it would be useful for me when I figure out how to bypass this severe lack in external power supply support.
Really camera designers… open up your options a little.
Anyhow, if anyone out there knows of the bypass for this particular camera, shoot me a message!
What you need is the DK-1N DC Coupler and AC Power Adapter Kit
You mention you tried, but didn’t say how. I’ve personally converted two Sony Infolithium batteries to external power. I crack them open, cut the existing cells out, and solder wires to their terminals on the battery’s board. Connecting a suitable power supply fools the board into working.
Looks great! I’d like to stack a battery holder top to bottom, for something like this:
http://www.mwdental.com/equipment/curing-lights/led/mini-l-e-d-curing-light.html
What a great idea!
I did something like this to a Bluegate audio adapter that runs the A2DP profile. One day it wouldn’t charge when I plugged it into the charger, so I opened it up, took out the LiPo battery and replaced it with a tiny circuit board. The circuit basically takes 5V power from the charger, steps it down to 3.7V with a LDO regulator, filters it with some capacitors, and then delivers power to the main circuit. Looking at it, you really can’t tell I modified it.
I never needed the battery in the unit anyway. The only reason I got the thing was to improve the impedance match between the headphone output of my tablet vs the input on an external amplifier. If you connected them directly, it sounded pretty bad. Doing it with the adapter improved the sound and made the connection wireless.