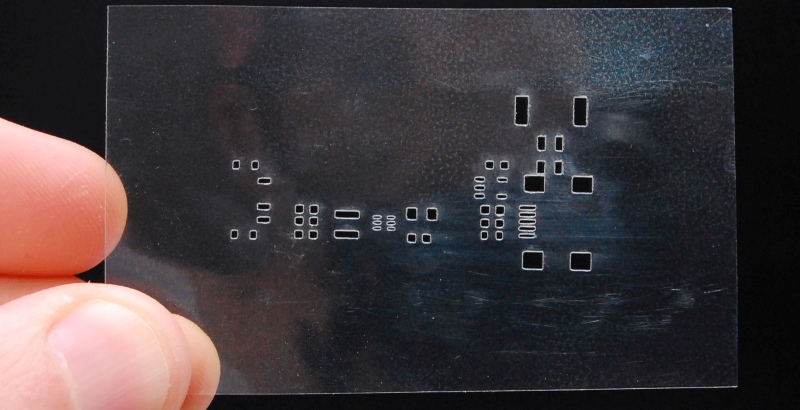
Prototyping your own PCBs? At a loss for how to apply your SMT electronics? Well — do you have access to a laser? [Felix] shows us a definitive way to use a laser cutter to engrave SMT stencils with ease.
The real trick here is to engrave — not to cut. Typically if you’re using enough power to cut straight through the plastic, you’re going to get melting and burning of the edges — which won’t work well for a SMT stencil. So what [Felix] found is to engrave at approximately 20-30W @ 400-450mm/s. He’s using Mylar as the material.
The results are pretty awesome — but if you’re without a laser, he also has an excellent tutorial on DIY metal SMT stencils by chemically etching soda can metal!
Alternatively, it’s possible to use a vinyl stencil cutter for SMT applications — just requires a bit of messing around when converting the file types!


I vector cut a few passes at low power (and higher speed), but whatever works for you I suppose.
(PS – etching takes a….g……e……..s………..)
Hey .. I thought I was impatient :-)
a….g……e……..s……….. = 3 minutes for the stencil in the video, quite long yes.
About 15 minutes for a large panel stencil, that’s e….o…n….s……. in this terminology.
Again, the settings are tuned to give nice smooth holes that won’t trap the paste, that’s essential if you don’t want to spend a….g……e……..s……….. cleaning your stencil every time you apply some paste.
For me a….g……e……..s……….. is more like waiting 5 days for an online stencil ;-)
The example was 3 minutes. I don’t think that’s a terrible lot slower than vector.
you can also play with the focus height. hit the object while its lower in the bed or higher in the bed. lots of ways to control how the laser operates on the plastic.
that’s one of my tricks in getting infilled lettering on plexiglass. I etch the letters, then raise the bed a click or two, re-run the process, raise the bed again, repeat. that way I can cut deeper into the plastic and not have to overpower it with harsh high-power force.
for the lettering, I will leave the masking on, spread some acrylic white paint into the voids, let it dry partially. peel off the masking and use a thumbnail (works best, does not scratch) to push away any overflowed paint. on shiny plastic, it works best; on matte plastic, you have to get to the paint before it sticks to the ‘rough’ surface.
laser cutters are things that, one you have access to, you wonder how you got along without them.
This is cool, couldn’t you use the laser cutter to cut a soda can stencil, as well?
Nope, not this kind of CO2 laser, it will reflect off any metal. You can engrave specially treated/coated metal but not cut metal. For that you will need a fiber laser.
Excellent information, thanks!
You could do very thin stainless tell (shim stock) with that laser. Edges won’t be pretty.
Stainless can be cut with low power CO2 (where low is under 250W), oxygen air assist helps.
Other metals, eg mild steel & aluminium can be cut but the power needed goes up dramatically.
You could spray the aluminum with black paint, etch it away with the laser, then etch the exposed aluminum chemically.
I’ve been doing this for a couple years now. But I cut through, though sometimes with only just enough heat to cut just over halfway through, with two passes, and take a needle and razor blade to cut through the remainder, and carefully clean up any flashing. This minimizes the melt back. I don’t anticipate this working well without air assist. For super small holes, I go to a CAD program and offset the holes inward by about half the kerf.
I tried this as well. It required a lot of fine tuning to get it just right and minimize the edge melting/residual effect. But the laser is ever so slightly varying in power depending how far away from the source you are and how clean the optics are etc. So for me this was just too much work and then cleaning up each aperture was another time consumer. The engraving was quite forgiving with any laser output variation and of course there is no cleanup, it’s ready to use as soon as it’s done etching.
It really didn’t seem that bad. Maybe 1-5% of the holes had a “hanging chad” which was quick to poke out. Even with the examples shown in the video, I’d still want to clean up the edges of both sides gently with light passes of a razor blade because the edges still show a visible bead because of melt back.
I wonder if there’s a way to have the laser ‘polish’ edges via some clever power/modulation/speed trick? custom programming, of course, and maybe even some bed height control in real time. turn the power down as the laser comes near the edge and also slow it down. or do a polishing pass around the edges. anyone ever heard of this kind of dynamic approach?
What about to repeat cutting path with lower power and little defocused beam? Too low to mark solid material but enough to melt sharp edges. Should help release thermal stresses in hard edges too.
The only thing I’ve seen along those lines is this technique for bending acrylic after cutting.
http://stefaniemueller.org/laserorigami-lasercutting-3d-objects/
I vector cut stencils because my laser (DC-K40 converted for Mach3) doesn’t raster engrave well. Covering both sides of the Mylar with masking tape and getting the power/speed right means I can get perfectly usable stencils.
I just use thin cardboard. then spray it with clear varnish.
No melting there.
That’s a great idea for one-offs and small batches (which mine always are).
I would add that a CNC vinyl cutter or a CNC router with a drag knife could be a better option for this. They are fast and make extremely clean cuts.
I have been using this technique for some year. I think engraving rather than cutting was an open secret. But all the hassle with calibration and the bad software for affordable lasers … plus the cheap stencilstencils from e.g. Smart Prototypes just made me to give up. I am happily ordering my stencils for less than 20 $ from China. Or for little more when using 100um or less for QFN.
Thanks a lot for this. I’ve been wanting to do this for a while but had bad results doing normal cuts. Just tried this out this evening and it works like a charm :)
I am not a laser guru, but I am friends with a couple. They have a Full Spectrum laser. I don’t know which model, but they use it for cutting wood parts for their stuff (I’ll plug them here: https://www.etsy.com/shop/SteamyTech). I’ve been making some electronics for the insides of some of their things, and approached them with this video to see if they’d help me cut some stencils.
We spent a couple hours iterating over the process, and we got good results.
One thing that helped for us was to put a (sacrificial) piece of paper behind the polyethylene film. My understanding is that the paper helped prevent the steel that makes up the lattice bed from heating up when hit by the laser, creating localized hot spots that marred the final product. I may not be saying the “why” right, but it did appear to help. Of course, it may have more to do with the difference between this particular (monstrous) laser and the one used in the video.