It seems you can’t mention the Raspberry Pi these days without someone bringing up the Odroid. Named after the combination of Open and Android, the current Odroid brand covers several boards – the U3, the UX3 with its 2 Ghz Samsung quad-core processor, and the C1, which is directly aimed at our favorite fruit pie computer. With all this popularity, one would expect a few awesome projects based around the Odroid machines, and you’d be right! This week’s Hacklet is all about projects using the Odroid on Hackaday.io!
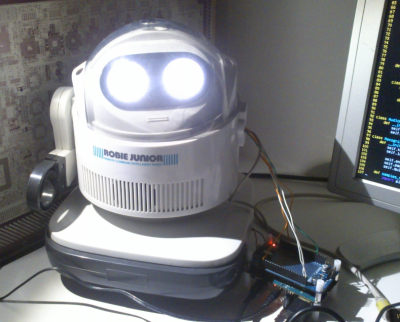 We start with [herrkami] and CRONUS. Cronus started life as a Robbie Junior, Radio Shack’s re-branded version of Takara Tomy’s Omnibot Jr. [herrkami] has upgraded Cronus’ brain with an Odroid U3. Cronus can now reliably respond to voice commands thanks to a little help from Google’s speech recognition engine and the accompanying Python API. Cronus is rather conversational as well, all due to the AIML framework. [herrkami] hopes to cut the cord (or WiFi link) once he gets CMU sphinx up and running. Some of [herrkami’s] best work is in his cardboard templates to create a mechanism for turning Cronus’ head. These are some pretty sweet updates for a 1986 vintage robot!
 Next up is [tlankford01] with Linux Tutorial: Odroid U3 Server w/ Seafile Cloud. [tlankford01] walks us through setting up a file server using the Odroid, a 16 Gigabyte EMMC card, and a hard drive to hold the files. As one might expect, this tutorial covers a LAMP (Linux, Apache, MySQL, PHP) server stack. The 9 project logs take us from a bare microSD card to a full server. The Odroid’s 2 Gigabytes of ram are put to good use running the open source Seafile cloud server package. Tutorials like this deserve lots of love from the Hackaday.io community. Sometimes you just need to get a solid file server up and running. When that happens, this type of project is often just what the doctor ordered! So don’t be a lurker, head over to [tlankford01]’s page and give him a skull!
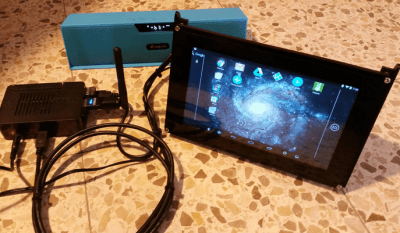 [Victor] gets us one step closer to an Odroid tablet with the HDMI touchscreen. HDMI touchscreen is a project to connect a 7″ 1024 x 600 LCD with a capacitive touchscreen to HDMI based computers. The heart of the project is Texas Instrument’s TFP401 panelbus DVI receiver chip. This chip makes interfacing LCD screens to HDMI or DVI video cards (almost) painless. There still is a bit of X configuration to do to get things running. [Victor] even got his Odroid running in Android with his custom screen setup. Those of us who have spent time in display an input configuration file limbo know that this is no small feat!
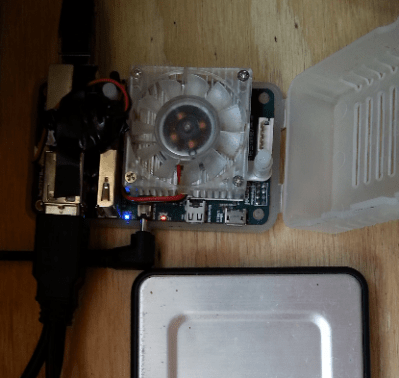
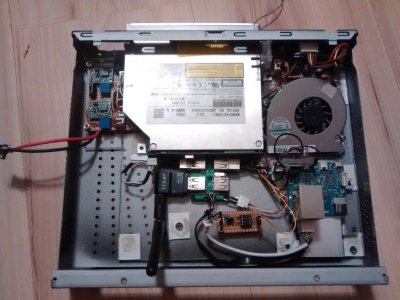 Finally we have [darth_llamah] with Odroid-U3 HTPC. [Darth] raided his junkbox and parts drawers to build a solid home theater PC using the Odroid-U2. The U2 is a bit older than the current U3 models, but all [Darth’s] work should apply to any of the Odroid series. An old Itona case provided the frame for this hack, but it took a lot of custom work with plastic and epoxy to make everything fit. [Darth’s] software stack is the popular OpenELEC Linux build. [Darth] even setup a real “soft” power button using an ATtiny85 connected to USB and s Adafruit’s TrinketHidCombo library.
If you want to see all the Odroid projects in one place, check out our new Odroid projects list!
That’s it for this Hacklet, As always, see you next week. Same hack time, same hack channel, bringing you the best of Hackaday.io!


Price : US$179.00
!!!!
For some of the U models, the C1 is the same price as the Pi with slightly beefier hardware Vs the Pi2 and non of that slaving the Ethernet to USB nonsense.
I’d say that the C1 is more than slightly beefier. In just about every way (CPU, memory, & GPU performance, for instance), the C1 is at least 50% faster than the Pi 2, and in other ways it is many times faster.
This is a fair price for this kind of platform that does not sell in millions of units.
But what do you get for $179? Dual-monitor output (HDMI and Display Port), 6-core GPU, 8-core CPU, 2GB RAM, 4x USB2.0, 2x USB3.0, eMMC and microSD, RTC, case, power supply, HDMI cable. Definitely worth it if you’ve used one. Replace your desktop computer with it if you want — it’s powerful enough.
I’m pretty sure only four cores are accessible at a time as its a dual-quad core.
The XU3 Lite is only $99. It’s missing the displayport and power monitor hardware and has a slightly lower clock speed (1.8/1.3GHz vs 2.0/1.4GHZ), and yes, you can use all 8 cores at once.
I am currently using one as a media server/NAS and the only thing it can’t handle is transcoding 1080p on the fly, but just barely. I typically get buffering about every 5-10 minutes for 30 secs doing that.
the U3 is $69 for a quad core samsung chip, 3 usb sockets, ethernet, micro hdmi, it’s also emmc upgradeable…..
The C1 has an impressive spec-sheet for the money, but it isn’t as “flexible” as the Pi. The power connector is weird, there is only one source for the MMC modules and very few brands of SD card work. Even if you do get a supported SD card, writing the OS images is not as straight-forward compared to other boards. Oh, and the US distributor will charge you a 25% restocking fee if you try to return it + shipping.
The barrel jack was a little weird but I also sorta understand why they went with that instead of two micro USB ports, 1 data, 1 power. Because that could get confusing and might not end well. I certainly wouldn’t say it is in any way less flexible than the Pi however there certainly isn’t nearly as much community documentation on it as there is on the Pi. Which means a lot more individual trial and error to get something unproven to work.
Also I am sorta wondering what was different about imaging the board? I just plugged the card (honestly not even sure what it was just that it was 32GB) into my computer (MicroSD adapter), flashed the image, plugged it into the C1, resized the image and that was that. From my experience It was exactly the same as with the Pi.
I will admit I did break down and get a eMMC not because my MicroSD didn’t work but because I could justify needing the faster boot time for what I’m planning on using the
C1 for. The bonus I found there is that you can boot off the eMMC and still address the MicroSD. Which was awesome because it let me scrimp on the eMMC, giving me both the fast boot time and affordable bulk storage because I will totally agree the eMMCs are many things but cheap is not one of them :P
I’m interested in Victor’s work involving the touchscreen as I have the same display, but there seems to be very little information out there to help people interface these. It seems that he’s rolled his own i2c (touch) to usb board using a PIC but there isn’t much detail and looks closed source. Shame…