X-ray crystallography, like mass spectroscopy and nuclear spectroscopy, is an extremely useful material characterization technique that is unfortunately hard for amateurs to perform. The physical operation isn’t too complicated, however, and as [Farben-X] shows, it’s entirely possible to build an X-ray diffractometer if you’re willing to deal with high voltages, ancient X-ray tubes, and soft X-rays.
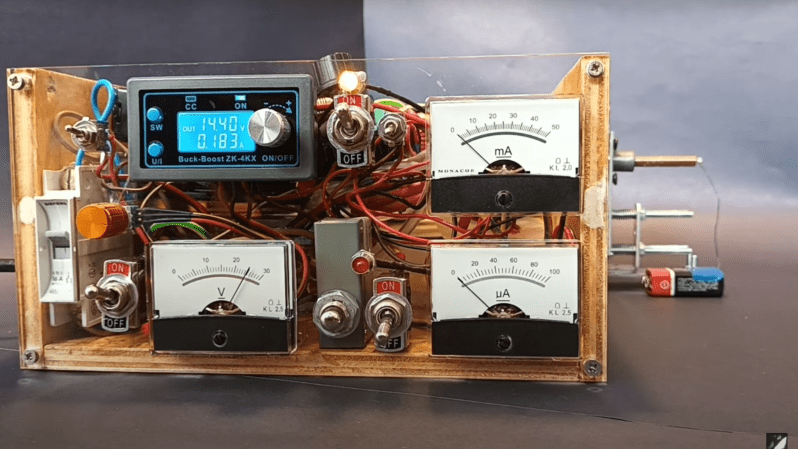
[Farben-X] based his diffractometer around an old Soviet BSV-29 structural analysis X-ray tube, which emits X-rays through four beryllium windows. Two ZVS drivers power the tube: one to drive the electron gun’s filament, and one to feed a flyback transformer and Cockroft-Walton voltage multiplier which generate a potential across the tube. The most important part of the imaging system is the X-ray collimator, which [Farben-X] made out of a lead disk with a copper tube mounted in it. A 3D printer nozzle screws into each end of the tube, creating a very narrow path for X-rays, and thus a thin, mostly collimated beam.
To get good diffraction patterns from a crystal, it needed to be a single crystal, and to actually let the X-ray beam pass through, it needed to be a thin crystal. For this, [Farben-X] selected a sodium chloride crystal, a menthol crystal, and a thin sheet of mica. To grow large salt crystals, he used solvent vapor diffusion, which slowly dissolves a suitable solvent vapor in a salt solution, which decreases the salt’s solubility, leading to very slow, fine crystal growth. Afterwards, he redissolved portions of the resulting crystal to make it thinner.
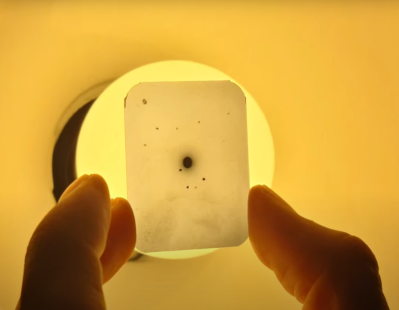
For the actual experiment, [Farben-X] passed the X-ray beam through the crystals, then recorded the diffraction patterns formed on a slide of X-ray sensitive film. This created a pattern of dots around the central beam, indicating diffracted beams. The mathematics for reverse-engineering the crystal structure from this is rather complicated, and [Farben-X] hadn’t gotten to it yet, but it should be possible.
We would recommend a great deal of caution to anyone considering replicating this – a few clips of X-rays inducing flashes in the camera sensor made us particularly concerned – but we do have to admire any hack that coaxed such impressive results out of such a rudimentary setup. If you’re interested in further reading, we’ve covered the basics of X-ray crystallography before. We’ve also seen a few X-ray machines.


This is missing many crucial parts such as collimators and apertures. Actual crystals in real goniometer heads are tiny. You should instead of a single crystal diffractometer try x-ray powder diffraction and measure reflections against theta. This would yield easier to reproduce results. I didn’t really see much of the reciprocal lattice being reflected.
Should my comment sound too harsh, it’s just meant to give a few ideas how to produce a better image.. Remember to mount samples inside glass, which is amorphous and thus doesn’t interfere with measurements. Use capillaries. For powder this works too, else you can put powder between certain plastics, some of which are amorphous as well. We use polyimide in the lab.
Good points, probably on the to-do list since usually one has to walk before they run :)
He actually has used this diffractometer for powder diffraction, and was actually able to get useful crystallographical data, but I don’t think he’s made a video about it: https://www.sciencemadness.org/whisper/viewthread.php?tid=160251
On another note, I’d strongly recommend the rest of his channel as well. He’s also documented building an X-ray spectrometer and an electron gun.
I use aluminum trays, 2 mm deep for powder diffraction. But like you mentioned its recording reflections, so the fact that the xrays bounce off of the bottom of the tray is not a problem.
Haven’t seen the word Bremmstrahlung in a long time.
Great project. I agree with Carl, the optics here seem lacking. This is how we learn though. I hope they keep iterating. I also hope they do so safely. X-rays are not friends of the living.
I just realized how bland my comment sounded. This project is super freaking cool. I have seen a lot of homebrew instrumentation and Frankensteined instruments in my career. It’s tainted my view for how challenging this project is and I regret commending the project for how the author has now made it accessible. Hoping for more updates. I’d love to build one of these someday
There was nothing wrong with your previous comment.
Having to use the nicest possible wording/tone gets in the way of valuable criticisms.
Then again, apparently I’m an abrasive asshole and it gets in the way of others ACCEPTING that good criticism.
*Shrug.
If people are so brittle that they can’t help but interpret “Good job, but here are tree problems…” as a personal attack on their intelligence/accomplishment/character, then there is an entirely different problem.
Here’s a video on how crystals were processed as raw material and manufactured into resonators https://m.youtube.com/watch?v=duZlWWwxIPQ
Using film to record the pattern is a great way to get around the problem of finding a suitable sensor for low energy X rays.
Another way is to remove the glass window on a CMOS or CCD camera sensor. Naked silicon is great detector for low-energy X rays (in the single-digit keV range), but the glass window blocks those photon energies.
X-rays of sufficient energy to get through a glass window tend to sail on through silicon detectors too, but still interact enough to generate (noisy) images, but those energies tend to be too high for crystallography.
Very nice work. I have been in contact with Farben-X before and he recommended this video to me.
I love the methodology of the plywood mounting panels with the plexiglass front panels and the semi-bundled point-point wiring in between. Bravo! What great hacker stuff!