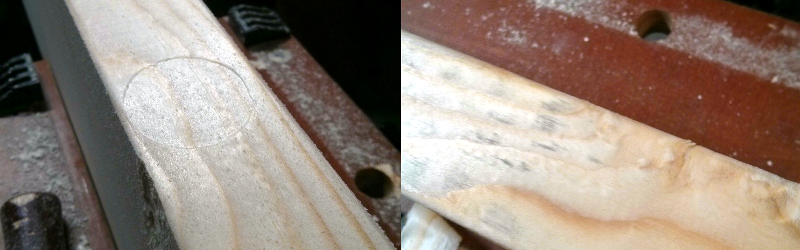
If you’ve done any woodworking in the past, odds are likely that you’ll eventually end up fixturing your stock in the crushing grip of a vise or C-Clamp. The results are painful, leaving a lasting impression of the clamp jaws on your beautiful, otherwise-unmarred piece of stock. Often, you’ll need to design around this issue, fixture it gently, or cushion the grip with a softer intermediate material. [Chimponabike] had other thoughts, though, and developed a technique for successfully popping the dimples out, returning clamped wood to its perfectly unmarred form.
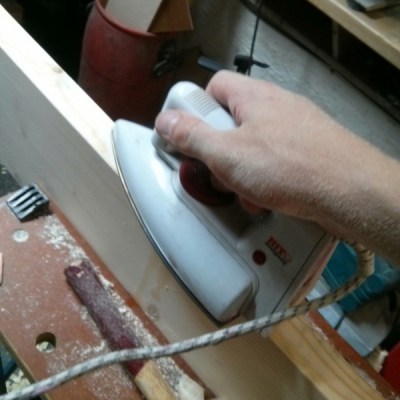 The Technique itself is dead simple and takes only a few minutes to perform. Simply apply a small amount of water, let it seep into the wood, and then bring a hot iron down onto the soaked wood to evaporate off the soaked water–instantly inflating the wood back into its original form!
It’s not the first time we’ve abused our tools and home appliances to do some clever things with wood, but it’s certainly worth adding to that “Tome of Techniques: Wood Edition” that you’ve been building in your browser’s bookmarks bar.
Thanks for the tip, [James]!


Although a great technique in restoring dings/marks on wood. It should be noted that it works best on soft wood (like the pine used above), and also if there is a finish, for instance a varnish, linseed oil, waxing, etc it will damage the finish.
I’ve used this technique successfully in restoring some stocks, but have had to remove the finish first. However i’ve used a dampened cloth between the iron and the wood to avoid any unnecessary burning.
A good tip indeed – however, this one is as old as… well, something old. He sure didnt “develop” this technique, sorry.
This technique dates back before wood shop. Remember wood shop? Back before it became technology class?
Steam?
Yup, steam.
Nice to see a decades-old tip is now a ‘hack’. Can’t wait until they tell us about using wax on blades ‘n’ screws ‘n’ stuff.
Slow day? Junior editor? Not enough ad impressions? Or just a typical Had-It’s-Day quality post?
Yes, you are correct. Hackers have existed since prehistoric time…
This is how culture works. You live and you learn. It takes time.
People aren’t born with common knowledge. It must be taught. Some things are so old they are forgotten. When it’s taught again it feels or appears to be a new idea but it’s not. There are no new ideas. When you see an article like this one, rather than attack the author for reteaching old principals, look from outside the box and realize you have acquired so much knowledge that its going around again.
or even better, do some research for every single article, a few searches and they might have had 3 or 4 good related tips as well as a bit of history on the technique, instead of the rather simplified notions put forth in the above writing.
Google returns 400,000 hits for “wood dents Dummies”.
Arcane knowledge indeed.
my point is that they have made old knowledge interesting before, my original point wasnt that they shouldnt show us “old” knowledge, but put it in a context that makes sense instead.
I look forward to the article telling us which end of the fork is which, I’m sure there’s a few of us who have yet to figure that out. Or don’t we do ‘food hacks’ here?
This ‘hack’ is probably in every woodwork book ever written, God didn’t need to mention it to Noah because it was old back then. It’s even in most general household tip books so you can get dings out of furniture.
As an aside, in a lot of cases you don’t even need the iron.
What’s fascinating about teaching things like this is that I don’t touch wood working at all and I never knew this. Now that I know it, pending I ever put a dent in some wood panels or furniture legs etc, I know of a quick cheap way to remove it. No need to read a wood working book.
There are also millions of hits for “wood dents” on Google….
As a bonus those sites also tell you about fixing scratches, cracks, chips, what if there’s a finish on the wood, and so on.
Well, I’ve never heard of doing this before (I didn’t realise that soft woods were made pliable using steam without damaging them) so this tip is interesting and useful to me. If you don’t like it, why don’t you go read something else instead?
Hard woods work too, you just need more steam. The more interesting hack related to this that I saw was the fellow using ammonia to soften the wood to rubber pliancy and then letting the ammonia evaporate out returning the wood to nearly full hardness in seemingly impossible bends.
Next time you see someone playing an acoustic guitar, mandolin, violin, etc. check out the sides of the thing, this is pretty much how they get them that way. Soak the (thin) slice of wood in some water until soaked, then slowly bend it over a pipe heated with a blowtorch or clamped into a form with a heating pad.
This ‘hack’ is on par with one I hear about earlier. Apparently you can join two wires together by heating up a special alloy and putting it on them. Isn’t that just amazing?
Sorry, very old and well known techniques aren’t ‘hacks’, they just make Had-It’s-Day look lamer than usual. Still, this originated on Reddit who are even more clueless than the average HAD editor.
Tony, soldering is a requirement of the trade. It isn’t a trick to join wires. It’s a method.
If you honestly have shitty things to say about HAD articles or the authors, stop reading them. You aren’t paying these guys to access the site. Stop complaining or go away. It’s simple.
Just like this isn’t a ‘trick’ or ‘hack’ to remove dents… to use use your words: “It’s a method”.
You do understand about analogies and point of view and all that?
I’m sorry that you had to endure a post about a technique you already knew. Rest assured, the editors have read your comment and are in the process of hastily tailoring this website (and all future posts) to your specific level of knowledge.
On behalf of all of the readers who were legitimately enlightened by this post, I apologize for our collective ignorance of an interesting technique.
/sarcasm
…and one day you might do some of that woodwork stuff you’ve read about.
(All woodworkers know about this)
(Seriously, it’s like on page 3 of every book)
(Never mind the millions of internet articles)
(TFA gets it wrong anyway by not using a cloth)
(You’ll never use it – the joke is everyone knows, but hardly anyone does it)
(It’s actually not all that useful – it’s only good for certain cases)
(And it raises the grain so you need to sand afterwards)
(It’s the Chip Quik removal stuff of the wood world)
I saw this in Pop Sci or one of those. Hammer down with a punch a design that will be a relief when done. Sand down to the punched in wood, then steam it to come up. It makes it look like you chiseled away all the rest of the wood leaving it perfectly flat.
Always have bits of flat stock and cracker box cardboard on hand to protect surfaces.
That is cool! :)
That is an awesome idea. I will definitely have to try that.
Every furniture shop has cheap clothes irons for just this purpose. We use them to apply pre-glued edgebanding, too.
I like this one. Kinda long, so skip around and you get the idea. Wood, and really compress and come back!
https://www.youtube.com/watch?v=fEATei2wewY
Another variation is where you put a wooden arrow through a wooden heart.
My father used to build wood airplanes (maybe biplanes too, I don’t know) using steam boxes to shape the frames. So I used to play with a lot of those impossible wooden “toys” in my youth.
Sadly, many are gone now, becoming nothing more than chew toys for a labrador.
…I just put a scrap piece under the clamp to spread out the force and not dent the wood at all…
Yeah, an ounce of prevention and stuff… It makes more sense to keep from marring the piece to start with and then you don’t have to dick with an iron and possibly getting burnt.
It’s for getting out the dent you make when you drop the clamp while taking it off.
Okay, I came back after a day and a lot more comments. Wow. So much negativity. I’ve been working with wood for years now, and it’s the first I’ve heard of using this technique for the making of reliefs. So even I learned something. Learning isn’t always about searching for what you need to know. The most fun I have learning is when I learn randomly like this.
Joshua, you pop pimples, not dimples. Pimples is the word you’re looking for.
Mustn’t forget that corn and weasels also get popped!
“Thanks for the tip, [James]!”
Who is James?
Thanks for the tip! There are some great variations on that concept in the comments too.
To all the whiners complaining that this is common knowledge and not a hack.. shaadaap!
A lot of people reading Hack a Day are beginners. We don’t all know this stuff and we don’t all have a mentor to learn it from either.
Furthermore.. there is a lot of variety here. One post might be about woodworking, the next is a microcontroler project then metalworking then analog electronics then…. I for one find all of it interesting and would love to be an expert in all of these different areas of making stuff. I doubt very many actually are experts in all of it though. The reader who is a seasoned pro in software might read this and learn something for example! If it’s old news to you.. click on to the next story!
Careful what you ask for, HAD will gladly stuff its blog with lame stuff like this.
They’ll still get a few dozen people commenting on it, so job done.
Funny thing, this internet. If you Google “how do I get dents out of wood”, of the 13,500,000 results it found at least the first 20 are “water and a clothes iron”. Even eHow.com!
But hey, if the only way you can learn is by whatever HAD spoon feeds you, well, carry on.
(Yeah yeah occasionally you might get an answer without realising you had the question, but that occasionally is really very very occasionally)
(Try DiResta on YouTube for wood stuff. Shows off a lot of techniques with almost zero blah blah blah crap)
Maybe it’ll finally drive asswipes like you away.
The problem is I never would have thought to Google that. I assumed that those dents were permanent, that there was nothing that I could do. Now that I have read this I probably will Google it the next time I have a dent to remove. Maybe other people have better methods or extra details to make this method work better. I never would have know it was possible though if I hadn’t seen it somewhere first. That’s what for me makes these posts worth reading.
Also.. some of the comments on it.. like the one mentioning stamping in a design, sanding flat and then using this method to make the previously stampled wood come back up.. that kind of stuff is great!
” I assumed that those dents were permanent”
Even if you believe it’s impossible to remove the dent, you’d still go out to google for ways to fill it in, and that’s when you’d stumble on the steam method anyways. The fact that you haven’t just shows that you’ve never needed the information.
This is similar to a well known technique for removing dings from guitars. Put a moist cloth over dent. Iron. Done.
i used to do pretty much the same thing with my grandad, only difference is we put a cloth between the two to stop the wood from burning. He also used to use it to hide nail heads. Sink the nail down with a punch, then do the same thing. The wood tries to go back to its original spot, and fills up some of the gap.
One caveat when working with assembled parts- a lot of wood glues, especially on antiques is heat sensitive and will cause previously joined pieces to fall apart in a heap of wood and messy goo.
Are, are heat sensitive. Jeez, me.