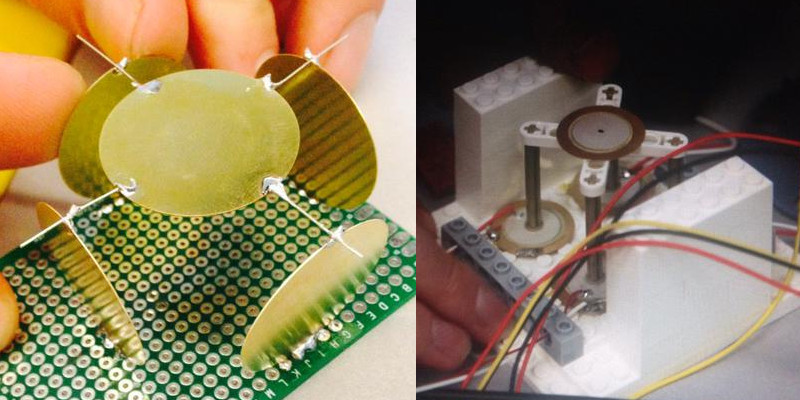
LEGO2NANO, are building an open hardware AFM (Atomic Force Microscope).
AFMs are a kind of probe microscope. Unlike an optical microscope, a probe is used to “feel” the topology of a surface. An atomic force microscope uses a flexible cantilever with a nanometer scale tip on the end. As the tip scans across the surface it will be deflected by its interaction with the surface. A laser spot is usually reflected off the back of the cantilever, and captured by a photodiode array. The angle of the reflected beam, and therefore which photodiodes are excited lets you know how much the cantilever was deflected by the surface.
One of the challenges of building an AFM is developing an actuator that can move with nanoscale precision. We recently reported on [Dan Berard]s awesome capacitor actuator, and have previously reported on his STM build which uses a piezo buzzer. LEGO2NANO are experimenting with a number of different configurations, including using Piezo buzzers, but in a different configuration to [Dan]s system.
The LEGO2NANO project runs as a yearly summer school to encourage high school students to take part in the ambitious task of building an AFM for a few hundred dollars (commercial instruments cost about 100,000USD). While the project isn’t yet complete, whatever the outcome the students have clearly learned a lot, and gained an exciting insight into this cutting edge microscopy technique.


The stage is really the easier part of an AFM. Making it cheap is a little more difficult when you are replying on off the shelf piezo actuators but still doable.
The scan tip is the hard part, MIT posted how they made their tips and it is not simple, a process involving masks, etching, and metal deposition. Kind of beyond most people. I think you can buy a tip from Veeco for a few hundred, or somewhere else, i can’t remember.
It’s straightforward in principle, though a little tricky in practice, to make workable tips by etching tungsten wire. Just putting the wire in an electrolyte and running some current from the wire to another electrode is enough, but tips made that way are unlikely to be good quality. Much better tips can be made if you make the 2nd electrode into a little loop that can hold a droplet of electrolyte in contact with the wire. In that case the etching will stop the moment the wire is etched all the way through and you’ll end up with an atomically sharp point if you can catch the wire gently.
Wrong, and not really…
The stage requires 3 rigid piezoelectric transducer blocks to form a Cartesian position system.
These blocks require low current ripple analog drivers that often exceed +-30V. Keep in mind some users calibrate the sensor on a graphite surface to correct for the mechanical nonlinearities in software.
Notably, if the sensor is not rigid the calibration part is very difficult to get working.
The single nano-tube probes can be found for around $30-$120 for a pack of five. Additionally, metal probes can be made/repaired by etching a tungsten wire tip in acid.
The process takes experience to get it right, but with a flimsy mechanical stage it’ll never really work well anyway.
Do you know who sells the carbon nanotube probes, I did a quick search and couldn’t find them.
Real Hacks don’t come from google…
Find the original project documentation, and the hardware stage kits are available for under $300.
The probes are easy to find… look gain… =P
I read somewhere of some one just cutting a metal (Tungsten?) on an angle. They wrote that it took a number of tries to get a god tip but it was obviously working for them. They also cut a piezo into sectors for the actuator.
you’re confusing STM with AFM .
STM requires sharp, rigid tips, and Simply cutting at an angle often works. Not because you clipped the wire into a perfect pyramid with one atom at the tip( that can’t happen ), but because of the exponential dependence of tunneling current on the tip-sample distance.
AFM tips ( the sort they’re talking about here [not tuning fork AFM] ) are flexible cantilevers that either map the contours of the surface, or are made to oscillate at a fixed distance over the surface. The bottom side of the untethered end of this cantilever has a fine structure facing the sample, and the other is shiny enough to reflect a laser beam onto the quadrant detector. You can buy these for a few ten dollars each. And if they’re used for contact mode AFM( described in the article ) , it’s unlikely you’ll be able to reuse them.
Piezos: Tubes with segmented electrodes are common for STM.
My HaD.io project used to be explicitly about a piezo-actuated mirror arrangement for a laser where destructive interference is used to keep unwanted light oscillations from occurring between the wrong surfaces. Destructive interference here means control on the nanometer-scale, which would sound preposterous if it wasn’t for these AFMs.
From my project’s deep links, here is another university’s take on the same principle for AFMs: http://www.instructables.com/id/A-Low-Cost-Atomic-Force-Microscope-%E4%BD%8E%E6%88%90%E6%9C%AC%E5%8E%9F%E5%AD%90%E5%8A%9B%E9%A1%AF%E5%BE%AE%E9%8F%A1/?ALLSTEPS
And here is an illustration of what I have in mind: https://hackaday.io/project/934/gallery#c3beb2bd2d074b6e6bb71582184ecf2f
+1 for using Lego in amazing ways.
so they’re only trying out contact-mode AFM?
Non-contact mode( the cantilever is continuously driven with a dither piezo) is preferred if you would like to use the cantilever for more than a couple of scans.
Dan’s work on his STM is truly amazing
Quibble: you mean the topography, not the topology. The one is about the shapes and arrangement of an object, the other is about those properties of it that are invariant under continuous deformation.
HaD, have you considered hiring a proofreader?
Paragraph 2, line 4,”using Piezos buzzer”
Why pay for a proof reader when people like you do it for free. lol