First introduced in 2002, The iRobot Roomba was conceived as a robotic vacuum cleaner. Just about every hacker, maker, and engineer out there immediately wanted one. The Roomba proved to be more than just a vacuum though; it was the perfect base for any household robotics project. Before long Roombas were being hacked to do way more than sweep your floor. iRobot recognized this, and added a hacker friendly serial port to later model Roombas. They even released a vacuumless version called the iRobot Create. Thousands of projects have literally ridden on the wheels of the Roomba. This week’s Hacklet is all about Roomba projects.
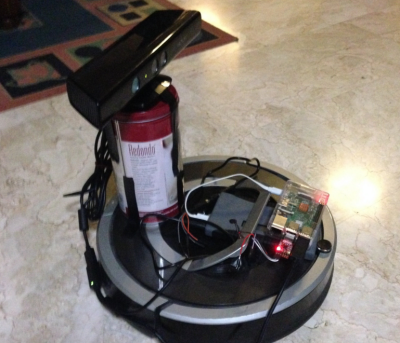
 We start with [fuzzie360] and Poor Man’s Raspberry Pi Turtlebot. [Fuzzie360] has their Roomba running Robot Operating System (ROS). ROS actually is running on an on-board Raspberry Pi. While Willow Garage may be out of business, ROS lives on as an open source project run by Unbounded Robotics. Installing it can be a chore though. While [Fuzzie360] hasn’t given a full tutorial, they have offered to give advice if and when you get stuck.
A Raspberry Pi would be overkill for the simple suite of sensors built into the Roomba, but it’s perfect for [fuzzie3680’s] modified setup with a Microsoft Kinect. [Fuzzie360’s] goal is to have a robot that can vacuum the hostile territory of a university apartment.
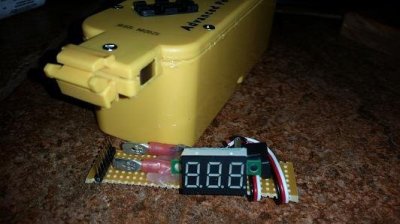
 Next up is [Sircut] who upgraded his Roomba’s power cell. Early Roombas were designed to use Nickle Metal Hydride (NiMH) batteries. The individual cells are built into a proprietary iRobot battery pack. NiMH can’t hold a candle to Lithium Ion batteries though. Lithium Ion cells are very common these days in devices like cell phones and laptops. In fact, [Sircut] used 18650 sized laptop cells for this upgrade. [Sircut] also added the essential LiIon battery protection circuit to make sure those cells stay happy. A voltmeter provides a visual reference that the batteries aren’t becoming overcharged. An upgrade like this will likely double the Roomba’s runtime, but it does come at a cost. Roomba’s original charge dock can no longer be used as the on-board charge circuitry isn’t designed for LiIon battery charge algorithms.
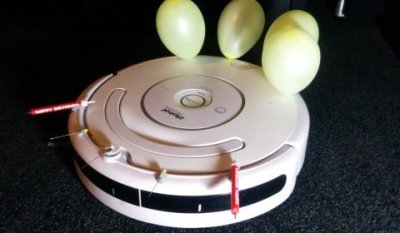
 Next is [Marcel Varallo] with Robot Wars for the Commuter. How does the IT department blow off steam? Fighting robots of course! Unfortunately, [Marcel’s] coworkers aren’t all programming mavens. Hopefully some programming is in the cards for them down the road. For now though, [Marcel] has created a robot fighting league using nearly stock Roomba robots. Each bot gets a set of 3 balloons and 3 pins. A balloon represents a life. Once your lives are all popped, you’re dead! [Marcel] also created an upgrade system where winning ‘bots can move on to stronger weapons like flamethrowers. During his research, [Marcel] found out that the brushes in his Roomba are powerful enough to sweep dust and debris up without the vacuum enabled. So he’s disabled the vacuums for longer
 cleaning battle times.
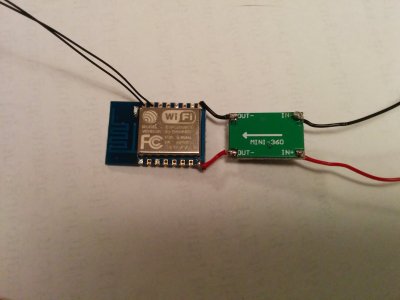
 Finally we have [Fredrik Markström] and ESP8266 controlled Roomba. [Fredrick] is hacking an ESP8266 module to be the main computer of this little Robot. Of course, a ‘8266 means it will be carrying WiFi, so this robot needs to have a web interface. [Fredrik’s] first problem was powering the ESP8266. The Roomba’s battery runs around 15 volts, which is definitely not friendly to the 3.3 volt ESP8266. A switching DC to DC converter was in order, and [Fredrik] found the perfect candidate on eBay. The ‘8266 will control the Roomba through the serial interface included on all the current models. [Fredrik] has big plans for this ‘bot, including navigation and advanced vacuuming algorithms.
If you want to see more Roomba projects, check out our new Roomba project list! If I missed your project, don’t be shy, just drop me a message on Hackaday.io. That’s it for this week’s Hacklet. As always, see you next week. Same hack time, same hack channel, bringing you the best of Hackaday.io!


I need help retrieving files from my broken HTC one m7. I was taking apart to change a speaker and broke the connection from the screen to the memory drive. I have tried using a USB OTG SD TF Card Reader and can not get it to work. Anyone knows how to retrieve the files in a different way. The screen does not come on at all.
Android Debug Bridge (ADB)
You really need to find a better place to post this. Is this story even about smart phones? Or even repairing anything? Try finding a proper cell phone forum like xda. Quit being a fucking troll and get a brain the world isn’t here to serve you you entitled fuck!
Only trolls call other people trolls. And he is just looking for help from intelligent people.
Then he should use the correct forum. Do instead of being ridiculed he’ll be going to where people expect and desire to help him with a problem of this nature.
Brb, asking for help with my architectural drawing homework in the comments section of a youtube video about sharks.
If you already had USB debugging turned on, Vysor should do the job. http://www.vysor.io Free app but you need Google Chrome on the computer you plug the phone into.
If you didn’t have USB debugging enabled on the phone, then you’ll have some fun hacking it to get it on so Vysor will work.
Too expensive a platform unless you can find someone throwing a dead one out.
Entirely not true. I bought a working one at t thrift store for $12.50 (half price day) and one that simply needed a good cleaning for $20 + shipping on ebay. This was five years ago, so I can only imagine the early models are literally being thrown out for free now.
passingby: these units are too expesive to buy new
mjrippe: entirely not true, I bought two used units for cheaps
doublespeak much?
His post did not include the word “new.”
No one have made this one yet ?
https://xkcd.com/1183
You really need to find a better place to post this. Is this story even about smart phones? Or even repairing anything? Try finding a proper cell phone forum like xda. Quit being a fucking troll and get a brain the world isn’t here to serve you you entitled fuck!
His question does not meet the definition of trolling. Your comment does. Dick.
That name.
Hey, thanks for the mention, guys!
Yep, I do intend to make a step-by-step tutorial when I’m done. I still need to (1) hack in some Roomba vacuuming and docking support into the ROS node (curiously, the underlying driver already does have support, but not the node/server) and (2) augment the docking station with more charging contacts for the Kinect and Pi battery. I’m thinking of either using a wireless charging solution or a simple low-tech flat metal springs and probes. I’ll see how it goes…
Just a small correction though: it’s a regular apartment, not a university one. I’d love to see a university apartment as big as the one in my video :P
Nickle :O
FYI: the Create is a nice cheap-ish “new” Roomba platform. $200 for a 650-series base and USB serial cable. I’ve got one and so far I’ve stripped out all the brush motors and bins and replaced the vacuum bin with the larger dust-only bin for extra holding capacity. Working on cramming a microPC (eg a Kangaroo or Meegopad) in the bin and using Windows for control…
I had the first Create and used it originally with the Command Module. I then started working with a small PC via the serial port. Unfortunately I zapped the power circuit on the Create and it will not power off.
Your robot won’t shut down? Sounds like you’ve started SkyNet there, Rud :)
It does when I pull the battery. My names not Forbin.
My hackerspace (HSBNE) has a roomba where the batteries were replaced with two big, heavy lead acid batteries on top (hey, just using what was lying around.) It’s hilarious how much inertia it has now – instead of tapping obstructions lightly and moving away it goes THUD.
980 is now the coolest thing, the other IROBOT ROOMBA line was old and outdated.