Forget to generate support material for your 3D printed part? Already a few hours in? Don’t cancel the print — you might be able to save it!
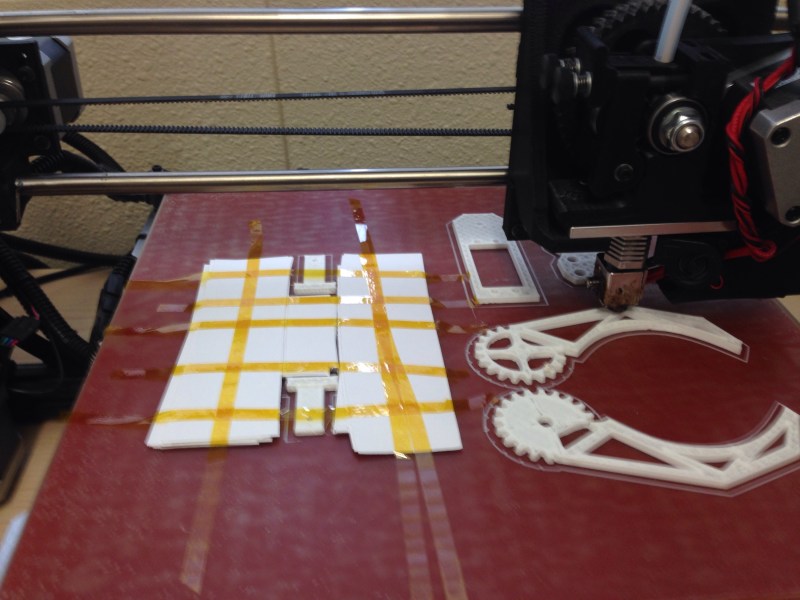
[Dr Dawes] was printing a bunch of different parts for students in his electronics class. He slipped up and forgot to add support material to the one part that needed it. Figuring this out a few hours in, he didn’t have time to cancel the job and lose all the prints, so he made the best of the situation and paused the print to build his own support material. He ended up taping down index cards to the bed around his object until they reached layer 13 — the layer that would have started to bridge across the support material had he included it in his Octoprint settings.
Cautiously, he resumed the print. It worked.
We wonder if this technique could also be used on purpose to replace printed supports when making a series of the same object. Do you have any good 3D printing tips and tricks you’ve learned over the years? We’d love to hear them! Send us a tip, and we might do a compilation piece! For example, designing for fasteners can make 3D printed assemblies much quicker to build!


Ha! nice. I have used masking tape as an ad-hoc support during a print. I attach a piece of tape to the side of the print and as the overhang develops, the hotend pushes the free end of the tape outward, supporting the growing overhang.
Genius! I just got my first printer (XYZprinting Da Vinci Jr.) and I will have to try this. Seems way more elegant than printed supports that need to be cut off later.
proprietary print cartridges…eww
You can apparently flash Repetier Host (https://github.com/luc-github/Repetier-Firmware-0.92) to allow a full open-source stack, including support for any filament. I considered picking one up over Christmas but the reviews seem split down the middle – half of the reviewers say they’re golden, the other half are entirely broken on arrival (or after a few prints).
Sounds like a fantastic solution. Will have to try this.
Interesting. This gives me a (probably not new) idea. Print the supports using a the normal method, but print a non-hardening (wax perhaps) layer between the item and the support. Easier to do if you have a printer that can switch materials without intervention. Has anyone tried anything like this?
If you’re going to use a dual head printer it’s better to just use a dissoluble support material. Some of them soften in hot water and others require something like a heated lye bath. The lye bath filaments are nice because there’s a low chance of accidentally getting lye on your filament roll.
I have done this with glue stick. You can set the print to pause and then run glue stick over the support surfaces. I’ve also done with with a removable/reusable printed support block with glue stick on top. It usually pulls away, but if not you can soften the glue in water.
I like the idea of a glue stick. I can probably even rig up something to hold the glue stick next to the print head, and modify the slicer to automatically apply the glue.
That was the eventual plan, but it has almost all the same problems to solve as a second extruder. Ain’t nobody got time for that.
That makes sense. Perhaps a glue “roller ball” work better?
Sounds like it might be a cheaper alternative than adding a head for dissolvable support, if you just have to print a glue stick bracket.
Yup – been there. Stuffed some tape covered foam into a pending overhang to save the print – did it hardcore though – didn’t realize at the time I could pause the print, so I was scrambling like a mad man prepping the impromptu support and then trying to quickly stuff it in before the head came flying over and bit my finger. It worked!
Also, there’s a video floating around of someone printing a large animal or something and in the middle of the timelapse video a hand appears for a few frames to manually support a sagging overhang until it’s bridged with another part of the print!
Reminds me of when a part once came loose during the last two minutes, and I held it there in place with the hot print head barely clearing my fingers until it finished. It was a small piece, but we really needed that print done.
Design and print a scaffold structure that precisely fits around the part and secures firmly to the print bed. Then when print reaches the layer where it’s needed, pause, install scaffold and continue.
Could even make more than one layer of support that plugs together. Would sure save a ton of filament by having reusable supports.
Or just use the software correctly and use correctly optimizes support structure. It’s only been working since 2010 but ok… Make it harder the “hackaday way!”
Would you rather print your ‘optimized’ support structure once, or repeatedly during each print? This isn’t about kludging around the software for the heck of it, it’s about not having to print the support structure more than once, as it isn’t something you need (more than one of) for the final product. (only the parts it holds up) The trickiest bit would be aligning it to the part and keeping it in place.
The actual bed of the printer should in fact be a bed of nails that can be raised and lowered by screws
Motorized screws, controlled by an Arduino. B^)
HOW IN THE HECK do you set octoprint slicing settings?
I’ve had a look around, and while I’ve been able to slice an STL with a profile file I copied over from cura into octoprint, I have absolutely no control over it. I cannot find anywhere a profile ‘quick reference’ with the settings, commands, and syntax so I can edit the file or write my own. I can find even less on the cura comandline engine mysterious args.
I’ve been trying to put together a crude software package for handling multiple printer and a submission system, but this has put a real damper on things. The one thing that would solve a huge majority of my problems is just being able to rotate the model before slicing. (the filament predictions are used to predict the best orientation for printing)
Thanks a ton for anyone who can answer this.
Agreed, Slic3r works well for me, better than Cura. OctoPi only plays well with Cura, so Slic3r users are out of luck. I have several hardware mods to finish first, but after they are done, I plan to setup a Raspi with Raspian, Repetier-Host and VNC. I can just copy all my current Repetier settings over and be on my way.
I’m open to different ideas, but this seems to be an easier way to use Slic3r with a computer (the RasPi) that’s permanently connected to the printer. The other way was to use 1 computer to slice, save it to a .gco file and send it to OctoPi. Hopefully with the VNC method I can use a tablet to browse for, then use VNC to slice and print the part with the freedom to add in any tweaks needed for that part. This also addresses your issue of viewing the print path before starting the print.
Here’s another tip for you. If you have a need for support material and for one reason or another do not have any, if you slather hot glue in the general area that you are looking for it can work quite nicely. The print head is more than hot enough to melt the glue and shove it out of the way (to a point, don’t go TOO overboard!) and given how the surrounding glue is largely still solid, once the plastic is deposited INTO the glue, it doesn’t really go anywhere, this can work quite nicely for being emergency support material.
Protomaker 3D Printer Wobble Fixed
https://www.youtube.com/watch?v=3VE4WorYklY
10. Sing!