Over on Hackaday.io, [bms.had] is showing his technique for 3D printing molds that he uses to cast (lead-free) pewter objects. The process looks simple enough, and if you have a 3D printer, you only need some lead-free pewter, a cheap toaster oven, and PLA filament. He’s made two videos (below) that do an excellent job of showing the steps required.
Even though the pewter is hot enough to melt the PLA, it doesn’t appear to be a major problem if you quench the piece fast enough. According to [bms.had], a slower quench will melt some PLA although that creates a smoother surface. You can see the 0.31 mm layer lines in the cast, though, although you can use any layer height you like to control that. Creating the mold is simple (the videos use Tinkercad, although anything suitable for creating 3D models would work). You essentially attach a funnel to your part and make the entire part a hole inside an enveloping shape.
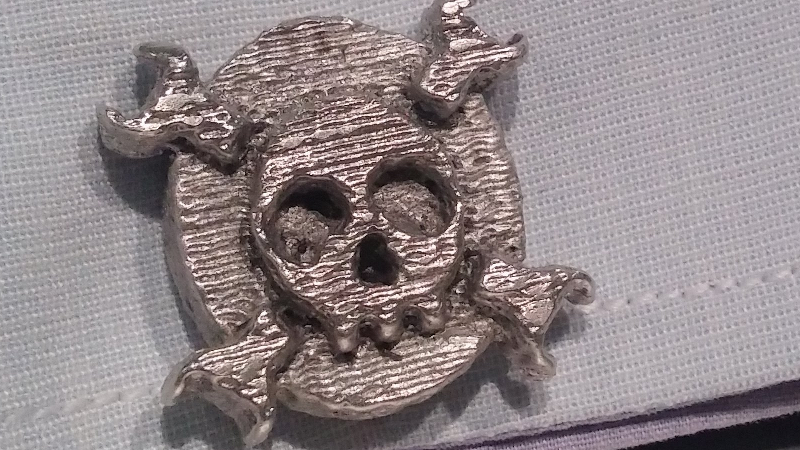
Once you print the mold and fill it with molten pewter, you quench it in water and then put the whole thing in a somewhat cooler oven. The PLA will melt before the pewter, making it easier to remove the piece from the mold. Of course, you destroy the mold during removal, but you can always print another one.
Pewter is mostly tin, with a few other metals added. We’ve talked about casting it before (including tips on how to recycle for a cheap source of pewter). The [bms.had] technique struck us as the opposite of what we usually see: PLA surrounded by investment and vaporized by molten metal. However, we have to say, we dig the cufflinks.


A couple of thoughts:
1) He should add some venting sprues to allow air to leave the mold at the bottom. He’ll be able to pour faster and get a better result.
2) Printing the mold in two halves might let it be removed much easier, just a superglue bond and then hit it to remove
Would ABS and acetone to soften it work better? It might get better detail since the ABS has a higher temp but you wouldn’t be able to heat it to remove the plastic without ruining the pewter. It’d think you could make due with some acetone if you used a split mold.
1. Good point in the air vents
2. Like the idea of two halves, will try this out.
ABS – my printer only does PLA, I tried the actetone approach, but could nit get this to affect the PLA. Heating to a temperature less less Pewter melting point does not damage the pewter.
Yea PLA will resist acetone, it needs some fairly nasty chemicals to dissolve it away so it’s not surprising. It looks like the PLA does well enough so this is really cool. I had been thinking of going all the way to lost material casting for making metal objects but most of what i want isn’t structural so pewter is a really nice way to do it that I hadn’t thought of.
Another alternative would be a mixed mold with ABS and HIPS. You could superglue and then use limonene to dissolve away the HIPS. Both have the temp resistance, but could create a muti use mold. HIPS alone would make a decent material. I’ve used it to print models intended for painting. It cost the same as PLA from the local source.
Seems more effective to use a PLA/ABS positive and sand to make a negative, melting the plastic to leave a void and then pouring the pewter in.
this, a hundred times over.
lost wax casting is an actual technique, if he had found a way to make reusable printed molds then it would be a whole different ballgame, using sand is cheaper, easier, faster and gives better results to begin with, on top of that the printed volume if using PLA for the positive is a lot less than the volume of the negative.
I do not have a oven powerful enough to heat a sand/plaster mould around a PLA positive, (I tried) . I also have no access to a kiln. My BBQ did not get hot enough to melt the PLA insulated in plaster.
I also my printer does not have a heated bed, so exotic materials are nit possible. As for the cost – less the 30p of PLA. (PLA is ~£15/kg).
I nit sure how wicker, easier and faster it can be?
Why is he not using ABS for the mold? Higher melt temperature would be a good thing here!
Another option would be one of the “filled” filament materials. For example carbon fiber filled for increased thermal conductivity of the mold, and modified slump properties.
My printer does not do ABS. Just a simple printrbot
·3·) Very very very very nice idea and execution!.
I’d only add the 2 piece mold suggestion ( reusable!) … although i’m not sure that TinkerCad allows for draft angle … PLA ain’t very elastic, is it?
But it would make it worth to print at lower layer heights.
And facilitate filing and smoothing it.
How long does each mold take to print? This seems like it would have a huge turn around time compared to other methods.
At least print the positive model and make a mold using silicone. Silicone caulk + water with a spot of fish soap will cure in hours. Even casting pewter, you’ll get several pours before you burn the mold.
Good point on the silicon for the mold. But rather than water/soap method, try adding just dry cornstarch in varying amounts and you can cure the silicon (100% pure caulk in a tube) in anywhere from an hour to just a few minutes. Of course the more cornstarch the less heat resistant the silicon mold is and the less flexible the mold is. But you can make some highly detailed molds. Also if you then thin down the mixture with acetone you can squirt it out of a plastic syringe into molds (plaster, aluminum, etc.) and it will then cure.
Smokey