Automatic bed leveling is the next killer feature that will be found on all commercial filament printers. It’s a problem that has been solved a few dozen times already; there are just so many ways you can go about it. The Printrbot uses an inductive sensor to determine the position of the metal bed in relation to the nozzle. The Lulzbot Mini touches the nozzle itself to four contacts on the corner of the bed. There are even a few projects that will mechanically level the bed with the help of a system of cams and springs. It’s a difficult problem, and none of these solutions are perfect. [mjrice] has been thinking about the problem, and he hit upon a solution that is simple, elegant, and can be replicated on a 3D printer. It’s the RepRap solution to 3D printing, and it looks cool, to boot.
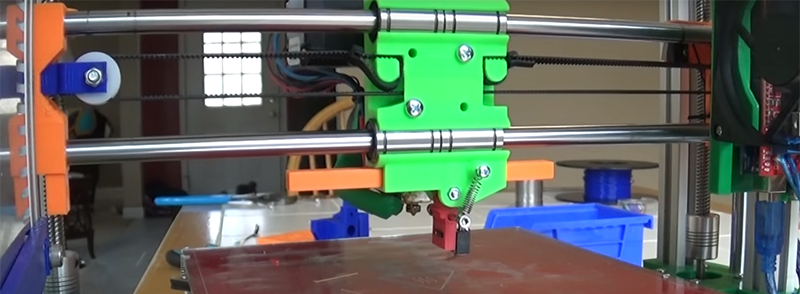
Instead of using the nozzle as a contact, getting an inductive sensor, or fabricating a baroque system of gears and cams, [mjrice] is doing this the old-fashioned way: a simple microswitch, the same type of switch you would find on the limit switches of any RepRap. Having a switch at the same Z position as a nozzle is an iffy idea, so [mjrice] made this switch retract into the extruder during printing, without using any motors, servos, or other electromechanical contrivances.
The key to this setup is a simple spring and a rack gear. When this rack gear is hit from the left side, it moves an arm and places the switch down on the bed. Hit the rack from the right side, and the switch folds up into the extruder. Combine this with a bit of G-code at the beginning of the print, and the switch will move down, figure out the actual height of the bed, and flip up out of the way. Beautiful, elegant, and the algorithms for bed leveling are already in most major printer firmwares.
You can check out the video of the mechanism below. It’s a great little device, and since it’s on a RepRap first, it’s not going to show up in a proprietary 3D printer next.


Awesome! Love those “using the existing mechanics” solutions!
My daVinci Jr has a very similar mechanism.
As does my Afinia h800
This seems like z homing to me not bed leveling at least not based on the video. Now I think you could use it for bed leveling, I didn’t see anything that would allow the plane of the bed to be adjusted automatically. I also wonder how accurate a micro switch is as a absolute position sensor. I’m sure they work decently as end stops, but I wonder what the repeatability is.
Sorry I always come at these from the industrial CNC side of things.
Just thinking in terms of overkill, replacing the switch with a optical interrupter system, and using an optical mouse sensor in camera mode (I think it’s mainly used for testing?) should work pretty well, as long as the camera refresh is fast enough to catch the interrupter tab mid-interruption.
Should be pretty cheap too, as long as you can find those mouse chips for a sane cost. A bit more work and you could probably use it for some sort of build-verification too (Hackaday had a post some time ago about per-pixel depth-sensing by focus-modulation).
You’re correct that it’s just homing. The microswitch should work relatively fine in that application. You also wouldn’t adjust the bed dynamically, you’d use the Z axis to adjust the height of the extruder to keep the difference constant.
Doesn’t that change the angle between the axis of the extruder and the bed? Does it matter? i haven’t really gotten on the 3D printing band wagon. Seems like you would have an uneven gap around the tip of the extruder and the bed.
The misalignment would be an issue for a CNC machine.
It’s easy to test the repeatability of the micro switches “as endstops”. Turns out it’s pretty good. IIRC, at 200 micron a full step, 12 micron a micro-step, I got around 5 microsteps. Hmm. 80 micron. That may not be accurate enough for Z height detection. :-(.
@Cynry The video is just showing the G28 – G29 works similarly but then probes in four locations to calculate the bed plane in Marlin.
This is a great idea. I must have used 200m of kapton because my extruder keeps hitting the bed even after trying to level. but from what i’ve seen auto-leveling is more auto-compensation and has the z axis constantly moving to cope with a wonky bed.
call me a perfectionist, but i like it when the z axis only has to move for the layers. i need a better soloution
Start using Scotch (3M) glue stick. I haven’t used Kapton on the bed since 2013.
Other brands should work if they have N-Vinylpyrrolidone in the composition.
I actually use glue stick on top of a wide roll of thin kapton. That’s on top of a clad FR4 (aka “unetched PCB”) with a nichrome heater on the underside. Sticks like flies on poo and requires maintenance like once a year. Maintenance = cut/peel up old kapton, wrap bottom to top back to bottom with kapton, apply a thin layer of glue.
The purple stuff is awesome. The dollar store stuff works, though. Everything in between works.
The kapton both protects the actual PCB from wear and provides a tiny amount of compression. The whole thing is loaded on springs at the corners (http://www.thingiverse.com/thing:7440 – I just put tiny springs in and use the screw to hold the spring in place), between that and the compressibility of the kapton it is quite forgiving of starting height. I have a variance of nearly 0.05mm from one edge to the other, and I print layer heights of 0.1mm all the time with few issues.
i use hair spray, perfect
Have you tried printing directly to borosilicate?
Picked up a few pieces so I can swap them out if I need to. Quick spritz of nonsented hairspray and I have yet to have a print fail to stick. Even better is if you are patient enough not to go ripping the print off the glass, there is something satisfying about the popping sounds a print will make as it cools and frees itself from the glass.
I am of course assuming you have a heated print bed, not sure how it would work with a non heated setup.
As far as non heated beds go (as I only have this) just a little bit of painter’s tape will work nicely, but it leaves a bit on the print if the nozzle is too close to the tape. I have never tried borosilicate, though I saw an article about it a while back and have been meaning to try it.
Ever tried something like a fine-pitch fine-drilled vacuum bed with a disposable bed liner? Been thinking about it for a while, but need a printer first (after Z, which comes after Y, which comes after… )
I’ve used a non-heated bed with hairspray, and it works pretty well, but no where near as well as on a heated bed. Same pop off cleanly by hand when done. Now I have had 2 prints fail to stick. So it’s not perfect.
I backed a nifty little all-in-one bed leveling sensor on IndieGoGo called BLTouch. It uses some manner of ATTiny MCU to emulate the typical servo/microswitch bed leveling configuration, and instead uses a coil to move this little metal shaft into position. Then there’s a hall effect sensor that detects when the shaft contacts the bed (Through a change in the magnetic field?) and the MCU reads that as the microswitch actuation.
So boom! One moving part, and it’s a little friggin metal rod being slid up and down by a COIL. The whole sensor package is tiny, and plugs into the same two headers as the usual servo/switch setup that people have been using, requiring no firmware modifications or additional gcode.
Sadly I haven’t had an opportunity to try it yet because auto bed leveling isn’t supported on my CTC-3D’s stock MightyBoard, and I haven’t gotten around to building an additional printer using a RAMPS board, or my (also crowdfunded) FastBot BBP 1S board. I was thinking of making a delta with my crowdfunded Diamond Hotend, the BBP 1S, and the BLTouch. So I’d have a really cool printer where all the major functioning bits were the results of crowdfunding. ;)
Nice to see this done on an i3-derivative. Here’s an older version of the same approach for the Lulzbot TAZ: http://www.thingiverse.com/thing:117957
Another for Mendel 90 that doesn’t lose X travel: https://www.youtube.com/watch?v=vTghOLwdMWQ
Here’s a cooler one for a Kossel Mini: https://www.youtube.com/watch?v=1eNz1l56H5E
Some printers use inductive probes but this requires a large metal surface for or very near the print surface, which can be weighty.
I never understood why auto leveling was such a big hit. I leveled my Printer once and never since. That was 2 years and a few meter of filament ago . Why would I need auto leveling for that?
It’s a mistake to extrapolate from your experience to every printer and every user in existence. Since automatic bed level compensation is such a big win for so many people, it should be plainly obvious that not every printer is a god-given perfect piece of machinery like yours is.
This was done in a similar fashion 5 years ago:
http://hydraraptor.blogspot.co.uk/2011/04/auto-z-probe.html
Why not just build a precise and rigid platform that *won’t need leveling* or compensation because it’s built level and will stay level?
That’s in my plans/ideas for the printer I’m slowly putting together. I have a late 1990’s Light Machines PLM2000 CNC mill and will be using it to machine the aluminum parts. The bed plate will be mounted to a sliding block on a THK HSR linear rail. I have a black aluminum heated bed plate, which will get sandwiched between a CNC milled/skeletonized aluminum plate and a sheet of glass, with insulation under the hot plate. Won’t be using binder clips!
I plan on using ball screws on all axes, with belts connecting top and bottom ends of the Z axis ones so I can drive Z with a single motor.
Progress depends on when I have $ to buy parts. Got the electronics with hot end, Arduino, LCD, RAMPS etc with 1 motor for the extruder. Why 1 motor? Because I bought a failed DIY CNC foam cutter project off Craigslist for $20 just to get the four stepper motors. The THK rails came from another failed project on Craigslist ($300 gantry router that never would have worked well), which also included the ball screws and steppers that are going into my $50 JET 9×20 CNC lathe conversion, which I also found on Craigslist. That was a nice find, a like new 9×20 for $50. Some of the mods on it are inspired by the Denford ORAC, which was a CNC Compact 8 clone. I picked up a dirt cheap treadmill, the motor from it is now mounted to the 9×20 lathe.
The quite nicely custom built wooden table from the router table is currently supporting the PLM2000 mill. I splurged $2K on the mill and have used it to repair a gear for a lathe that LeBlond quoted me $1500 and at least 3 weeks lead time.
I’ve been following the DIY 3D printer thing since Rep Rap was an assembly of Erector/Mecanno squirting hot glue into crude cylinders and cubes. It certainly pays dividends to not jump right in, to watch what others fail at and thus gain the benefit of those fails instead of repeating them. :) Fails like 3D printing PLA joints to assemble a cubical 3D printer frame from extrusions, then leaving it inside a car during a hot Idaho summer day… when there’s a surplus store that has the metal corner brackets made for joining 4040 extrusion together at perfect and *rigid* right angles.
Can I just say that the focus in the 3D printing community on ‘automated bed leveling’ is completely asinine, and from a machinist perspective, makes you all look like kooks.
It’s like you have collectively decided that ‘yep it’s fine, we’ll keep designing mechanically substandard machines, while driving ourselves mental trying to solve a problem that’s only a problem because of our substandard construction techniques!’. You’re taking the most primitive hardware problem that a first or second year mech eng undergrad can solve and turning it into extremely complex, simultaneous software AND hardware problems.
If the machines were built to be stiff in the first place, and the axes subsequently calibrated at assembly to be normal to one another, bed leveling would be a rare act of re calibration rather than a headache. Almost every 3d printer I’ve come across has the stiffness of a wet noodle – and as a consequence, can’t maintain axis and bed alignment.
So many of the problems the print community faces are a direct consequence of the community refusing to accept that it doesn’t have the expertise to solve simple mechanical problems. It’s the fundamental appeal of 3d printing, and why it’s found it’s biggest home in the electronics community – converting a 3d model to a physical, functional item, while requiring absolutely no ability, skill, or intuition when it comes to fabrication; it turns fabrication into a black box process. But then those same people that try to turn fabrication into a black box process, are the ones driving the machine design that facilitates that black box.
Maybe I’m missing something, but as a machinist, looking at the problem of bed leveling, it isn’t a problem at all. It’s something a machinist faces every day, and it’s solved with a $50 0.01mm dial indicator and a little patience once in a blue moon.
It’s almost as if a $300 machine made out of threaded rod isn’t as dimensionally stable as a two ton mill!
This. It is obvious the problems can be solved in the high-tech, expensive way like in commercial printers. Figuring out the cheap ways has been what makes reprap etc. popular.
That’s not even the comparison I’m drawing. More like, a $300 printer made of threaded rod isn’t as dimensionally stable as a $500 mini-mill that weighs under 100lbs. But even that misses the point. Anyone with a basic understanding of statics and rigid body mechanics could design a 30lb, $300 3d printer that would beat the living snot out of one of those allthread abortions any day. It’s just that the people that are going around designing 3d printers to be ‘cheap’, aren’t doing it with the fabrication knowledge that allows you to build cheap, light, but stiff structures.
So please, design one and post your drawings
Yup, unless people have their own shed and spend $10000 on their machine, they don’t have the right to own a printer!
You must have worked many, many years in a scarecrow factory to become so adept at crafting strawmen.
The Solidoodle Press uses a far less complicated mechanism to restract/deploy it’s microswitch auto-bed-beveling probe. The probe friction locks either up or down and there’s a channel guide for retracting or deploying it at the Y End Stop. The printer just move the head to the Y End Stop and then either forward or back on the X Axis to retract for deploy.
I like the simplicity, though I would change the rack gear to be triggered by a solenoid (only so the X carriage didn’t have to travel the whole length to set/unset the mechanism).
There are a lot of mechanisms similar to thing on Thingiverse but most are based on servos. I never liked those because (in my experience) servos are not accurate enough to ensure your probe is absolutely perpendicular to the build plate.
mjrice’s design solves that issue by making the mechanism purely mechanical which is really excellent. Then, if you added an electronic way to set the system (like with a solenoid as I mentioned, or maybe a servo), it’s still not altering the actual tramming mechanism so you’re not going to compromise the accuracy.
Nice work mjrice! I’d like to try this out one day.
“mjrice’s design solves that issue by making the mechanism purely mechanical which is really excellent.”
This is the key point to me as well. For others saying, “Look how it’s done on X printer”, yes, this is a solved problem. In fact, it exists with a servo on the current Wilson 2: https://www.youtube.com/watch?v=Na5BOL5HeD0
The problem is the rigidity of the current solution (if the servo arm doesn’t always go all the way down). This new solution completely solves that IMO.
Autoleveling is a great thing for low cost printers that can’t maintain the level/zero from one print to another. I’d rather build the machine so that it is rigid enough to maintain the level and zero settings. It costs a little more to do it that way but print quality and precision also improve with rigid construction.
Nice build, like your printer. Thought this way of doing it has been done a long time ago, been in the marlin FW for at least a year if not more.
I have a 2 year old+ K8200, not going to win any awards for detail but is strong and never needs re levelling. Great for printing brackets and other chunky stuff. I also built a Pursa type printer, as I printed the frame it is a bit ‘fixable’ :) so has a similar system.
I’m sure the delta has a all mechanical z leveling setup? And that’s been around for a long time now?
Yup. Allen key setup, I have it on my custom made Kossel Mini. There is a spring-loaded allen key, that contacts a microswitch when deployed. Pushing up the key (contacting the bed) moves the top of the allen key off the switch, registering a contact. The Key can be deployed automatically by moving the allen key near the tower belt and moving in the Y direction to move the key. It can be stowed by moving to a position off to the side of the bed and pushing the allen key down on top of a screw. Kind of like how a retractable pen works.
I stopped using it. I made a new print bed mount that is spring loaded and it all just kind of works without needing to be re-probed all the time.