Lining up the beam from your homebrew (or retrofitted) laser cutter doesn’t come without its challenges. For instance, how do I use my remaining eye to align an invisible beam that has enough power to burn through some objects in its path? Some of us will go through the extra hassle and expense of mixing in a visible guide that traces the path of the CO2 laser. For the penny-pinchers out there, though, [Stephen] has us covered with an inexpensive technique that will cut you down by only a few strips of masking tape.
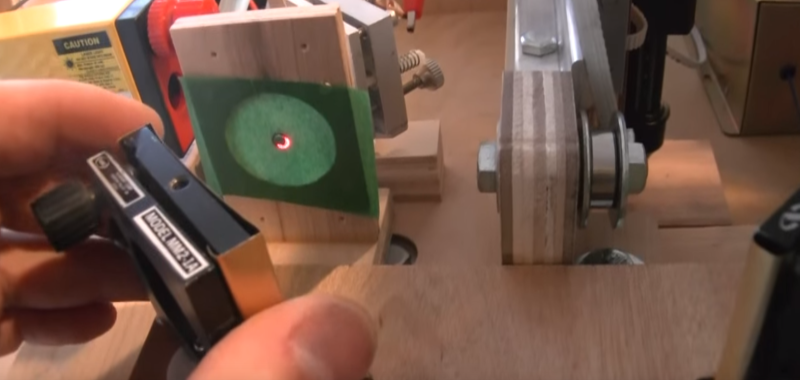
Stephan’s technique is simple, but elegant. He covers each mirror with tape, fires the laser, and leaves a burn mark, working his way from the last mirror that the laser hits to the first. With a burn mark on each mirror, and one through a guide made from a sheet of plywood, [Stephen] has a pretty good idea where the native direction of the beam is headed. He then swaps a red dot laser in to line up with the burn marks, and then aligns the mirrors using visible, and safe, light. Phew! Now that’s a lot easier than iteratively firing the beam and replacing the tape on the mirror each time we want to tweak the mirror alignment.
With all that burnt masking tape, the process can get a bit smelly. Nevertheless, we’ve filed this one away for later when we start getting that itching, burning sensation that kicks us into building our own homebrew laser cutter.


It´s a bit scary to see all this wood being part of the build, especially around the optic path, in conjunction with what seems a powerful IR 808nm diode.
Aluminum + black heat resistant paint (oven paint) is much safer.
A workaround could be a simple smoke detector ( LED + photodiode) in several places in the housing. Can be conveniently hooked to the safety circuit without relying on the controller.
Scary how? Do you think the wood will explosively combust or something?
if a mirror breaks down or anything happens on the optical path, this could lead the laser beam to hit the wood inside the housing, What can go wrong ?
Mmmm… The wood would char a bit? Or at high power levels either get hole straight thru it or have some small flames. No explosions or other crap. You know that actually cutting wood with a 40-60 watt laser is not a big issue? But needs to be monitored for small flareups. Same thing here. Only a complete retard would run any hobby-class laser unattended.
What do you think would happen when “something goes wrong”?
I have a,Reci W1 laser tube . They come with a lathe turned protective tube screwed to the output mirror . This is machined to an inside diameter of 12mm. I bought a battery powered boresight laser ( used for alignment of rifles) of the same bore ammunition . it is a perfect fit in the protective tube. From there I can align my machine
I thought gas tube lasers didnt use laser diodes?
Dude, just use some fax paper
I was wondering about cash register tape.
Yea, that is what full spectrum suggest you use for their over priced machine.
The better option is to buy a role of thermal address labels, they are easy to apply like masking tape but will not leave adhesive residue on your mirrors like burning through the masking will. When using the thermal paper you can use a 5ms pulse and it should mark it without burning through.
I wonder, if burning the masking tape directly on the mirrors will not damage them. At least they get strongly contaminated. Cleaning them gives a risk of scratching them.
You’re right. The burning adhesive leaves gunk on the mirror that needs to be cleaned afterwards.
I find the best way is to tape a circle of cardboard over the lens and then apply making tape to this for successive firing. You can also see how far and in which direction it has moved due to your adjustment. I never found alignment this way to be particularly difficult or time consuming.
If you watch the video you’ll see he uses little brass covers that slide over the mirror mounts. No gubk mess.
Commented above that the better option is to use thermal address labels, no need to burn through and no adhesive mess.
This is a pretty bad idea, as burning the tape directly can lead to extensive damage, particularly if the burned material adheres to the mirror surface. This can create hot spots, and the damage can ‘run away’.. In this case, because the backing material is adhesive, the residue from just the tape (let alone burning) is difficult to remove, and will likely lead to damage of the mirror surface.
A less ‘burnable’ solution is to use thermal receipt paper, since you can run at significantly lower power to create a mark and not burn the paper. Plus, it’s cheap (you can buy a case of the stuff for nothing) or you can just pull any old receipt out of the trash and it’s often ‘good enough’ for this purpose. Thicker paper tickets (such as those issued for metro / train fare, etc.) are a bit better, since the heavier paper won’t burn as quickly.
Good idea with the thermal paper. I’ve used postits and masking tape so many times over the years, and have yet to run into problems because of it. I see your point though, and worried about it the first couple of times. I always clean my mirrors with alcohol and a q-tip after aligning. And I use wood (fixed with tac-it to the head itself) instead of tape at the lens.
I liked the method of introducing a second visible laser that Stephen used. I’ll probably try this approach next time. Red laser and receipts it is.
To be fair: I’m a bit biased because I work in an optics lab. Sputter-coated gold mirrors are rather expensive and should never be cleaned. Now, if you were to use pieces of cut HDD platter, then perhaps it’s a different story.
Typically, we use a combination of isopropyl alcohol, acetone, and/or methanol for cleaning (depending on how dirty an optic might be). I’ve found methanol to be the best, since it doesn’t absorb water and other contaminants as easily as acetone, and it removes organics much better than IPA. Plus, it dries just quickly enough that it leaves very little residue.
There are several companies that make a beam-viewer card for 10.2 micron, but they’re really expensive (~$280 each) and must be illuminated with UV light in order for them to work.
He does not put the tape directly on the mirrors. You can see on the video that the tape is on an extra plate which is slid onto the mirror stand. Also, it is on the image above – that light bracket.
How about using a ccd camera to view the iR spot during alignment?
If the wavelength is less than the upper sensitivity range for silicon (i.e. in the range of 400 – 1100 nanometers), then yes, this works just fine. If you’re using CO2 however, then the emission wavelength is 10.2 micron (10,200 nanometers), so you’ll get nothing.
This works well for IR around 1 micron (and obviously visible), so if you have an IR diode in this range (i.e. 808 nm) then you’re good to go.
I am not sure about the CO2 lasers, but I once did this with a optical fibre transmitter(IR laser CLass 1M and a Nokia C6-00… It got a blind spot on the chip where the laser hit it.
“how do I use my remaining eye to align an invisible beam that has enough power to burn through some objects in its path?”
I see what you did there.
If you can see it, then you didn’t do it right.
Reminds my of a previous job; I used to work on kilowatt range laser cutters. The beam path was long enough that trying to have a concentric HeNe beam might work as a first approximation, but wouldn’t be good enough for the final alignment. We typically aligned those beasts by putting a precision cut metal crosshair in place of each mirror and firing the beam at a target behind them. Then you could check the shape of the crosshair burn and see how the beam needed to be moved.
Thermal paper worked GREAT as a target there. Second best choice was acrylic (although if you think burnt masking tape smells bad… that stuff smelled like some sort of weird synthetic garlic substitute). In a pinch, I’ve aligned a laser with corrugated cardboard as a target.
If you can’t get those precision cross hairs for hobby class laser mirrors, this could be a pretty good business opportunity for someone reading this…
You could also use an IR detector card. As upconverting frequency is really hard and only works for select frequencies, those instead contain a dye which is “charged” in visible light and releases visible light again when excited by IR radiation, meaning you can hold it in a IR laser’s path and will see a bright spot on the card. You might have to move the card after some time as the dye gets discharged, and you shouldn’t use your laser at full power on them. Costs about ten Euros, though I don’t know how hard it is to source them.
He certainly has an overly complicated procedure requiring multiple jigs and target holders. There are cleaner procedures on YouTube or various web pages.
The metal collars that he makes might protect the mirrors, but mask where the outline of the mirrors actually are. We use 3×5 card stock, because it’s thick enough to burn a spot without burning thru the card. (Thermal receipt paper is good, but almost always burns thru.)
Using 3×5 card stock, use your thumbnail to emboss the outline of the mirror holder. When you fire the beam, you can now judge both your near-field spot and the far-field spot (which should be identical), but also if you have the spots correctly centered within the mirror.
This technique, or some derivative, is the manual of literally every laser cutter that has a manual.
This is not my idea but there is a way to aim a IR CO2 LASER with a B/G LASER:
https://jpst.it/G88H
Also there are digital cameras that can resolve IR either by removing the lens filter or using night-vision mode (Sony HandiCam).. Also some digital cameras could resolve short wavelength, mid-wavelength, and long wavelength:
“Long-wavelength cameras — the most popular infrared camera — typically detect infrared wavelengths in the range of 7-12 microns. Cameras operating in this spectral range provide great deal of detail because atmospheric absorption is minimal. Both long- and mid-wavelength cameras provide accurate temperature measurements and can produce detailed differences across small or large temperature ranges.”