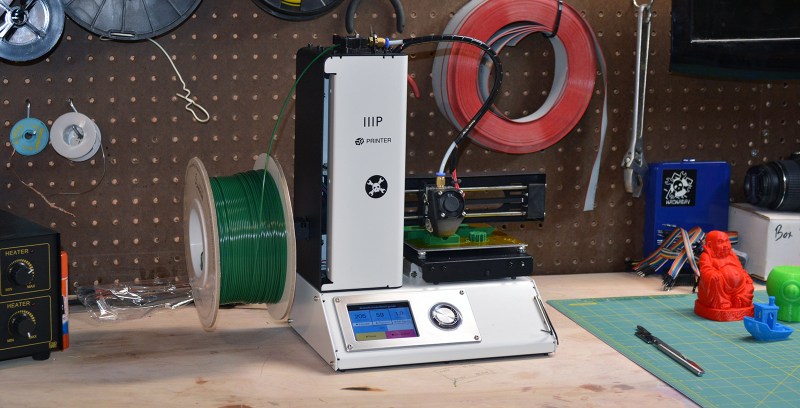
2016 is the year of the consumer 3D printer. Yes, the hype over 3D printing has died down since 2012. There were too many 3D printers at Maker Faire three years ago. Nevertheless, sales of 3D printers have never been stronger, the industry is growing, and the low-end machines are getting very, very good.
Printers are also getting cheap. At CES last January, Monoprice, the same company you buy Ethernet and HDMI cables from, introduced a line of 3D printers that would be released this year. While the $300 resin-based printer has been canned, Monoprice has released their MP Select Mini 3D printer for $200. This printer appeared on Monoprice late last month.
My curiosity was worth more than $200, so Hackaday readers get a review of the MP Select Mini 3D printer. The bottom line? There are some problems with this printer, but nothing that wouldn’t be found in printers that cost three times as much. This is a game-changing machine, and proof 2016 is the year of the entry-level consumer 3D printer.
Boring Specs
Monoprice’s MP Select Mini doesn’t require special filament, and it can use the standard Open Source 3D printing software. This is in stark contrast to the XYZPrinting da Vinci from 2014. The da Vinci uses chipped, DRMed filament, and a proprietary interface instead of standard G-code. The MP Select Mini doesn’t pull any of these tricks, and is a minor miracle for a $200 printer.
Like most of the name brand printers found at CES last January, this printer is a rebadge of something already being made somewhere in China. The most likely suspect for a manufacture is a company called Infitary. You can buy a printer nearly identical to the Monoprice MP Mini on AliExpress right now, and it doesn’t seem Monoprice added anything special to this printer.
Judging by the spec sheet, I’d guess Monoprice doesn’t even know what they have on their hands here. The real specs for this printer are actually better than what Monoprice has published. This printer is capable of a layer height much smaller than 100 microns.
Prints

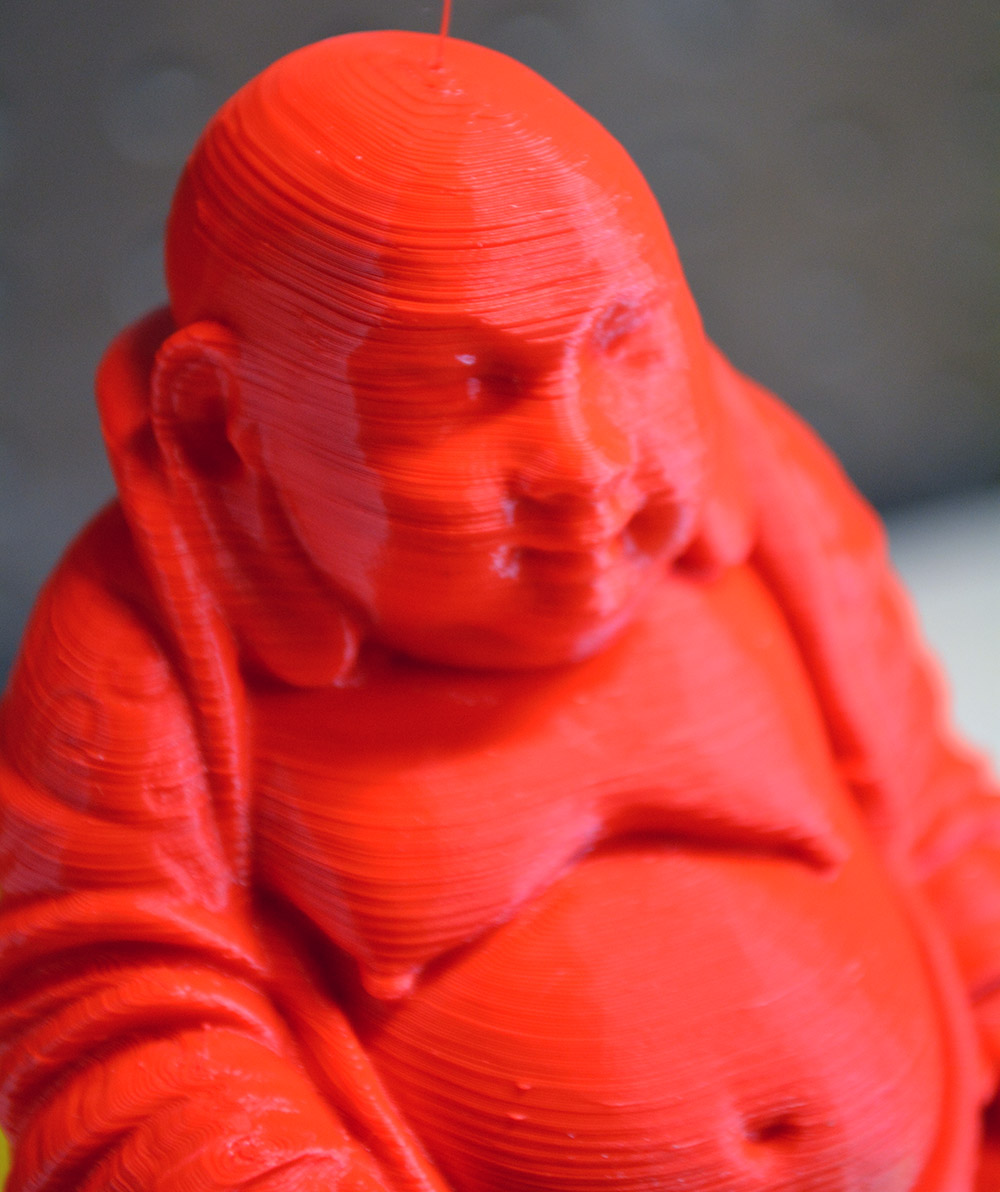
Before showing off the prints the Monoprice MP Select Mini can produce, I must mention a simple fact: sample prints are not indicative of the quality of a printer. A 3D printer is just a CNC machine, and most of the work in turning an STL file into a real object is done by the slicer.
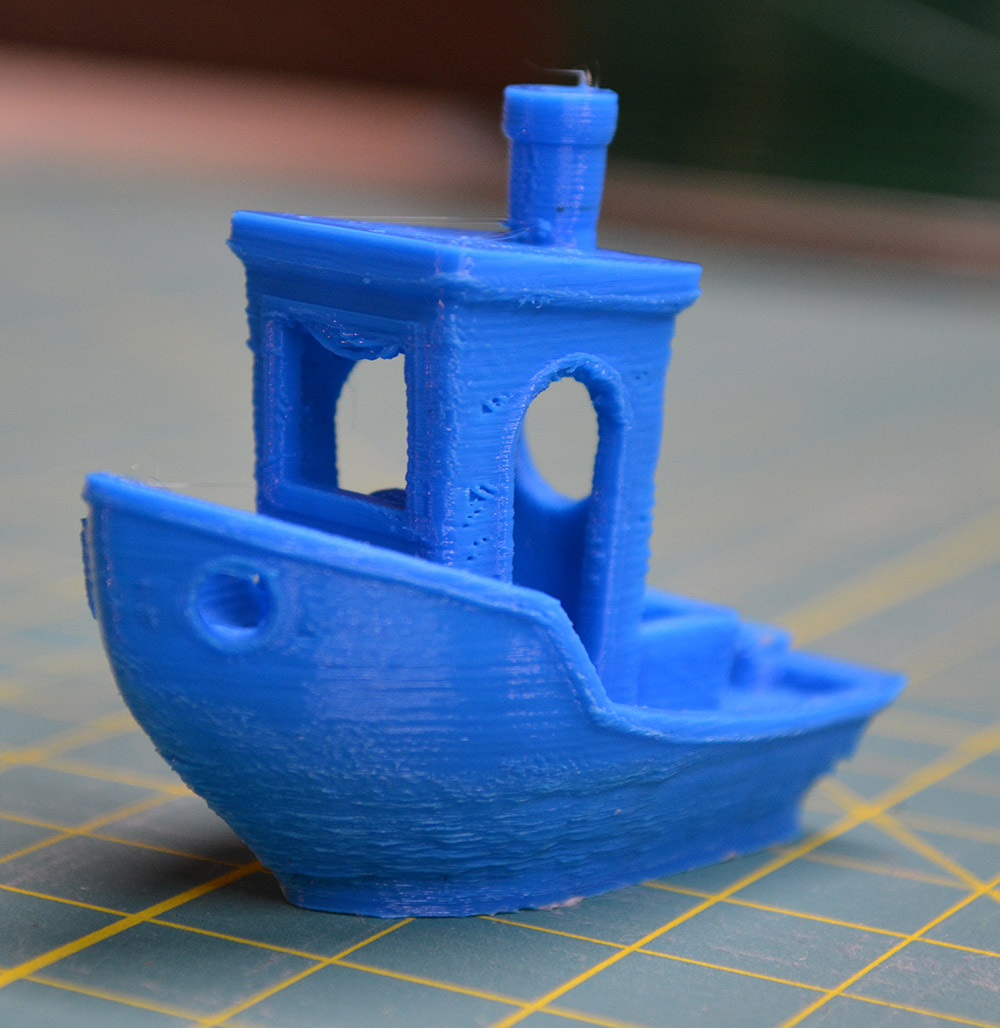
That said, there are a few things you can tell by looking at a few 3D print samples. Z axis wobble can be easily identified by looking at straight vertical walls. The ability of a printer to control the hotend temperature and use the fan can easily be seen in overhangs.
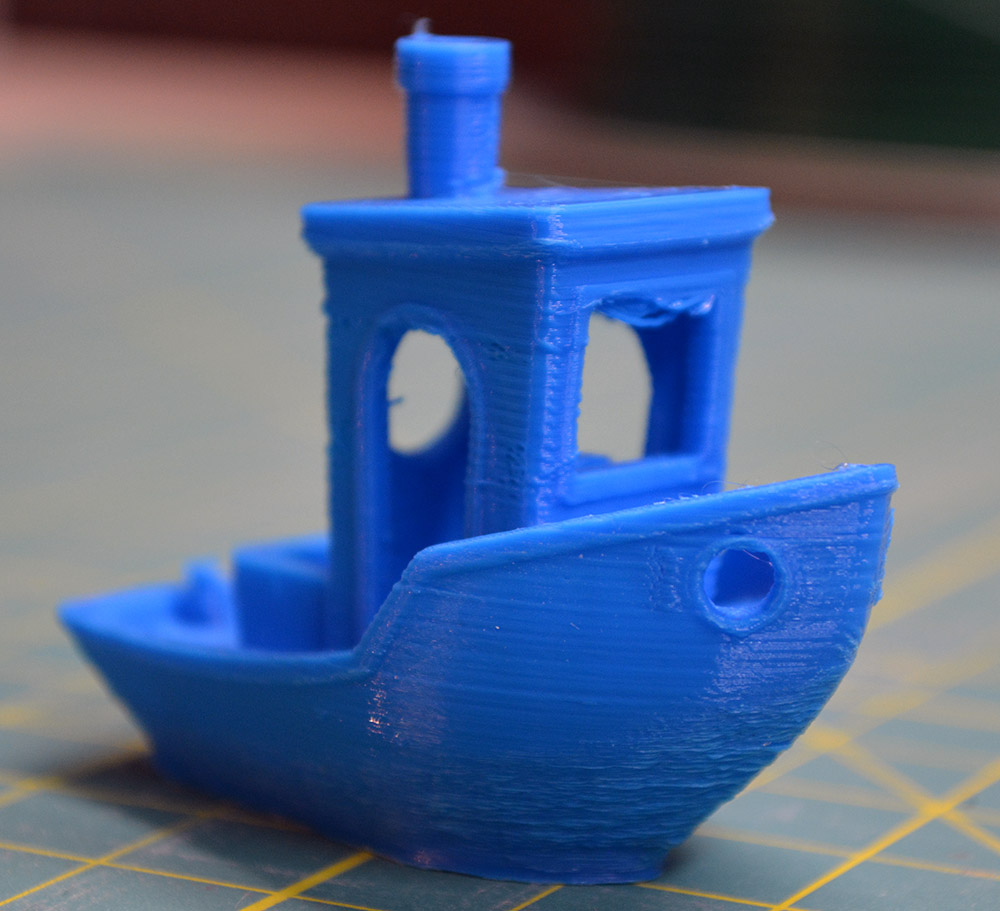
My first few prints were of Benchy, the tugboat 3D benchmarking tool. While not perfect, out of the box and with the recommended Cura settings, this printer produced a Benchy that is at least equal in quality from any other uncalibrated printer. With a little work in getting the right settings, I can see this printer producing Benchys that are at least equal to those produced by any other mid-range printer.
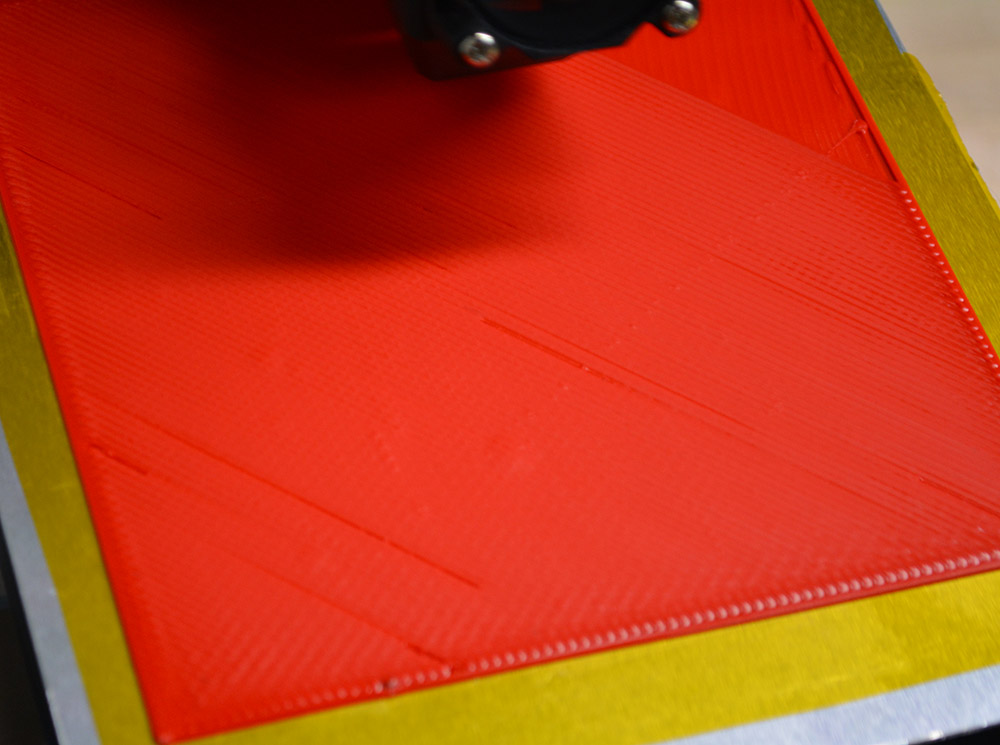
There is one glaring issue with the Monoprice MP Select Mini: the temperature control loop for the hotend is terrible. My printer has +/- 5 degree temperature swings over a period of several minutes, and this has been seen in other reviews of this model. The reason for this is an uncalibrated PID loop. Nearly every printer firmware has a PID autotune function that clears this problem right up. The firmware for this printer does not have a PID autotune function as far as I can tell.

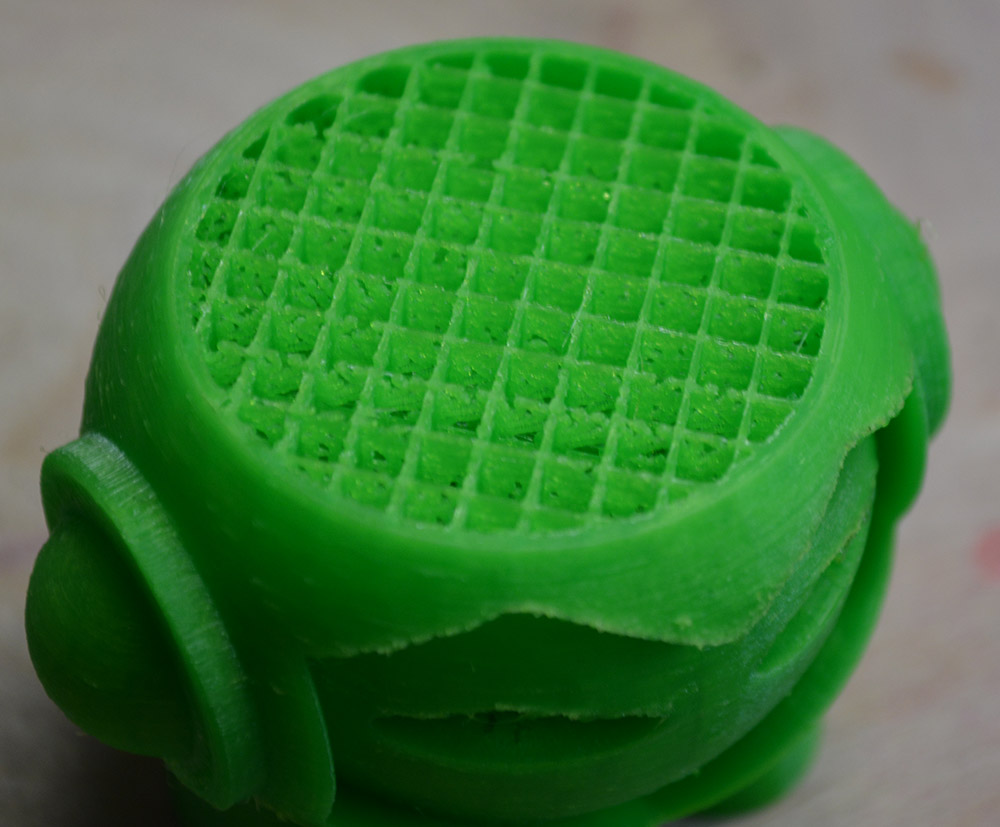
Are the prints made on the MP Select Mini good? Yes, they can be. The MP Select Mini has a few problems, but none that won’t be easily fixed by the 3D printer community in a few months.
Teardown
This printer is built down to a price. The strange thing is, this fact really doesn’t show until you start taking it apart. The chassis is all metal, the X and Y axes are belt driven on 6 mm rods, the Z axis is leadscrew driven, and there’s really not much to write home about. The printer is built solidly, and I can easily foresee it standing up to a lot of abuse.


The Motors and Mechanics
The standard for all 3D printers, from the cheapest fleaBay specials to the high-end Lulzbots and Ultimakers, is stepper motors. If you have a 3D printer, chances are you own four or five NEMA 17 stepper motors. Are they the best solution? That’s arguable, but it’s the standard. The MP Select Mini bucks this trend with a circular, non-NEMA motor on the Z axis.
The Z axis is leadscrew driven with an M4 threaded rod. It’s weird, and the Z axis is tremendously slow. This, however, is a selling point Monoprice failed to mention. Because the Z axis lead screw’s thread pitch is so fine, this printer can produce objects with a very, very small layer height. [Prusa]’s calculator gives a very low theoretical minimum layer height for this setup. The minimum layer height is not 100 micron as the spec sheet says, but it can be taken as evidence Monoprice is underselling the capabilities of this printer. It does mean Z axis travel is very slow, but that really doesn’t matter.
The Electronics
Here is where the MP Mini Select shines. If you’re looking for the one game-changing feature of this printer, it’s the controller board.
Before I broke out the hex wrenches for the teardown, my only impression of the firmware and electronics came from watching the test prints being built. There was something very different about this machine: the acceleration. The acceleration ramp when travelling from one end of the bed to another is like nothing else I’ve ever seen on a 3D printer. It was smooth, precise, and almost beautiful to watch. I figured this was custom firmware. It was, but that’s only half the story.
The electronics board for this printer is a 32-bit ARM Cortex M3, a vast improvement over the 8-bit ATmegas found in almost every other 3D printer controller.


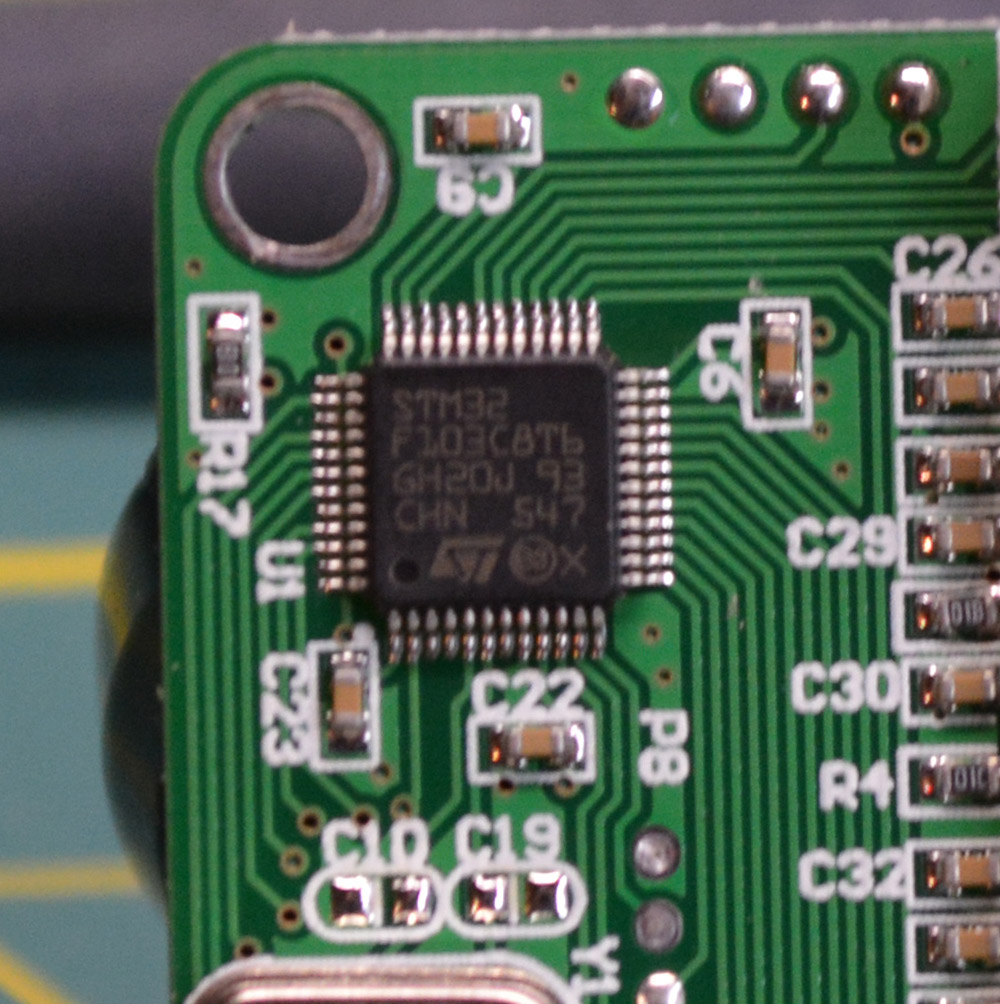
This printer is an exercise in how inexpensively you can produce a printer, and these efforts clearly show in the electronics board. There are only six chips on this board: four HH4988 motor drivers (I assume off-brand clones of the popular A4988 stepper motor drivers), a buck converter (most likely for the LCD), and the microcontroller, an STM32F103 microcontroller. Yes, 32-bit printing is finally here.
It is impossible for me to understate the importance of the ARM microcontroller in this printer. Until now, with the exception of the Smoothieboard, the vast majority of 3D printers have been built around ATMega microcontrollers. This is understandable given the historical context; the first RepRaps were developed around 2009 or thereabouts, and the Arduino was very big at the time. 3D printer controller boards were developed around these 8-bit microcontrollers, and development continues to this day.
Everybody recognizes that ARM microcontrollers are the future of 3D printer control boards. ARM micros are cheaper – the STM32F103 on this printer board is half the price of the ‘standard’ ATMega2560 or AT90USB found in every other printer controller. ARM chips are more powerful, allowing for smoother acceleration. ARM micros are just a better solution to the problem.
Despite these obvious realities, thousands of people have been working on 8-bit controller boards for the better part of a decade. There’s a lot of technical debt to pay off in the Open Source 3D printing world. This technical debt was just paid off by a random embedded dev in China. If you want to see the future of 3D printer controller boards, all you need to do is buy a $200 printer from China.
As far as the LCD and controls go, they’re exactly what you would expect. It’s a full color TFT, most likely the same model used in an old non-smartphone, with a single rotary button. I believe the LCD and button assembly connect to the printer board over SPI. The controls allow the user to load a file from the SD card, move the axes around, and set the temperature. It’s the bare minimum, but you don’t really need much more.
Heated Bed
On most consumer 3D printers – those that have a heated bed, anyway – you’ll find a PCB heat bed screwed or clamped to an aluminum or glass plate. This is the standard. The MP Mini Select doesn’t have a separate build plate and PCB heater. Instead, a thin sheet of aluminum is bonded directly to a PCB heater.


While this makes for a much cheaper build – you don’t have to add an aluminum or glass sheet to the BOM, in addition to any fasteners – I am afraid it won’t be as robust as the standard separate aluminum/glass build plate and heater. That doesn’t mean it’s a bad solution, just that a bonded aluminum sheet won’t be able to take as much abuse without warping.
An innovative, low cost hotend
The theme of this printer is being built to a price, and nowhere is this more apparent than the hotend. To the manufacturer’s credit, this hotend does use a standard heater cartridge and replaceable thermistor. This is the future of hotends, and even though you can still buy hotends with nichrome heater cores, these are on their way out.


The hotend consists of a 0.4mm brass nozzle screwed into a heater block, and a heat break screwed onto an aluminum heatsink extrusion. This is possibly the simplest hotend in existence, but that doesn’t mean it’s skimping on features. I haven’t taken this hotend apart yet, but I suspect it is an all metal hotend. There’s simply no space in the heat break for a PTFE liner. That’s amazing for what is apparently the cheapest hotend you can buy and allows the MP Select Mini to print in exotic plastics.
I would not recommend printing in exotic plastics, though. There is one feature desperately missing from this hotend: a second fan to cool plastic squirting out of the nozzle. The MP Mini uses a single 20mm fan to blow air over both the hotend heat sink and right on to the molten plastic coming out of the nozzle. This is a bad design, and combined with the poor temperature control in the firmware, results in poor bridging capabilities for this printer.
These Are The Upgrades You’ll Want
Every 3D printer needs upgrades. Some, like the Lulzbot Taz 6, come with just about everything you could want, but ideally you’ll still want to stick a Raspberry Pi in there for headless, networked printing capabilities. Cheap eBay kits? You’ll want a better build plate, a new extruder, and maybe a better hotend. The MP Mini is fairly well equipped, but there are a few extras you’ll want.
A New Build Surface
As mentioned above, the one-piece heated bed for this printer is one of the most interesting designs I’ve ever seen. The print surface that comes with the MP Mini, though, is just a large sheet of masking tape. This will last you a few prints, but after that you’ll want something better.
For this review, I used a 6″ wide strip of Kapton and glue stick, but the current ‘best material for a build plate’ is a sheet of PEI or Ultem mounted to the build plate with a sheet of 3M 468MP adhesive transfer tape. You can get a 12″ x 12″ PEI sheet from Amazon for $16, and a 12″ x 12″ square of 468MP Transfer Tape for $17. That’s four PEI build surfaces for the MP Select for $37, and will be an amazing maintenance free build surface for PLA, ABS, and (reportedly) PET.
A Raspberry Pi / Octoprint Setup
There are reports the MP Mini is loud. Mine isn’t, but apparently results may vary. In any event, you’ll want to install your printer somewhere out of the way – a workshop, garage, or basement – and let it do its thing for several hours at a time.
While you can print from an SD card (and I have exclusively), that still means that you need to sneakernet files between a computer and the printer. Octoprint removes the need for this sneakernet, and allows for remote control of a printer over a network. If you plan on using this printer for more than just the occasional trinket, an Octoprint setup will be a huge benefit. The instructions are available on OctoPrint.org. You’ll want the Raspberry Pi that has been gathering dust for several years, a USB WiFi adapter, SD card, and a USB power supply.
A Hotend Adapter
Every hotend will die. Hotends are consumables. They last a while, though, and even after 100 hours of printing, there’s nothing to tell me the hotend on the MP Mini won’t last as long as any other hotend.
Unfortunately, there’s no source for direct replacements. If you want to replace the hotend on this printer, you’ll have to shell out another $200 for a new printer. Spending $200 on a new hotend is crazy, and any company that forces that on consumers will quickly go out of business.
If you buy this printer, this should be the first thing you print. I whipped up an adapter in OpenSCAD that puts an E3D hotend on the MP Mini printer. It bolts directly onto the X carriage. Is it perfect? No, but if you print this adapter out, you’ll be able to print a better adapter out with your new hotend. Just print that and tape it to the back of your printer. You’ll thank me later.
Should You Buy This Printer?
There are problems with this printer. It is a closed source design, and replacement parts are impossible to find. The firmware doesn’t have handy features like Marlin’s autotuned PID values. The fan design for the hotend needs work. This printer uses a Bowden setup, so flexible filaments – Ninjaflex and Semiflex – are unusable. Trust me, I tried.
Printer Comparison
The Monoprice MP Select Mini is, by any account, a My First 3D Printer™, so let’s compare apples to apples. The class of printers that can be called a My First 3D Printer™ aren’t the Lulzbots, Ultimakers, or other machines that cost $1500 and up. ‘Beginner’ 3D printers are better defined by the SeeMeCNC Eris, the Printrbot Play and Metal Simple, the Deezmaker Bukito, the Maker’s Toolworks MiniMax, the da Vinci printer, and [Prusa]’s i3 Mk2.
The Monoprice MP Select Mini stands out in its price range. This machine is only $200, and you’re getting features you won’t find in a $600 Printrbot. This is a game-changing machine, and I would recommend this to anyone looking for their first 3D printer. Thanks to Monoprice, the entire market for entry-level consumer 3D printers has been upended. $200 is almost impulse purchase territory, and Monoprice is going to sell a lot of these machines.
Now we have some work to do
When the da Vinci printer was released two years ago, an immense amount of effort went into reverse engineering the chipped filament and reprogramming the control board to speak normal G-code. Now the same work must be done on this printer.
The control board for this printer must be reverse engineered and duplicated. The first person to do that will lay the foundation for the next generation of RepRap control electronics. I would highly recommend putting the reverse engineering efforts on Hackaday.io. Perhaps more importantly, a proper, Open Source 3D printer firmware must be ported to this printer. Right now, many of the shortcomings of this printer can be fixed through a firmware update. With open, improvable firmware, combined with its decent hardware, it could be outstanding.
Even without a rewrite of the Marlin firmware and a clone of this electronics board, it’s still a fantastic printer. It’s not perfect, but it’s good enough for the thousands of people who will end up with one of these on their workbenches.


Thanks for the Smoothieboard mention :) There are other 32-bit controllers nowadays like the Duet and the Replicape. Working on Smoothieboard v2 to try to keep ahead :)
Any word on when that v2 might be ready for some beta testing? I’m tossing around the idea of a high end board for my new custom Ultimaker styled aluminum extrusion frame printer. I would love to try to crank out some wild speeds with a Smoothieboard.
It’s a huge project, very ambitious, so it’s taking some time. Many folks are helping, but “when” the beta will be available we can’t say, depends on how much help we’ll get, how many problems we encounter …
Avoid Second System Syndrome at all costs!!!
https://en.wikipedia.org/wiki/Second-system_effect
Benchoff is Bench-ON today. Great review and you hit all the points that I and other long-time hobby 3D printer people would want to investigate.
+1
+!
Even I have to agree with that one. Makes you wonder if he got someone to do his homework for him.
This is friendly ribbing, not being an asshole, right?
No, AC is genuinely an asshole, if you define ‘asshole’ as personal attacks against me, without contributing literally anything else. See:
http://hackaday.com/2016/03/23/hactivate-lead-a-hackaday-meetup-in-your-city/#comment-2963822
http://hackaday.com/2016/03/14/engineer-humanitys-future-the-2016-hackaday-prize/#comment-2954533
https://hackaday.com/2016/02/18/the-contrarian-response-to-apples-need-for-encryption/#comment-2924071
https://hackaday.com/2016/02/10/were-hiring-4/#comment-2915272
There’s also Rev Tactule, and a few others that are at least smart enough to change their handles every few months. All different IPs, so there’s at least half a dozen people who spend a fairly significant portion of their lives insulting me in the comments section of a fringe tech blog.
Considering that last sentence, this is fucking awesome.
Hey, don’t take it too personally, there’s arseholes everywhere. And I can’t think of any other blogs where whatever you write about, a significant chunk of the readers are likely better educated and informed – as you can’t be an expert in everything covered here.
But ignoring it might be more professional? Looking up IPs of people who’re rude to you just seems a bit… I don’t know, like something evil politicians, mass surveillance, police state, welcome to the EU, etc.
“Fools show their annoyance at once, but the prudent overlook an insult”
Most of us can tell the trolls from the jokers, even noobs like me Brian. Their insults get old quick.
I only read/ post from work, so the IP thing is handled for me far, far from where I even live / work. I never use the same handle, people that have since the beginning of the interwebs have baffled me. ‘Specially the hacker types who should know a thing or two about opsec….
He’s not an asshole. Assholes are useful in that they make shit happen. This guy’s just a turd.
@mb: “Assholes are useful in that they make shit happen. This guy’s just a turd.”
A useful clarification, which I’ll remember. :-)
It sounds like you’re winning.
There’s a Facebook group that has been working with this printer since it came out, doing tips, tweaks, mods, and so forth.
https://www.facebook.com/groups/1717306548519045/
The printer is made by Malyan: http://malyansys.com/en/?page_id=315
It actually has *WIFI* built in (the antenna is behind the LCD). You can get firmware from the manufacturer that enables this, or supposedly wait a bit for the official “Monoprice” firmware to come out.
I’m really happy with mine so far.
I was wondering why there was a signal strength indicator on the display. Thanks for the links! As my first 3D printer it’s nice to see a community out there for some help. (like replacing the slightly broken thermistor).
I thought so; that’s what I found out this weekend when I set mine up. Getting the toolchain working on a Mac has been a bit frustrating but I got Cura 2 working by modifying the Prusa i3 .json file. This is my first 3D printer, and you’re right; at $200 it IS very nearly an impusle purchase. It will be interesting to see what happens going forward.
Just use the “old” version of Cura and you can set the build settings as described with the printer. Or at least that’s what I did after I ran into the same “Cura 2 doesn’t let you define custom printers without esoteric JSON editing” problem.
Could you post your modified JSON file somewhere. This is my first 3d printer, not sure what setttings need modifying besides the obvious plate size, nozzle size.
The Malyan M200 has two fans on the hot end instead of a single fan with a cover/duct.
this is not true, it has only 1x 30mm fan on the hotend. source: i own a malyan m200.
Well, that’s cool. I wondered why it had that indicator.
https://hackaday.io/project/12209-monoprice-mp-select-3d-printer-reverse-engineering
404: File not found
He deleted that project. *He* did, not us. At least that’s what the admin panel is telling me.
Anyone else who wants to take up the challenge is more than welcome to start a project.
Well I can reverse engineer – or ‘clone’ this hardware. I’d need suggestions for any chip changes – not the micro – like the stepper drivers. (Don’t want any ‘oh you should have’.)
That means laying out a new circuit board, 3 prototype boards costs around £100, delivered in a week. I’m not taking on the software, someone else can tackle that thankless task. (‘Oh you could have….).
Wayback machine has no luck.
I bought one of these on sale the other week. Arrived quickly and I had thrown in a couple of reels of PLA to keep me amused for a long time. Printed a good model in a few tries. Gears within 2 days and have a few plans on what to print next(ie the model in this article).
It’s my first 3D printer. I don’t even have a strong use case for it, just thinking I would use it to make enclosures for some of my electronics. At $200 USD it was just too good not to give it a try, even with 3KG of PLA it was still under $300.
Aside from a broken wire near the thermistor that has made the temperature readings a fun challenge until I can get a good replacement, it’s been excellent. Fair warning: there is no real support at Monoprice for this, just return it for a replacement. I went with fixing the broken wire after actually troubleshooting things.
I have not clue what I’m doing with these, but as a beginner it was easy to use, simple to setup and does not feel cheap. I think I’ll keep it.
And I’m really glad to see the links to places where I can get more info in this article. Thanks.
I think this could be my first starter unit, I’ll have to wait for my next Monoprice coupon. Thanks for the beginners testimonial.
So, as someone looking for their first 3D printer, would you recommend this product or an i3 kit?
The i3 is going to be a better printer. It has a larger build area, it’s going to have an auto bed-levelling sensor, and everything is already tested.
You’d be buying a kit, though, and you’re going to spend $700 if you go with an i3 from Prusa. I can’t tell you if those extra features are worth $500.
The Folger i3 kit is $270.
https://folgertech.com/collections/3d-printer-full-kits/products/folger-tech-reprap-2020-prusa-i3-full-aluminum-3d-printer-kit
Can you speak to the quality of this kit? Was about to jump on the RepRepGuru one from Amazon.
I’ve built a Printrbot Jr., a Printrbot Simple, and am 98% done with building a Printrbot Play.
I bought the Monoprice printer on a lark, “it’s $200, how bad can it be?” and to use to print some improved parts for the PBPLay.. but I’ve ended up being super-impressed with this unit. Sure, it needs some tweaks/tuning here and there, but even straight out of the box (only leveling the bed) I was surprised at the results.
I forsee a lot of these (or a similar model at a nearby price point) going out the door this holiday season.
Good review!
The beauty in the controller board isn’t just 32bit, it’s the cost. Right now the cheapest you can get a 32bit board for is around $100. A quick glance at that board and I would guess retail price would be between $50-$60, manufacturer cost around $30. But again, looking at the components any layout, there is no way it could handle the 15-20 amps that a full sized printer consumes.
Any clues on what voltage the power supply is? that would play a big role. 12v is the current standard, but many are switching to 24v which lowers the amperage requirements ending in reduced costs.
Another problem is that there is no unified 32bit firmware. Smoothie is only designed to run on the LPC1768/9 MCU’s, and other firmware run on the Arduino compatible Due – Atmel SAM3x. The Due based firmwares are typically direct ports of an arduino 8 bit software, that doesn’t take full advantage of everything that a 32bit MCU has to offer. In addition many of these boards suffer from feature bloat that increases the cost of the board (when was the last time you used an Ethernet port?), and increases the complexity of the firmware (there are countless LCD’s that are supported in Marlin, along with features that were for a one time use case).
Until someone develops firmware that is portable (a Hardware abstraction layer that allows choice of MCU’s), along with a board that is cheap (~$60) then no, 32bit has not arrived.
Smoothie has been ported to STM32F4, and is currently mostly ported to LPC4337. The main reason we don’t have support for the ATMEL SAM chips is that the last time somebody looked at porting to it, there was no chip available in that series with enough flash to contain Smoothie.
Smoothie is based on the mBed HAL, which is ported to a multitude of chips. And the next iteration of the firmware we are working on is even more easily portable.
I think Smoothie is the closest we currently have to a “unified” firmware.
About ethernet, for the v2 board we are actually planning a v2-mini board with a strong focus on cost, which won’t include Ethernet, however the v1 board currently has an Ethernet interface, and it is in fact very very much used … not sure it qualifies as bloat … maybe you are just missing what’s so great about it :)
Wireless is a bit more useful, considering I’m not going to be placing my printer right next to my router.
The flash thing is an issue, considering that it has 512kb of flash space, double that of the arduino mega, I’m curious what is eating up all of that space. No EEPROM might be an issue, but since the configuration is stored on SD it should be ok.
It depends, some people will find wifi useful ( like folks at home ), others will find ethernet useful ( like at my fablab or in local companies ).
Somebody is working on an ESP8266 firmware that will make one act exactly like a Smoothieboard’s network interface, so once that’s done, people will have a choice. And it’s extremely cheap and will just plug-in.
About flash, what’s eating up all that space is code, very simply :) We do have many more features in there than most folks realize …
I’d be interested in the cost down version. I have absolutely nothing that runs on cables anymore. Everything is Wi-Fi – even digital cameras.
“It depends, some people will find wifi useful ( like folks at home ), others will find ethernet useful ( like at my fablab or in local companies ).”
Or folks who have a proper number of ethernet jacks at home. I have 37 jacks including two next to the workbench in the garage and a couple in the attic. I find this trend of dispensing with wired ethernet disturbing and misguided. “Next to the router”??? Phzzzt. Get a wiring closet…. :-)
When you’re dealing with real-time systems, you will discover that wired interfaces will always perform better than wireless. Read the blogs about people that have tried to use wifi with printers and you’ll find a lot of these experiencing print blow ups. Give me wired any day. People using wifi just transfer gcode files to the SD card onboard the printer works – but that’s not the same as hosting the gcode on your PC and controlling the process from the PC.
It’s a 12V supply, rated at 10A. I’ll run a few prints and figure out how much current it’s actually pulling.
I have one, it pulls about 100 watts when running heated bed to 50c and extruder to 190c.
Not much head room left for the power supply.
12v 10amp power brick.
Good Post
Stephanie, open your eyes, please. There are many 32-bit controllers < $100. Duet, AZSMZ mini, the $60 Gen7-ARM to name a few.
http://www.reprap.org/wiki/Gen7_Board-ARM_2.0
There is also a universal, fully portable firmware: Teacup. Runs on small ATmegas (Arduino Nano), big ATmegas (Arduino Mega & Co.), ARMs and even desktop PCs. Pretty fast, 550'000 steps/second were demonstrated on an STM32F411. Handily also the one coming with Configtool for easy, text-editor-less configuration.
https://github.com/Traumflug/Teacup_Firmware
The RepRap universe is a bit bigger than what one can find on eBay.
There were a lot of duplicates of this comment. They were deleted.
Protip: no mod, ever, is mashing F5 waiting for new stuff to come into the mod queue. If you see a ‘your comment is pending moderation’ just sit tight.
Sorry for the double-posts. Glad to see it’s solved now :-)
Lol. Been there!
Also: https://github.com/ambrop72/aprinter
Of course the “last time I used an Ethernet port” on my printer (Malyan M180) is “never”. Because it doesn’t have one. But I would if it had. The printer is in another room than my main PC. So it would be much more convenient than running around with the SD card.
Why not using NXP FRDM-K64?
Cortex M4 with HW floating point, 1MB flash and 256KB ram, uSD card socket, ethernet on board, debugger (jlink!) on board. Good SDK support (os, drivers, lwip, freertos, mbed, etc…). Extended arduino R3 headers (double pin count). 35$ on digikey/farnell.
In fact you just need to design a good I/O shield around the extended headers (or even use standard R3).
The Smoothieboard v2 is going to be using the LPC4337, which has different specs, but is comparable …
Nice review, this looks like a nice printer for someone starting out and is not sure they even need one. :)
I have one and the only issue I have had with it so far is the filament getting caught up in the air gap mentioned, once I figured out what was happening it has been pretty smooth sailing. I would actually like to get more of the tape they used, I tore it after about 8 prints, I am only getting 2 to 3 prints using the 6″ wide blue tape I am using. Oh and some spare clips for the fan cover since one of them got lost during one of the many disassembles trying to figure out the feed issue, the replacement made from a safety pin seems to be working well enough, but I am sure I will lose another one.
I did have some issues with the big button changing selections when I push it, but I found if you press a little above the middle and a slightly upward direction it is manageable.
I bought this to learn on, and I think it is a good value but I am already wishing I had a bigger bed.
You can buy a Prusa i3 DIY Kit for $234.00. Not sure why you would want one this small.
No assemble required, it took less than 30 minutes to start printing assuming you got filament ahead of time. I figured I could determine if 3d printing was something I could get into before committing to a bigger machine.
Small is exactly why I got it. I have to clear off my entire workbench and whatever projects I have if I want to print with my pussa and can’t do anything else while it is printing. This I can leave in the corner printing while working on other things.
“With a little work in getting the right settings, I can see this printer producing Benchys that are at least equal to those produced by any other mid-range printer.”
Typical lazy reviewer BS. Can you see that with your super-powers?
Oh look, it’s the guy who accused me of being in the pocket of big mayonnaise.
To answer your question, yes, I can see that with my superpowers. If a printer is over extruding, dialing back the extrusion will produce a better print.
Now, two questions for you. Is that seriously your best criticism of this post, and why shouldn’t I ban you?
Edit, because I have edit capabilities: We don’t have time for low-quality trolls like Rev. I’m looking for some trolls that can take pride in there work.
I admit my own laziness in not reading past that point, but I looked further and was dismayed to see zero pictures of the bowden extruder mechanism; not even a mention of whether it’s an airtripper style or even what toothing profile is on the drive gear. Especially with a section “Motors and Mechanics”. The review does not even say if it requires assembly out of the box or if it comes preassembled. As you modified it, I’m not really sure what YOUR final price tag was.
PS it’s “their work”, not “there work”
The dark, secretive, interests of big mayonnaise are tangy, delicious, and would compliment any sandwich.
(This comment brought to you by Hellman’s LOW FAT WHIPPED GREEK XXXTREME Mayonnaise)
I can’t believe it’s not mayo!
Challenge accepted.
Can it print cheeze whiz? I demand to know. This review is beetle dung to be consumed by dung beetles without this information. Your mother should be ashamed and your father’s father too.
Actually has anyone tried printing cheese? It melts, right? If people have done chocolate, why not cheese? Apart from the fact that it’s made out of germs.
I seriously lol at that! Come on, chesse doesn’t have THAT many germs.
*takes a bite of blue cheese*
Seen it done
https://www.youtube.com/watch?v=MmTaOvlJMpA
Good trolls… Check! I’m your man!
And don’t forget “Big PVC”
Brian, take a holiday, srsly. “why shouldn’t I ban you”? It’s just the web, man. Holiday. Take it.
Brian is talking about “producing Benchies”, meaning “little Benchoffs”; the 3D printed robot impersonators I mentioned earlier, that are now writing his articles. The new ones are at least equal to those produced by earlier printers; they are superior, in fact. Keep up the good work, robots, and there might still be hope for this blog! (or whatever HAD is)
Can you provide more specifics about the thread pitch of the Z rod? I looked at the calculator and I’m lost as to calculate what this “layer height much smaller than 100 microns” should be. I bought one of these and I’ve love to know where to start with tweaking that layer height, when slicing. I love this printer. Thanks for the write up on it.
My best guess – and this is a guess, because I don’t have the bolt to test it – is that it’s an M4 x 0.7 threaded rod/leadscrew.
If it’s not that exact thread pitch, it’s close.
Well, nuts to you.
It’s really interesting that they used a different motor for Z. Is it a geared stepper? I have been avoiding building a conventional mendal design because I do not have any nema 17 motors at all, so it’s neat to see alternatives (however embedded in a product they may be).
It’s not a geared motor, it’s just a different, smaller than NEMA 17, standard stepper motor. The fact is that the z-axis is very slow, and combined with the threaded rod a small motor provides enough holding torque and acceleration to drive that axis.
Usually it does seem cheaper to just use the same motor on every axis, simplify the BOM and drive the cost per motor down with bigger orders. I guess in this case, they actually figured out that using an even cheaper motor is more cost effective here.
http://www.aliexpress.com/store/product/Infitary-Portable-Mini-High-precision-3D-Printer-Fully-Assembled-Auto-Leveling-3d-printer-with-1-roll/2184116_32671235802.htmlhttp://www.aliexpress.com/store/product/Infitary-Portable-Mini-High-precision-3D-Printer-Fully-Assembled-Auto-Leveling-3d-printer-with-1-roll/2184116_32671235802.html …..this one is auto leveling with toch screen…. newer model?
Omfg, this 3D printer can apparently even print out a Benchoff-impersonating robot that writes decent articles!
That’s impossible. The byline says Benchoff, therefore it’s a shit article.
It makes it even worse knowing you are capable of not writing shit. That means most of the time you just choose to write shit.
When people are surprised when you do something well, there may be a problem.
Or maybe *you’re* the one who’s full of shit. What if it isn’t Brian after all?
haha! You should swap bylines with someone sometime and see if the trolls notice!
Thanks for the article.
One thought – there’s often reviews here, which are really good, but the odd comparison might be helpful to draw the info together? If you felt like doing a toms’ hardware style comparison between printers at this price range, That’d be helpful for people considering the options.
Yeah, we could do some sort of ‘Guide to 3D printing’. We could do it yearly or something…
That worked in 2012. It’s not going to work in 2016. There are too many machines, and doing a guide like that would mean tens of thousands of dollars a year just buying machines, and probably two full time positions. No company has the resources for that.
I honestly expect Make to discontinue their yearly guide to 3D printing. Even with the limitations they place on themselves (only out-of-the-box ready machines, no kits) there are simply going to be too many machines. This monoprice printer shows you can’t limit yourself to ‘name brand’ machines, so ny ‘guide to 3D printing’ is going to be a ‘guide to 3D printers manufactured by companies who are popular enough, or have a sufficient marketing budget’.
A subset of 3D printers, like resin based kits, is something I could get into.
How about just one for newbies. I still can’t get the courage to pull the trigger and buy a $200 one. I will soon, but the learning curve is going to be steep.
A guide for starters would be nice; maybe every 2 years or so?
http://hackaday.com/2016/07/06/build-a-3d-printer-workhorse/
I really liked this article! It’s what I needed to read.
I have a theory about the software in this printer. They took the STM32 and used http://www.stm32duino.com/ to plug in the arduino code found in most 3D printers. Cheaper and higher performance chip, same results.
Does that mean anyone who buys one has a right to receive the source code?
Yeah, that should be it…but maybe Brian skipped reading the manual and instructions. Anyway, i have no idea how it is implemented, just thought that it could be a shortcut to do it.
Hahahaha. Wouldn’t you?
since this is sold in the US, can anyone say what would be the real cost of getting a $200 from china?
FYI, here in the EU depends on country, but you would get to paying 50-200 more on it for customs.
If you click on the aliexpress link it should supply you with shipped price. Shipped price to US reads $272.
You totally skipped the Fabrikator Mini at HobbyKing.com. Completely open source and prints amazing. I recently reviewed the Select Mini on my YouTube Channel (filamentfriday.com) and I am impressed and agree they offer a lot for $200 but I still feel the Fabrikator Mini launched the sub-$200 3D printer, this just improves on it.
http://www.aliexpress.com/store/product/Infitary-Portable-Mini-High-precision-3D-Printer-Fully-Assembled-Auto-Leveling-3d-printer-with-1-roll/2184116_32671235802.html. .is this a newer model with touch screen and auto leveling?
nope a copy, and far too many 3d printed parts. the mP one has all cast or injection molded plastic and nothing 3d printed.
I would hope that someone does figure out an auto bed leveller, but honestly unless you move your printer around constantly you only have to do it once a month or so.
Sweet…go to know…thanks….
Good*
the one they are showing in the video doesn’t have 3d printed parts… as far as I can tell. 3d printed parts wouldn’t make sense production wise either… I’m thinking the one in the photos is a prototype and the one in the video is the one you get shipped but no way to tell unless someone has acutally bought one and I don’t see anyone that has?
The Risk-Reward ratio on this chinese brand is too high.Especially if the printer is called ‘Lesser Panda’!
I’ve been printing at 50micron on this printer all week. All the limitations dont exist with a little bit of tweaking and some setting changes.
Care to share the tricks to get this going. I’ve got a few small prints that really could use learning the tricks of the trade.
So, if you’re gonna go Monoprice, and your penny jar isn’t stuck at $200, then wouldn’t it make more sense to get the Maker Select 3D Printer v2 for $350? I haven’t been able to find a comparison review for them, but at the very least you’d get a far larger build volume. Am I missing something? Other than price, is there advantage to the Mini over the Select?
I’ve been looking hard at that one too. Probably different controller board in it. I like the larger print area though.
We’re talking low budget printers here. Going from $200 to $350 is 75% more expensive. Another $50 and you get TWO printers instead of one.
???????????? that I support the (il)logic of your argument (two inferior somethings is better than one superior something?!), but the Select has 400% of the build volume of the Mini for that 75% increase in price.
Why does Monoprice say this is a 100 micron layer height printer? Because they want you to buy their MP Select Pro with 20 micron layer height and smaller build volume for $500. http://www.monoprice.com/product?p_id=15607
Can we see more review articles like on similarly-priced 3d printers (and kits)? I know somebody above mentioned the HobbyKing printer and some Prusa I3 kit – would love to see the comparisons between all of them.
Nice review. But I stopped trusting it when it came to the discussion of Z axis resolution. With the most commonly used M8 rod one gets a theoretical resolution of < 0.001 mm already, which is a lot less than what one can actually print, so no gain with an even higher (theoretical) resolution other than, well, slower vertical movements.
Usually such thin spindles are used to somewhat compensate for weak and/or inprecise mechanics (curved spindle rods), so they do make sense at times, but they aren't exactly a hint on high quality.
Shipping to the UK is another $100 plus import tax no doubt… Any Monoprice MP selects available in the UK?
Having looked at the Monoprice site, I wondered if the i3 clone was a better buy?
in uk you should try here, In uk you are supossed to be able to retrive the import rate http://www.ebay.com/itm/MP-Select-Mini-3D-Printer-/391464642819
Not in spain… There is a way any EU country to get this but without paying lots of import taxes or whatever?
So $327 all up from ebay. AFAIK the VAT is only reclaimable on business purchases, not private purchases.
OK. Stupid question time. We all know what happens when you put styrofoam in acetone: It melts into a gloppy mess. Can I press that gloppy mess of styrene through a die to make printing filament?
You might be able to, but I don’t think I could. Give it a try and report back?
Very nice and informative writeup.
Seriously, is there a way to get one at a reasonable price in europe? You can only get directly to monoprice with an horrible deliver price and the doubt if you will have even more in taxes, or by ebay that a more reasonable deliver price but still expensive and lots of taxes
We need an EU agent!
Looks like they already sold every one again… Someone knows where to looks for the unbranded one or something? Looks like a mix of the Malyan M200 with the extruder of the Infitary that apears in the post
http://wiki.malyansys.com/doku.php
The wiki seems to indicate the M200 has a marlin based firmware… though it may just mean that it is compatible with the same command set.
Thanks, Hackaday. Monoprice is sold out of these printers. HaD Effect! I should put in an order anyway so I can get one when they’re back in stock.
Still not giving up on my larger, extra rigid and flex-free FDM printer with all ballscrew drive. If the firmware on this cheap one gets hacked/replaced, the electronics could be transplanted to larger printers.
Is anyone know this printer already support WIFI? Someone have tested wifi print though Repetier-host.
Jonathan,
Out of the box, it doesn’t support WiFi, but if you update the firmware (available from Malyan), it will enable the WiFi
Didn’t see this one on banggood when I tried a quick search. There are others though for slightly more, but no idea how good they are. That’s the problem with 3D printers now, you can’t see the forest for the trees.
Any thoughts on the M3D printer? (https://printm3d.com/themicro/) for the 350 price point its not bad. Im looking for a decent one and the ones you went over seem pretty good. Id be mostly printing custom lego parts for trucks and other things.
@dragonskullinc Do not buy this printer.Maintenance is a pain in the A with the custom motors and frame.Also the extrusion rate and print speed is super slow.The design has inherent flaws which adds to the frustration.
Brian,
You mentioned that printing from the micro SD card means “you need to sneakernet files between a computer and the printer.” I discovered that Repetier-Host has a function that allows you to upload to the printer’s SD card via USB, so you don’t have to move the card to your computer and back. I upload my gcode file, disconnect my PC, and print from the SD card.
Pretty much all hosts ( repetier, octoprint, pronterface, simplify ) and firmwares ( marlin, repetier, smoothie, etc ) support uploading to the SD card. It’s part of the standard Reprap protocol. Smoothie will even allow you to do that over the network …
Great review.It got me thinking about the costs the chinese sweatshops work for in producing these things.(assuming it is being produced by Malyan ).One thing I have noticed from my previous MonoPrice purchases of chinese makes is that Monoprice does have stringent QC procedures in place which means you might see die cast metal/press cut metal /injection molded nylon in places where the chinese use cheap plastic polypropylene moldings.Also shipping parts and replacements back and forth to Monoprice in Los Angeles is way cheaper than following up with the chinese maker in downtown Shanghai.
Btw,Did you finally fit it with the E3D ?
It’s back in stock
Today only, use the code “CRAZY” to get a $40 discount on this printer. That makes it $159 which is impulse purchase territory.
sold out
Great review, Thanks. I recently purchased one. Do you know what driver to choose in replicatorG ?It works fine in Cura.
It’s at Jet.com Opt out of free returns, use a debit card and (here’s the catch) it has to be your first time ordering to use the TRIPLE15 discount code for $30 off. Shipping is free.
https://jet.com/product/MP-Select-Mini-3D-Printer/6aacb19912cd471b9a4bfa697da6cc24
Do you have the file for that piece you said to print RIGHT NOW?
Why has no one mentioned the unpopulated Serial Header next to the STM32? The datasheet is pretty helpful, with 3 UARTS. The developers have even indicated that they will eventually release the firmware as open source, but are currently using several Non-free Packaged. It relies heavily on GRBL and Marlin code. The Smoothieboard looks like it also might share some fundamental similarities and ideas on how you could potentially write some firmware fro the STM32. The Smoothieboard being a bit more Robust and faster though, and luckily more Opensource friendly. Makes me wonder what we can discover about the MP Select Mini, maybe dump the flash?
I’ve started a group for owners of the monoprice mini 3d printer. We can swap ideas, mods and try to solve problems. Join! https://www.facebook.com/groups/1830689443829526/
(this article was excellent)
Hi Susan –
billbradford posted that there’s already one which was started a few months ago, and it’s about 1,500 strong. I’ve got my printer on the way and just joined; the participation looks looks positive, check it out!
https://www.facebook.com/groups/1717306548519045/
Hobbyking is promised to make this printer available from eu warehouse from November / December. I was wondering how many of you would be interested in this opportunity, because if everybody leaves a comment under the product, demanding its earlier availability, maybe we can pressure them to make it available sooner: http://www.hobbyking.com/hobbyking/store/__103391__Malyan_M200_Desktop_3D_printer_US_Plug_.html
(This is not intended to be an ad, but so far it is harder (and more expensive) to get this 3d printer in the eu than in the us, because of the higher price, shipping cost and customs)
This Printer is available in the Hobbyking EU Warehouse(and UK Warehouse) under the name “Malyan M200”. It sells very fast and stock is already low(only 10 left at this moment in the EU Warehouse). Grab one if you want before they are sold out as its unlikely that they will be restocked before christmas 2016(that is said in the comments by hobbyking staff). The printer is sold out in the international warehouse(china) already.
Don’t print the hot end adapter first. Print extra arms for the extruder. They give you 2 of them, the spring on the extruder will brake them very fast so print extra arms. i used PETG with 100% infill, .4 layer hieight, .4 shell, Raft, 15 print speed, 95% flow. the link below is the arm
http://www.thingiverse.com/thing:1743385
I have tried a few times to get the wifi activated but no luck. Have they took it out of the later ones
Power supply SUCKS and so does Monoprice customer service. Monoprice is clueless when it comes to support. If you are going to purchase, buy from someone else!
Hi there.
Great thread. I just bought my printer (not used it yet) and wanted to ask about the PEI plate/tape which is recommended in the review. Can anyone tell me if this is still considered a good idea? And any instructions on how to apply it?