Looking for a quick DIY project to separate yourself from the crowd at your next business function or maker expo? Take a leaf out of [Pete Prodoehl’s] book and make your own name tag complete with blinking LED!
Minimalist, yet flashy (sorry!), this quick project can be completed inside a few hours with few resources, and is a great way to display your DIY handiwork.
Laying out the basic design in Inkspace and exporting it as a DXF file, [Prodoehl] opened it up in Silhouette Studio so a vinyl template could be cut and then pasted to a name tag-sized copper board he had on hand. The cutout served handily during the 75 minute etching process — he used a mixture of hydrogen peroxide, vinegar and salt — and after a quick coat of Liquid Tin, he was ready to start soldering.
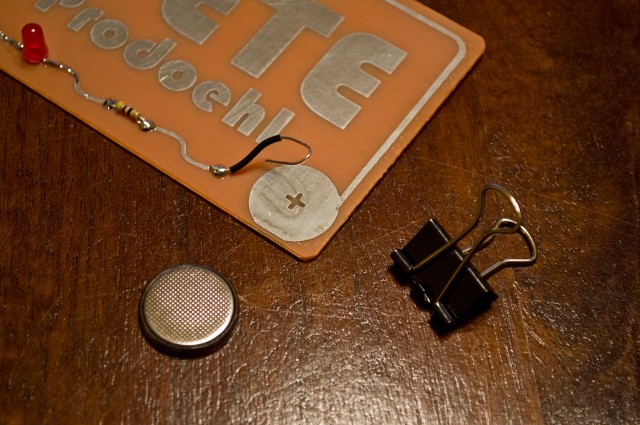
Lacking a small enough drill, [Prodoehl] improvised by simply soldering a pulsing red LED and resistor to the name tag’s surface, which you can barely see — the mark of an experienced maker! A binder clip holds the CR2032 battery in place along with a short wire to complete the circuit. Drilling a hole and adding a name tag clip completed the project in short order.
While we’ve seen some really complex name tags before on Hackaday, the elegant simplicity of [Pete Prodoehl’s] design is a great way for new and experienced makers to show off their skills.
[via RasterWeb]


I couldn’t figure out the circuit until I realized it’s an already-blinking LED.
Do you need a resistor for those? I thought it was built-in to the LED’s flasher chip. Not that it’ll stop the thing from working. Flashing LED wired to a battery was the first project I made for someone to use, as a kid, fake “alarm” for my grandparents’ caravan. Ran off 4 C batteries so lasted for months.
Good point. I just looked up a few blinking LED datasheets, and none of them would need a current-limiting resistor with the 3.0V CR2032 cell used here. So, this attempt at minimalism is a fail.
Thanks for pointing out my failure! The name tag is derived from a Learn to Solder kit/activity I did, and when I taught people about it I went through Ohm’s law I mentioned how you could get away with using no resistor for the circuit, but we used them as it gave one more thing to solder in place, and covered how different LEDs require different resistors. Also, since I wanted this to be a mix of art and electronics, I thought adding a resistor would be a good idea.
Great way to also evaluate someone’s soldering skills. ;)
A great one.
what a fantastic project. I would never have thought of that one. Keep up the good work!
It’s Snark Week on HaD!
That, or it’s HAD opposite-day. It is a bit… erm… unsophisticated, compared to some of the works of genius like the ECG card.
No attempt at sophistication here… just learning and trying new things.
You’ll be a walking red light district!
If you used a blue LED, it could be even more minimalist by ditching the resistor.
Actually for the Learn to Solder activity I did (which this is based one) we used a 2.2 ohm resistor for the blue LED. Yes, that’s almost zero, but it let me discuss Ohm’s law with people who had no prior knowledge of electronics. (And gave them one more thing to solder in place.)
I would have made the name part of the circuit by writing the name in cursive but still a cute little idea.
Yes! I did think about that, but I did this as a quick experiment. Hopefully future attempts can incorporate the name in the circuit.
This would go especially awesome with the carbon fiber/kevlar DIY PCBs That Sparkfun did not too long ago. https://www.sparkfun.com/news/2116