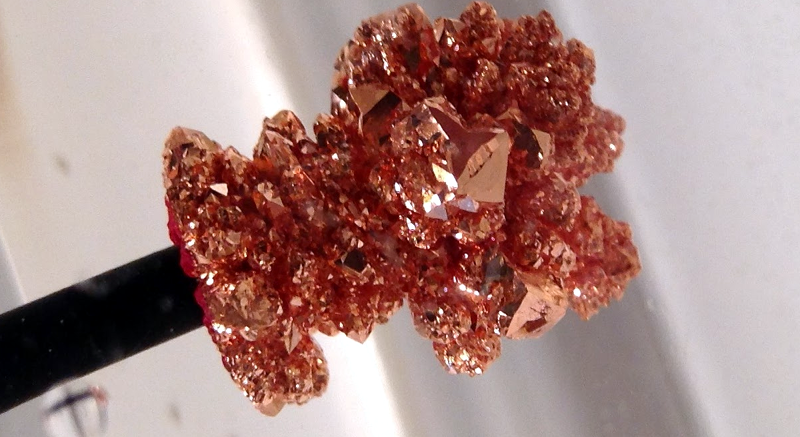
One of the staples of kitchen chemistry for kids is making sugar crystals or rock candy. Why not? It is educational and it tastes good, too. [Science with Screens] has a different kind of crystal in mind: copper crystals. You can see the result in the video below.
To grow pure metal crystals, he used copper wire and copper sulfate. He also used a special regulated power supply to create a low voltage to control the current used to form the crystal. The current needed to be no more than 10mA, and an LM317 holds the voltage constant. However, that regulator only goes as low as 1.25V, so diodes cut a volt off the output.
It took six weeks to grow the crystal. It looked great until exposed to air. To restore the shine, he dipped the crystal in vinegar and then sealed the crystal in mineral oil.
This isn’t the first time we’ve looked at crystal growth. We’ve looked at other copper science that doesn’t involve crystals, too.
Thanks to [David] for the tip.


That looks much better than the previous examples! Now I do want to try this out.
Time to start sorting my pennies.
Excellent time-lapse BTW.
Make a lamp outta dis plz. :D
So would one simply substitute the copper pennies for the copper sulfate or does the copper have to be in solution?
I would drill 2 holes through each coin and try using them at the anode. You could create the copper sulfate solution using copper pennies and sulfuric acid but that’s not what I would try myself.
U.S. one-cent pieces from 1962-1982 are about 95% copper.
I want to have several experiments running concurrently. A few with pure copper wire and a few with the wire wrapped thru several pennies.
You still would need the sulfate solution.
Thx! Also, I see that big box hardware stores sell 2 lbs of “Zep Root Killer” (copper sulfate) for about $13. :-)
If one electrode is sacrificial you only need enough of a suitable electrolyte to allow the metal ions to transfer across the solution an onto the other electrode. N.B. What the linked pages mentions about current and voltage levels, that is very important. However you may want also to experiment with ramping up the current over the length of the entire run to see if you can control the fractal dimension of the final deposit.
amazing
The Lm317 (or any other voltage regulator) can easily be used to create a constant current source. But so can a transistor with one resistor.
Nice crystals.
Side note: What he need is a current source not a voltage source and it is very esay to do with a LM317 he only need a resistor between out and adjust and take the output at the jouncion of adjust and resistor.
Isource = 1.25/R
REF: http://diyaudioprojects.com/Technical/Current-Regulator/
All the comments on using the LM317 as a current source are valid, but recall the LM317 requires a minimum current output to regulate properly. This is typically 3.5mA, but it can be as high as 10mA, which is the target current.
A simpler method that would work well in this application is to use resistive stabilization. This is a voltage source in series with a resistor to stabilize the current. For example, a 12V supply from a PC and a 1,200 Ohm resistor would deliver 10mA into a short crcuit. The copper sulphate cell is going to be a low resistance, so the current should be fairly close to 10 mA and remain constant over the duration.
I have a simple solution for that. A parallel led + resistor large enough to draw 10mA, keeping the regulator stable, while still providing a constant current. http://electronics.stackexchange.com/a/211765/17178
The result looks quite nice, but please remember that copper sulfate is higly toxic to microorganisms (according to local wikipedia), so dispose leftovers correctly and don’t throw it in the sink.
If you are on septic. People on city don’t have a lot to be concerned with, it dilutes out pretty quickly before it even makes it to the treatment facility.
Other than bringing it to a hazardous waste site, is there another method to dispose of copper sulfate? Maybe a chemical reaction?
Evaporate the water & throw the residue in the garbage or if you’re on municipal sewage, flush it down the drain.
At the hobbyist scale it won’t cause any issues for a municipal landfill/sewage treatment.
http://www.ehow.com/how_7810008_dispose-copper-sulfate.html
You use it to make Grapes and Roses don’t catch FRUIT and LEAF ROT!
once you’ve sucked out the copper I wonder if whats left is hazardous?
Even before then it’s not particularly hazardous. Not great for the environment or your koi pond but you’re not gonna create a superfund site if you spill some in your backyard.
Once you get most of the copper out (assuming you use the same solution) all you’ve got is some particularly hard water high in chloride & sulfate. Still not great for fish & invertebrates though due to residual copper.
Actually copper sulphate is used in koi ponds and aquariums to handle algae problems.
Koi & trout in particular are known to have sensitivities to copper so its use is ill advised without special attention to the rest of the water chemistry. Low alkalinity can exacerbate its effects.
And to prevent blight on tomatoes. It’s even considered ok for organic cultivation.
There is copper sulphate in Miracle Grown… throw it in the garden!
a few years ago, I was, umm, “walking” near a reservoir (definitely poaching…) and I saw a couple of water department workers in a large flat bottom boat, slowly motoring along.
They had a huge pile of copper sulphate in the boat and were throwing shovelfuls across the surface of the water.
And this kids, is how they control algae!
but yeah, copper in this form is really toxic to plant life and takes decades to leave.
Just ask the folks down stream of the oc’teddy mine in West Irian or on Bouganville Island…
Are there other metals can i do this with?
maybe, copper sulfate is probably the easiest salt to get and the least poisonous to work with.
you could try tin, lead, arsenic salts
Every metal. In theory.
This is in essence how the Hall-Héroult process works to refine aluminum.
Worth pointing out that Aluminium cannot be plated from water. Arsenic probably not, the chemists can argue if it’s a metal or not. Magnesium, titanium, not. Anything that’s a better reducing agent than hydrogen will result in hydrogen. Anything that isn’t a good conductor.
Iron and Zinc might be good ones to try. I made copper crystals a long time ago, the more dilute the solution and the higher the cell voltage the more treeing is produced. My crystals were tiny, I used an unrelated supply from some solar cells and a resistor.
Might try nickel too. We did some electroplating back in 8th grade, used copper sulphate and nickel sulphate if I correctly remember 30 years ago.
Nickel salts are nastier than most people would guess and a lot of people have a nickel allergy. Probably a better plan than lead, but maybe not the best to start with.
Now just electroplate the copper crystal with a tiny bit of gold and impress all your friends with your wealth.
Haha I love that idea! I would like Chrome-plated crystals if it’s possible.
You can do it electroless, but you need a Nickel layer in between. Like the chemical NiAu surface of PCBs. Otherwise the Gold will diffuse into the Copper.
On another note, for the sake of reproducibility, anyone experimenting with electrochemistry should really start reporting numbers in /current density/ (i.e. mA/mm^2). Many funky electrochemical effects (especially things like surface morphology or how nice the crystal grows) are going to be related to that figure. It’s a little funny here, as the current density goes down as the crystal grows larger, but this might be useful for the seeding part of the growth, which can be critical (for example, if someone tries to use a tinier piece of copper or expose less copper on their wire, they might not have the same results)
Nowhere near a chemist, here… Instead of copper-sulfate, could one use the remains of PCB-etchant after an etch? (I suppose there’re different types).
I can not comment on growing crytals, but it have used saturated etchant to copper plate with not too bad results.
I was wondering the same thing.
You might have to neutralize the acid or something. It should be relatively pure compared to using root killer, but I’ve never etched a PCB so… Make sure you don’t use Ferric Chloride?
If you did use ‘used etching solution’ the results most likely wouldn’t be repeatable or consistent.
https://en.wikipedia.org/wiki/Electrochemistry
https://en.wikipedia.org/wiki/Electrolyte
Lol. Yeah, I should know better than that. ;)
This depends on the type of etchant. I can not imagine it would be possible with FeCl3. With the copper chlotides from the HCl/H2O2 process it should be possible.
How about using an empty PCB board to grow the crystals onto ?
either one that has been stripped or better yet one not yet populated ?
You need some kind of conductive surface for plating. Coating it with some kind of conductive ink (graphite or silver-based) might work, but the result might be somewhat flaky.
I meant one with the vias still on it, just a copper wire to jumper the contacts
I’ve just started a similar experiment, inspired by this beautiful attempt at growing copper crystals. I devised a small PCB to monitor and control the current across the electrolyte (current source -> load -> shunt resistor -> diff amplifier -> ADC), the current and voltage are displayed via an LCD screen and a small DC motor coupled to a homemade propeller type agitator is driven three times a day to swirl the liquid (time base used: DS3231 module). That might be overkill but I wanted a well controlled experiment.
I produced the copper sulfate myself.
If I get good results I’ll try to contact the author of the experiment and will share with all of you.
Hi – cool stuff! I grew some oxide crystals long time ago, but never metals. I have some thought about the setup, maybe you can give some comments.
1.) some kind of change in seeding: If you change the polarity serveral times in the first day you may destroy some parasite seeds and get larger crystals. Small crystals dilute much faster due to the surface/volume ratio.
2.) usage of another electrolyte. I remember an old book with an experiment to measure the Faraday constant. The added some sulfuric acid (prevents some copper sulfate hydroxide componds, too) and ethanol. The recipe was designed to get closed shiny surfaces.
3.) Use an Arduino and a DAC in a feedback loop to control the current density during the crystal growth. larger crystals are equal to larger surfaces and you can increase the current density (mA/cm2)
What are your thoughts on that?
Frank
(Sry for my school english)