It’s well-known that buying Flash storage devices from cheap online retailers is fraught with danger. Stories abound of multi-gigabyte drives that turn out to be multi-megabyte ones engineered to falsely report their capacity. So when [Jason Gin] found a source of 64GB Toshiba eMMC chips for only $6 per device he bought a few, but was prepared for disappointment.
To test them, he decided to use an SD card interface. There are minor differences between eMMC and SD, but the interfaces are electrically the same and in most cases an SD controller will happily do business with an eMMC. It was not however an easy task to connect the two — these eMMCs were in BGA packages, hardly the easiest ones to work with. He resorted to dead-bug soldering the relevant interface wires to SD lines, and connecting up his computer.
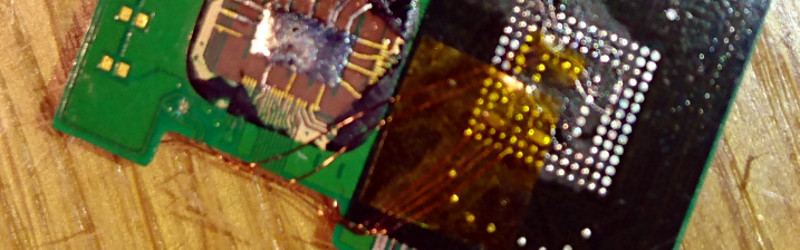
His first attempt was something of a failure, wiring the chip to the PCB of a cheap USB-to-SD adaptor. This did not put him off though, he followed it up by cracking open a very old 2GB SD card that contained a PCB instead of being potted, and soldering his eMMC in place of its Flash and controller. This even fit in the original SD housing, and met with success when plugged into more reliable SD card readers. He was thus able to confirm the capacity of his chips.
His blog post is worth a read for more than just the very fine soldering involved. He takes us through some of the intricacies of SD interfacing, as well as talking at length about the decoupling and termination required to make a reliable connection. We particularly like his use of an area of unconnected BGA balls as prototyping space for decouplers.
If you marvel at the exceptional dexterity required for hand BGA work, we’ve a couple of other treats for you. There is this TI infra-red sensor BGA soldered to a piece of stripboard, and this wafer-level chip package soldered to an SOIC prototyping board.


McGyver is so proud of you and will make that long due backup now!
Great now the original Intro music is playing in my head why did you say everyone else must suffer now…
https://www.youtube.com/watch?v=UKTNWI0eYJ4
It’s pretty much my duty to listen to this every time it’s posted, and then to follow it up with a binge on netflix once I get home.
now you’ve done it, now i’m not gonna get anything done tonight. jeeze thanks a lot haha
I need to get these important documents to the US embassy, all I have is some PCB material, some wires, Kapton tape and some loose eMMC memory chips in my pocket. Lucky I have my lighter and paper clip as a soldering iron.
This does not work in most cases, and you’ll get an error 22 on Linux. Most eMMC are 1.8v, so you need a voltage level converter.
The voltage is more or less predictable coming in. Smd resistor or two and maybe a cap if it’s noisy.
Soldering deadbug to tiny things requires a tiny, hand turned, worm drive plotter; made from parts of old floppy drives; with the handles geared down, for extra precision. A jig above and below for soldering and enamelled copper wire. I shake far too much, struggling to solder dip, for any length of time, let alone smd or ball array.
I presume you are referring to yourself with the following: “Soldering deadbug to tiny things requires a tiny, hand turned, worm drive plotter; ma………” based on ” I shake far too much, struggling to….”
eMMC cards are easy (for myself amongst others) to solder deadbug style compared to some generic 16Mbit 8-ball BGA chip as part of some (easy to circumvent) DRM/obsoletion mechanism.
That contraption sounds interesting. Any pics/links to it ? I´m really interested in the concept/idea. Thanks..
Just read the source article and learnt something new…
I had always thought the eMMC cards can only be read with an MMC host over 4 pairs of LVDS connected data lines.
I didn’t know they have SD-MMC capabilities built in.
I first read up on the MMC protocol based on a mechanical HDD found in an Archos 5 (Gen6).
I then looked into eMMC cards and gave up.
I have AFAIK 2*64GB cards and a 32GB at work in an assorted salvaged IC bag. Now I know more, time to put them to use I suppose.
The eMMC interface doesn’t use LVDS signaling, just single-ended serial or 4/8 bit parallel. The new UFS standard uses LVDS and so does SD UHS-II.
The MMC protocol you read about before refers to the CE-ATA interface, essentially ATA-over-MMC. Haven’t tried using one in a standard SD/MMC interface and can’t find a CE-ATA HDD for cheap online.