I work a lot with high voltages and others frequently replicate my projects, so I often get asked “What voltage is needed?”. That means I need to be able to measure high voltages. Here’s how I do it using a Fluke high voltage probe as well as my own homemade probe. And what if you don’t have a probe? I have a solution for that too.
How Long Is Your Spark?
The simplest way to measure high voltage is by spark length. If your circuit has a spark gap then when a spark occurs, that’s a short-circuit, dumping all your built up charge. When your spark gap is at the maximum distance at which you get a spark then just before the spark happens is when you have your maximum voltage. During the spark the voltage rapidly goes to zero and depending on your circuit it may start building up again. The voltage before the spark occurred is related to the spark length, which is also the spark gap width.
The oscilloscope photo below shows this changing voltage. This method is good for a rough estimate. I’ll talk about doing more precise measurements when I talk about high voltage probes further down.
But it’s not quite so simple. The shape of the electrodes plays a big part, as does the pressure and temperature of whatever is in the gap, usually air. For flat electrodes, or spherical electrodes whose diameter is significantly greater than the gap size, in air at 25C (77F), the following formula can be used:
voltage (kV) = 3 x pressure x spark length + 1.3√spark length
The pressure is in units of atmospheres and the spark length is in millimeters. Most hackers work at atmospheric pressure which is 1 atm, so that can be left out of the formula. Also, for a 10mm spark gap, for example, taking the square root of 10mm and multiplying by 1.3 means you’re adding an insignificant 4.1. And so the formula is usually simplified to just:
voltage (kV) = 3 x spark length (in mm)
or for centimeters:
voltage (kV) = 30 x spark length (in cm)
That’s just another way of saying that there’s 30kV/cm. For inches, the formula is:
voltage (kV) = 76.2 x spark length (in inches)voltage (kV) = 11.8 x spark length (in inches)
In the photos above, the measured voltage is 17kV. The spark gap width (i.e. the spark length) is measured as just under 5mm. If we apply the formula for a 5mm spark gap, we get 3 x 5mm = 15kV. The larger the spheres, the closer the measurement should match the formula, for a certain voltage range, but more on that below.
However, if you use sharper electrodes such as needles or rods, then at sufficient voltages the electric field between the electrodes will be less uniform and in places will be strong enough to ionize some of the air in the gap. That essentially creates a high resistance short-circuit which means your voltage will be lowered. The formula above will no longer apply. In that case you can try looking up your spark length and electrode configuration in a chart.
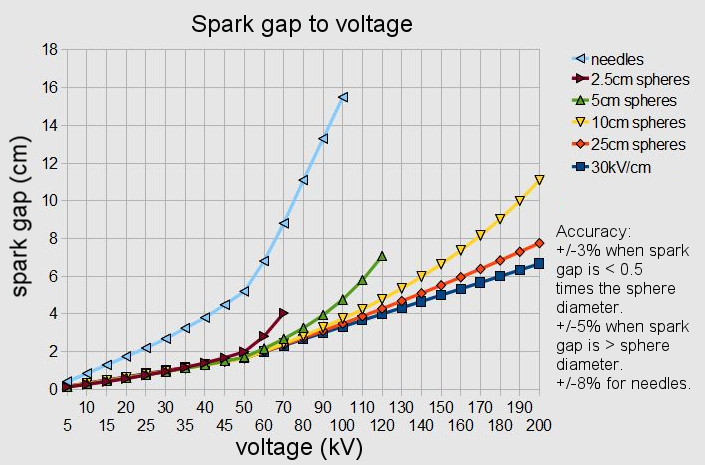
The above chart summarizes all of this. The bottom line in dark blue is the line according to the formula (essentially 30kV/cm):
voltage (kV) = 30 x spark length (in cm)
That formula defines a linear relationship between spark length and voltage. It looks like there’s a bend upward at 50kV but that’s because the voltage scale below 50kV increments by 5 and above 50kV it increments by 10. Above that is the real data. As you can see, needle electrodes follow the formula the least. The larger the sphere diameter, the higher the voltage they get to before they no longer closely follow the 30kV/cm line. Most of my work these days is below 30kV, though my electrodes are rarely big spheres, as is the case for most hackers. That is unless you’re working with Van de Graaff generators, but even then usually only the dome is spherical and the other electrode isn’t.
Using A Fluke High Voltage Probe
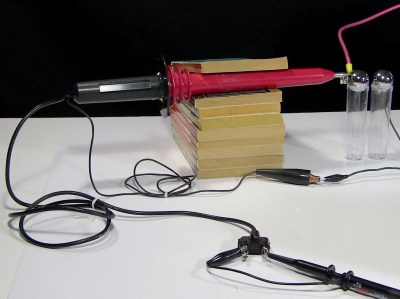
For more precise measurements I use a Fluke 80K-40 high voltage probe. This one is designed for use from 1kV to 40kV DC, with accuracy varying from 1% to 2% depending on the temperature, and not including the accuracy of the meter. For AC it’s designed for peak AC, 20kV RMS and gives an accuracy at 60Hz of +/-5%. The input resistance is 1000MΩ. It’s for use with a 10MΩ +/-1.0% voltmeter, or oscilloscope as in the photos above. Meters with other impedances can be used with the help of an external shunt or a correction factor, all of which is described in the probe’s documentation.
When making the measurement, take the reading on the meter or oscilloscope and multiply it by 1000. That’s how I went from the 17V shown on the scope to 17kV in the example above.
Here are two more photos of where I’ve used the Fluke probe. One is with a 10MΩ FET analog meter for measuring the voltage across a smoke precipitator. The other is with the analog meter again but I’m holding the probe in my hand. I’m measuring the voltage across a lifter that’s being provided by a PC monitor power supply.
A Homemade High Voltage Probe
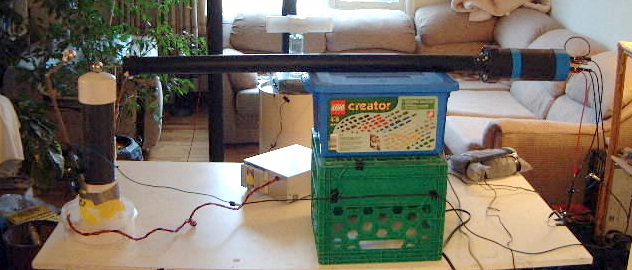
The Fluke is good for up to 40kV DC but I’ve had to measure higher and so I made my own probe. The highest I’ve used it for is 75kV DC, though it’s designed for a maximum of 150V at the meter, which equates to an input voltage of 150kV.
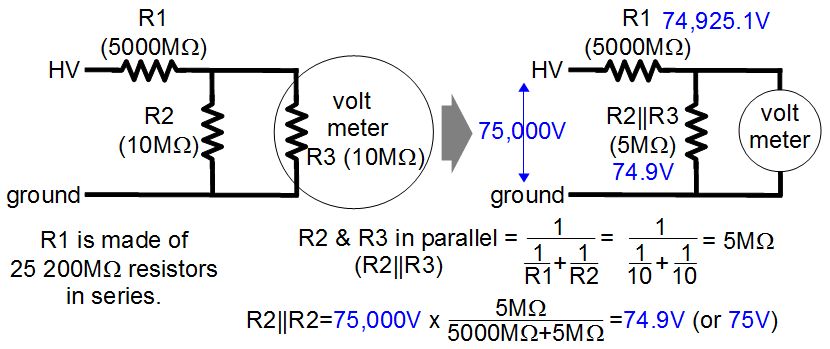
The above is how it was designed. R1 has a very high resistance compared to the meter’s impedance of 10MΩ (R3) and the resistor that the meter is measuring across, also 10MΩ (R2). It can be done without R2 but that would put the meter in danger of having a high voltage across it.
R2 and R3 are two resistors in parallel and combined can be counted as a single 5MΩ resistor as shown in the first formula in the diagram. Together they’re usually labelled as R2||R3. The schematic on the right is a simplified way of looking at the circuit with R3 pulled out of the meter and combined with R2.
R1 and R2||R3 form a voltage divider. The second formula in the diagram shows how the voltage across R2||R3 is calculated. Notice that the result, 74.9V is almost 1/1000th of 75,000V, the voltage being measured. It’s only 0.1% off, which is smaller than the meter accuracy. That means we can say that to get the actual voltage you simply multiply the measured voltage by 1000 (75V x 1000 = 75,000V).
The value of R1 was selected so that it wouldn’t load down the circuit being measured. High voltage circuits often don’t have much spare current for measuring purposes. R1 was also selected such that there wouldn’t be a problem with leakage over its surface. In my case R1 is made up of 25 smaller resistors and so with the voltage divided among them, I figured there’d be no leakage problem. R1 was lastly selected so that R2||R3 would have a useful voltage range across it. 3000V is measured as 3V, 20,000V is measured as 20V, and 75,000V is measured as 75V, and so on, which are reasonable values for a meter.
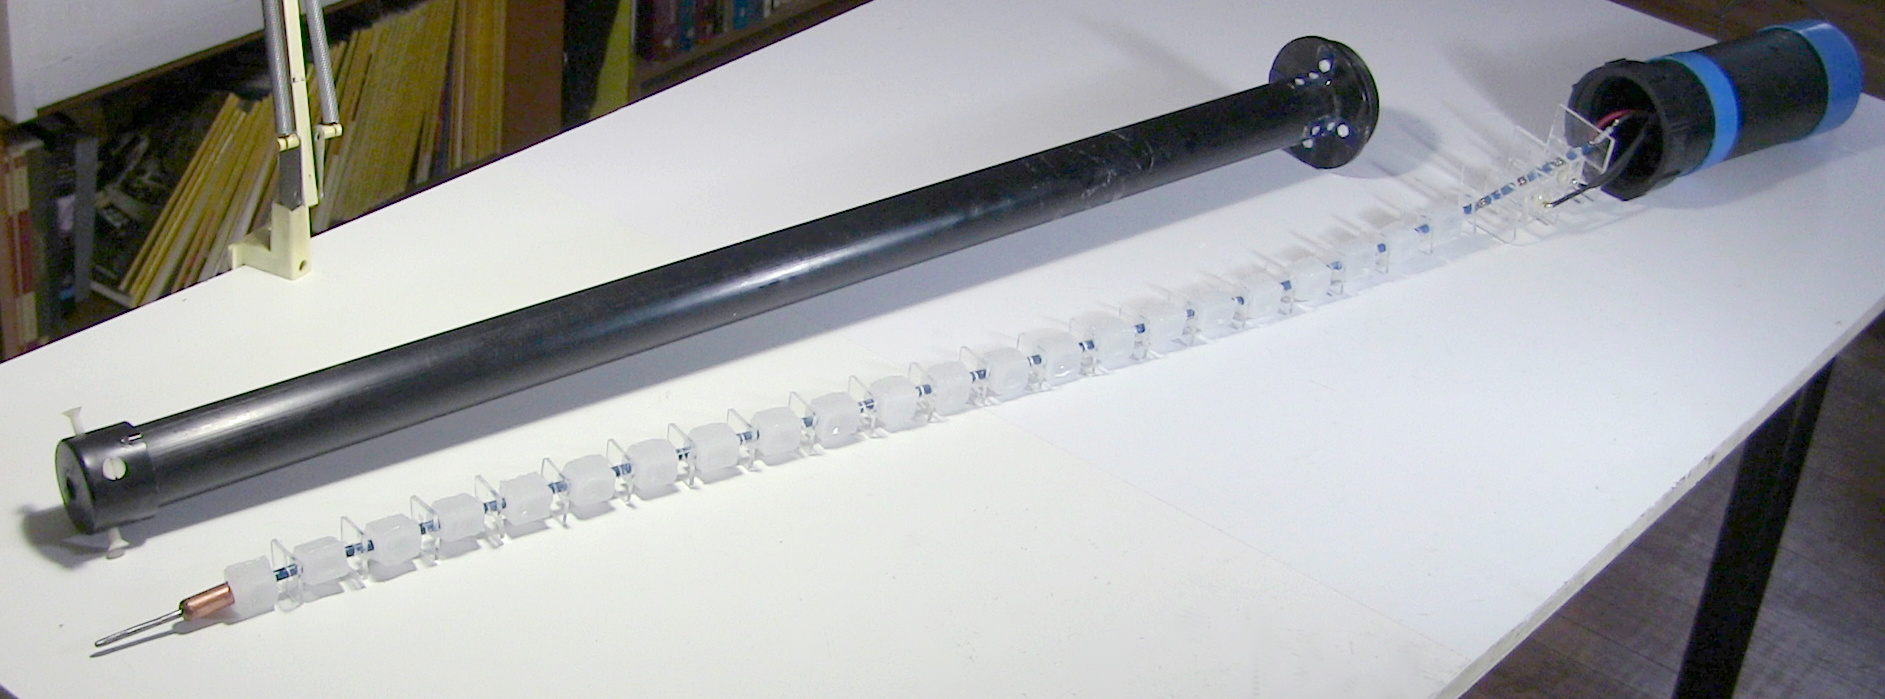
For R1 I purchased 25 200MΩ high voltage resistors (MX440-200M, 1%, 11kV) from Caddock and connected them in series. In hindsight, I should have gone with higher resistance but longer resistors which would have made for a shorter probe.
The resistors were all soldered together with big, round solder bulbs to avoid sharp points which can cause losses due to ionization. Then each connection was encased in a mold and paraffin wax poured in to further minimize losses.
For added protection for the meter from high voltage I added two spark gaps inside in case some of the resistors shorted. The calculations for that are very involved so I won’t go through them here. From the photo you can see they consist of rounded solder bulbs, spaced a precise distance apart from the metal end caps of two resistors.
Conclusion
And that’s how I measure high voltage. I’d be very curious how you’ve done it, what probes you’d recommend and what your experience has been. Also, have you done any AC voltage measurements? That’s something I haven’t done. Measuring the voltage of a Tesla coil comes to mind. Let us know in the comments below.


Fluke reminds me of the one I use to use on TVs. Except it had insulating plates going down it’s length.
Just a note: the 3KV per mm does not work well with AC high voltage, especially at radio frequencies. Also this is not a good method for determining the voltage output of intermittent/pulse devices such as ignition coils, flybacks and tesla coils http://www.extremeelectronics.co.uk/spark-growth-teslacoils/
That’s a good point. I stated that the probes are for DC and low frequency AC only, but that applies to the spark length trick too. As I said in the summary, I haven’t done AC voltage measurements, I’ve mostly done HV DC, but I think what you say on that page should apply to the Tesla coil’s primary spark gap too. The air in the gap would still be fairly ionized before the next spark occurs, lowering the voltage needed for that next spark. I suspect that’s why Tesla coil builders go through great lengths to have airflow around and through the gap.
Yes, the airflow is to remove the hot ionized plasma so the spark has to start again on every cycle. It is that burst of current that causes a spark gap oscillator to oscillate.
Am I being stupid, or is the inches formula incorrect here? 1 inch = 2.54cm. A spark at 2.54cm = 2.54 x 30 = 76.2kV. Therefore surely voltage (kV) = 76.2 x spark length (in inches).
Nope, since 1 inch is longer than 1 cm, you have to make the other side of the multiplication smaller to arrive at the same voltage value.
[voltage] = [30] x [length in cm]
[voltage] = [30/2.54] x [length in cm * 2.54]
[voltage] = [11.81] x [length in inches]
Clearly a conceptual error by the author and most of these responders. You are saying 1cm gap is 30kV and 1 inch, which is 2.5 times greater, is 11.8kV.
Stefan Dzisiewski-S (@stefandz) is obviously correct. (Or I am wrong, which would make twice this year, which is highly unlikely!)
You’ve got your math reversed there. kV = 30 x GAPcm = 30 x (GAPin / 2.54) = 30 / 2.54 x GAPin = 11.8 x GAPin
1 in = 2.54 cm, not the other way around.
I guess I didn’t write that out properly. You’re trying to solve this – Y x GAPin = 30 x GAPcm. Since GAPin = GAPcm / 2.54, then Y x (GAPcm / 2.54) = 30 x GAPcm. Therefore, Y x GAPcm = (30 / 2.54) x GAPcm, and through elimination Y = 11.8
man I can’t write what I’m thinking properly today. Replace all my GAPcm / 2.54 up there with GAPcm x 2.54… so GAPin = GAPcm x 2.54, Y x CAPin = 30 x CAPcm, this Y x GAPcm x 2.54 = 30 x GAPcm, thus Y x GAPcm = (30 / 2.54) x GAPcm, and Y = 11.8. Good lord.
“GAPin = GAPcm x 2.54” more coffee!
I still maintain my point – GAPcm != GAPin / 2.54. If the gap is 1 inch, your formula implies that the gap in cm is 1/2.54 = 0.39 cm, which is clearly not true.
Agreed, I wrote that totally wrong. My coffee hasn’t kicked in. My point was to prove that Mr Dufresne was correct, and my flailing about wasn’t really helping much. I got there in the end if you read my many replies…
Simply put, inches are longer than cm, thus the necessary multiplier is smaller.
I have re-read your replies – but still think the outcome is incorrect. You’re right in saying that inches are longer than cm – totally agree. Let’s say 10 cm = 4 inches (not quite right, but keeps the maths simple). These distances must have the same breakdown voltage, which implies that A x 10 = B x 4. It can then be easily seen that A (the multiplier for cm) must be smaller than B the multiplier for inches. Inches are bigger, which means you have fewer of them (a smaller number for the same measurement). To make the end product the same (the breakdown voltage) your multiplier must be larger.
If you work through the maths to calculate the breakdown voltage for a 1 inch gap:
Using the cm formula – voltage (kV) = 30 x spark length (in cm), 1 inch = 2.54 cm, voltage (kV) = 30 x 2.54 = 76.2kV
Using the inch formula given (which I claim is incorrect) – voltage (kV) = 11.8 x spark length (in inches), voltage (kV) = 11.8 x 1 = 11.8kV
Clearly, these answers cannot both be correct. I feel like we’ve strayed a long way from the original (and excellent) tips given in the article. However, correcting the formula in the article would help make it useful for a wider range of people.
Centimeters are longer than Millimeters, so the needed multiplier is larger – and it is.
Inches are longer than Centimeters so the needed multiplier is larger – and it needs fixing.
Indeed, you’re correct as my caffeine-less raving earlier clearly showed (once you ferret out where my contortions were correct and where they flew off into la-la land). GAPin = GAPcm / 2.54 obviously, so solving for Y where Y * GAPin = 30 * GAPcm… Y * GAPcm / 2.54 = 30 x GAPcm, Y * GAPcm = 76.2 * GAPcm, Y = 76.2
I need to wake the hell up before I try to math.
You are correct. 76kV per inch is the generally accepted value for the dielectric breakdown of air.
@raelik
>>1 in = 2.54 cm, not the other way around.
What? NO!
2.54 cm = 1 in is exactly the same as saying 1 in = 2.54 cm.
@ Everyone else
kV = 30 * d(cm)
kV = 30 * 2.54 cm/in = 76.2 kV / in
kV = 76.2 * d(in)
You and Steven made the same mistake
kV = 30 * d(cm) = 30kV/cm
And yes 2.54 cm = 1 in but you can’t substitute 2.54 cm to get inches. You’ve made a logical error. 30kV/cm is not logically the same as kV = 30 * cm
In the second formula cm is not a variable you can substitute, it’s a unit on a variable, d.
kV = 30 * d(cm)
30kV in / 2.54 cm != 11.8 kV/in (I mean, mathematically it does but not in the real world) It equals 11.8 kV in / cm.
You have to multiply in order to cancel out cm.
30kV/cm * 2.54cm/in = 76.2kV cm / cm in = 76.2kV/in
kV = 76.2 * d(in)
Always do dimensional analysis!
Also use quick logical estimates. An inch is longer than a cm ==> kV/inch must be greater than kV/cm.
Fixed. Shame on me too since I’m such a huge fan of dimensional analysis. Thanks all. That should meet all our mental gymnastics requirements for the day. :)
Testing…
spark length = 10mm = 1cm = 0.3937in
3kV/mm x 10mm = 30kV
30kV/cm x 1cm = 30kV
76.2kV/in x 0.3937in = 30kV
For measuring high voltage, I use a random HV probe I got on the cheap from Ebay. It turned out to be a Heathkit 40Kv probe with an 1.1GΩ resistance, designed for use with a VTVM (11MΩ impedance). I just happen to have a couple of those lying around…
I love Tesla coils (:
My little one can pull arcs of almost two feet and happily light a strip light across the room.
I can’t wait until I have the finds to finish it’s bigger twelve foot high brother (: [ may also need to finish the triple grounded Faraday cage too. ]
I have used 1 M + 1 M + 100 K series string, and I connected the multimeter in parallel with 100 K. However my source could not supply enough current, so voltage would drop when measured. Clearly more resistance was needed. Your setup is much better.
http://i.imgur.com/KnnsVal.jpg
Important:
Most resistors have a significant voltage coefficient, particularly with a significant potential across them. It is possible to do this well but not as trivial as it appears here.
O
Does air humidity have an impact on the dielectric breakdown value?
why no mention of humidity for spark length???
a mate got a few dozen (!!) Barco studio monitors, in summer they were great, in winter they became a tad “worrying”, they would arc over every few minutes.
so true, …. also for cigarette smoke!
don’t smoke under half-million volt power lines during dry / crackley-whistley-buzzy weather!!!
I’m not sure about exhaled smoke, but I have seen high voltage lines arc to ground with a bushfire burning under them!
Water bombers are not allowed to drop anywhere near high voltage lines either.
First, great article.
But a note on the spark gap to voltage plot: “That formula defines a linear relationship between spark length and voltage. It looks like there’s a bend upward at 50kV but that’s because the voltage scale below 50kV increments by 5 and above 50kV it increments by 10. ”
Assuming that chart is excel based, use the x-y scatter and it will automatically space the data out properly. You may have used a line chart or something which sets each horizontal point out equidistant from the next. XY scatter is more appropriate for this. Best to not have to explain why a curve doesn’t look quite right.
Love all the tips here. A few notes from my previous experiences:
1. The spark gaps to protect the meter are a great idea / essential (especially if you end up with a failure where the return lead for the divider is not connected, causing the meter to float up to the voltage being measured – or as far as it can manage before something bad happens). If you don’t want to go through the hassle of making your own gaps, gas discharge tubes can be a very useful alternative.
2. Brass dome nuts are very useful if you’re creating a higher power load where connections are bolted as opposed to soldered. They are also a useful way to make an arc-down wand for discharging / checking something is safe before working on it – dome nut on the end of a piece of nylon rod with an earth cable / braid attached to the nut with a ring crimp.
3. If you’re looking for real precision in your divider bear in mind that most high voltage resistors have a voltage coefficient that kicks in well inside the rated voltage. More resistors run at a voltage further within their maximum rating = more linear over a wider input voltage range. Manufacturers don’t like talking about this (and some don’t even characterise it) but it’s often there and it’s measurable if you have a variable HT supply and a decent current meter.
4. (forgot this one, and it may be the most important!) all my designs have the safety earth (for the spark gaps) as a ring crimp connection – that way you can’t pull it out so easily if you’re being vigorous!
5. If you’re designing an HV system and are getting ticking (small, localised breakdown) a long acrylic tube makes a useful ear trumpet to help identify the offending bit of the circuit without getting your brain tickled. Obviously if you can see the arc this is less necessary…
6. If you’re getting corona discharge, lights off + lab coat over the head as a cowl can help you see the purplish glow. Don’t rely on your nose – you pretty soon get desensitised to the smell of ozone (over 15 minutes or so).
Great tips.
2. Cool. I use metal balls that I’ve tapped so that I can put a bolt into them for making the connections. I hadn’t thought of using brass dome nuts. http://hackaday.com/2016/06/15/wrangling-high-voltage/#jp-carousel-209541
5. Does the long acrylic tube help isolate the ticking so that you hear it only when the tube is pointing at the source? If so, that will be super useful since source of the the ticks can be hard to find sometimes, specially when it’s dangerous to get too close.
6. I’ve used darkness for that reason, but also sometimes when I want the corona but need to have it in specific places. I talked about that in the tips and tricks section of this article on flying lifters http://hackaday.com/2016/07/13/expanding-horizons-with-the-ion-propelled-lifter/.
Love the lifter!
Yup, the acrylic tube really helps to isolate things (if you’re really going for it an earplug in the “non-listening” ear helps a lot too). We used to use this a lot and you REALLY know when you’ve hit the right spot. Test it out on a spark gap which is just about ticking over and you’ll see what I mean. I think I used something like 20mm OD tubes with 2mm walls.
I usually run into the problem regulating the output of a proportional DC-DC converter at 1 to 3kV to within 0.1%. The high value resistor is the greatest contribution to error so I start out with Caddock USF300 series resistors with 0.01% tolerance and 5ppm/C drift. They are expensive though.
I understand very little of this but in the automotive world we use spark gap tool to measure the ability of an ignition coil to produce voltage. There are scales in KVs on the tool but not sure of the accuracy of the scale. but we are looking for the ability of the coil to produce a spark that is capable of jumping at least an inch when full charged and good battery voltage. Unfortunately pressure in the cylinder, fuel mixture all contribute to that same ability to fire the mixture within the cylinder, so not sure how 1 inch gap in the atmosphere translates into the same ability within the cylinder,
I am get a 7mm spark from a Van de Graaff generator globe, however when I measure the voltage with a high voltage probe I get around 4 kilovolts. Can you give me some idea of the mistakes I could be making? Which measurement would be more correct?
Thank You
Measuring using a spark gap width is more rough than with the probe. That’s because of the following… When a spark will occur is partly dependent on the shape of the electrodes on either side of the spark. The larger and rounder they are, the higher the voltage before a spark occurs. You can see that reflected in the chart in the article above. For example, for a 4 cm gap and 5 cm sphere’s as electrodes, you get 90kV whereas for a 4 cm gap and 25 cm sphere’s as electrodes you get 110kV. The shapes of the electrodes is a factor in the shape of the electric field between those electrodes and that electric field influences at what voltage the air will break down and spark.
To give an example on Wimshurst and Bonetti machines you typically see a ball pair on each electrode a say one inch ball with a small 1/2 inch ball on top. When trying to get long spark you typically point the smaller ball on the positive side up towards the large ball on the negative side, then you will get 1″ per 30kv which is slightly more than double the expected spark length for that voltage. So if the terminals on your spark gap are different sizes and the smaller one is positive you get substantially longer sparks. The same holds true with van de graaff generators if the top is negative output and you use a smaller ball grounded to discharge sparks from the larger ball you get longer sparks. Ball plane gaps have this effect too if the plane is negative and the ball positive. The longest sparks for a given voltage are with sharp needle points. Because of all this it’s a pain to accurately guess voltage with spark gaps, unless you understand all these factors. Another thing is in order to actually output the voltage a power supply is putting out, you need roughly one inch in diameter electrodes for every 100,000 volts, so 2″ for 200,000, 3″ for 300,000, so if you have a power supply that is putting out 300,000 volts but you only have half inch balls on the electrodes you will never get anywhere near 300,000 kv out. I see a lot of photos of people using crappy alligator clip wires for output of their high voltage generators and then claiming they have 300,000 kv or more coming out. I made this mistake myself. You need high voltage wire rated at the voltage you are putting out, or a lot will leak out of the wires, just because you see a 10 inch spark doesn’t mean you are getting anywhere near the voltage out you think you are!
Hi Steven
Not sure if this will be visible to all, and is a little off track.
I am trying to design a surge generator to give a large decaying sinusoid with 600V peak and 4kA short circuit current with 15.9kHz oscillation.
My design so far involves charging a large capacitance and rapidly discharging it through an inductor, but the switch connecting the capacitor to the inductor needs to briefly take about 20kA peak.
Essentially I need a very high power switch that goes short circuit when it sees 600Vdc across it, and can take an initial current of 20kA.
I thought of using a GDT but they are only rated for a few operations at such a high current so I thought perhaps a spark gap might do the job. Then I found your article on measuring voltage by spark gap distance. Your voltages are much larger than 600V, and your currents a lot lower, but can you advise if this is a sensible approach for a solution.
I had thought about manual switches but I am not sure if the arcing will cause an issue with the specific waveform I am trying to generate.
Any advice would be appreciated.
Hi. I tried to measure the HV node of a plasma tweeter, which uses a modulated power oscillator running at 27 MHz to drive a tesla coil and ionize the air in a confined space (the throat of a horn). I initially tried using a Tektronix 40kV high voltage probe, but I got a value of 3kV P-P. That seemed very low based on the diameter of the plasma, about 6mm. Before I found your site, I tried making a probe with 200 Meg HV resistors with a 1,000:1 ratio, and then a 1 Million:1 ratio, and both read low like the Tek probe.
In desperation, I tried measuring the maximum spark gap length using my homemade probe. I was able to confirm that the probe didn’t load the circuit too much by observing the intensity of the plasma in the speaker and seeing that it didn’t chance noticeably.
I got a maximum arc length of about 1cm, and then did a search for how to convert that to voltage and found your site. 30kV sounds reasonable, given the reliability with which the speaker is able to start and maintain a 6mm diameter ion cloud. Thanks for the tips.
Since you study spark gap. I built a device. I input 12vdc at under 1 amp throughout. I use an alpha source at the end of my anode. I spin a metal cathode plate in front of it coated with synthetic diamond bits. I get a sustained bright blue atmospheric plasma across a gap of 3mm. The plasma column does not cross directly but angles back towards the oncoming diamond bits. How is it forming plasma? Why does it go further than straight across? It starts as a spark with zero gap. As the gap is widened it turns into a plasma. Why? How?
Respected sir… Please clear my confusion ASAP. 🙏
It means when spark gap is at max distance, it gives minimum voltage to my lifter or ioncraft. And when spark gap is at minimum distance it gives maximum voltage to lifter….Because spark gap is a short circuit. Right sir?
Rarely is atmospheric pressure 1 Atm as barometric pressure and altitude both come into the picture…