If you remember old computer magazines (or browse them today), you’ll see that back in the late 1970s and early 1980s, you weren’t always sure what you were going to do with a computer. Games were a staple, but they weren’t very exciting. Visionaries talked about storing recipes, writing Christmas letters (to send via snail mail), and keeping home inventories. You probably don’t do any of those things with your computer today, unless you count e-mailing instead of sending Christmas cards. We think sometimes 3D printers fall into that category today. Sure, you want one. But what are you really going to do with it? Print keychains?
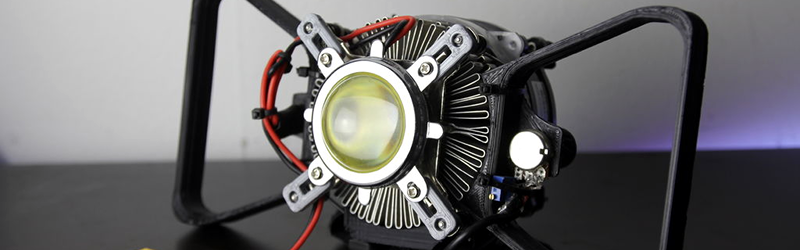
That’s why we always like seeing practical designs for 3D printed items. Like this 100W flashlight. The electronics part of the build is simple enough: a 100W LED module, an off-the-shelf driver board, plus an old PC cooler and some batteries. But the 3D printed parts makes it all come together and it looks great!
To put things in perspective, an old-fashioned flashlight (two D cells and an ordinary bulb) puts out about 15 or 20 lumens. A halogen focusing flashlight might put out over 200 lumens. An LED array like the one used here can put out 7,500 lumens!
This isn’t the first time we’ve seen this sort of flashlight. We’ve even seen them with water cooling. That last post, by the way, talks about the difference between more expensive LED modules and the cheaper ones, which might be useful if you are planning on using these for any kind of photography.


DIY LED lighting would be quite nice. Driving the LEDs is by far the simplest part, and there’s a TON of resources when it comes to that. There’s tons of ways to drive/automate them too… The two real problems I have are thermal management (custom heat sinks and such) and even worse: the light fixture part with fancy metal parts which cost a lot, and with the specialized light diffusion materials. This is also what ends up being the expensive part (not the LEDs nor the electronics).
The biggest trouble I find with LEDs is the poor CRI of the diodes. You need secondary phosphors a’la Philips L-Prize to get a halogen equivalent light. Otherwise it’s worse than the cheapest CFL bulbs with non-uniform hue and blue/yellow fringes. It makes paintings, photographs, models etc. look like crap because the patchy spectrum desaturates the colors and makes the hues indistinguishable from each other.
It’s always a shock for people when they see a painting I did under the halogen lights on my easel, and then they bring it home under their cheap LED/CHL bulbs and it looks like someone put a slightly grey-blue transparency sheet on top of the canvas and the depth effect (atmospheric haze emulated by difference in saturation) dissapears. You have to paint with that in mind and use only very distinct colors and a limited palette.
I have three “barrister’s bookshelves” as a mineral cabinet display. Halogens kept failing and Home Depot never had the same brand to replace the one with the corroded contacts. Even the smallest CFL’s were really way too bright. Now I have 15 ten watt white LED’s in series with a bridge rectifier off 110 volts. I’ve had a problem with some of them failing because I didn’t use the right heat sink grease but they look great,and run cooler than the other options. I suppose I could have sourced properly designed LED under-cabinet lights, but I built the whole thing for about $50.
Um…. 100% unrelated…. Good for you, now go have a cookie.
Hmm, this looks like a perfect opportunity to use some of the old stock intel coolers I have knocking about.
This is funny. Earlier today (well, actually yesterday) i was browsing aliexpress, saw how cheap these LED have become and was asking myself “do i have some old CPU cooler laying around?”. Wondering if i should buy some (smaller, not 100W) LED to tinker with…
I discovered the big CPU heatsink+fan setup as shown in the above torch build is overkill for the 50watt LED I have, look at the size of the salvaged heatsink+fan I paired with the 50watt LED in the link in my post below.
The DC-DC boost converter mounted to it appears to generate more heat than the LED, and the whole thing can run for long periods of time with nothing overheating, in fact I use it to discharge lipos down to 40% storage level faster than my Turnigy TQ4 charger can if I didn’t get to use them out in the field.
The heatsink is not oversized, because the conductance of the chip packaging is usually somewhat poor. The high C/W from the junction to the back of the chip, and then from the chip to the heatsink, means that when the heatsink feels “reasonably” hot, the junction is already at +90C and the lifespan and brightness of the diode are reduced considerably.
So the heatsink really should remain cool to the touch. Otherwise you have to de-rate the diode. The datasheet specified values only apply when the junction temperature is 25 C which is practically never.
For example http://www.luxeonstar.com/assets/downloads/DS64.pdf
That’s a 1 Watt LED (3 V ~350 mA)
“Typical thermal resistance junction to pad 10 degrees per Watt.”
Suppose the absolute efficiency is 25%. That means 750 mW of heat through the junction at the rated current and even with a heatsink at stone cold 20 C the internal temperature for the diode will be 7.5 degrees higher than ambient. Now if you have a chip with 50 of these diodes for a 50 Watt light, bolted to a good CPU cooler with a C/W of 0.2 when the fan is running, you get an additional 7.5 degrees for 15 degrees above ambient. If the fan is off, the C/W increases considerably.
Well, they are cheap but as usual, you get what you pay for… https://www.youtube.com/watch?v=NjKgPLeJ79Q
I need to print a case for mine, but I keep putting it off. https://www.youtube.com/watch?v=QoLgcA20ptM not as impressive as some of the other guys who have made kilowatt units.
Ooo! Dive light =automatic water cooling!
Actually, I still keep all of my recipes on a computer.
Me too, the card file box doesn’t balance too well on top of these newfangled flat screens so they’re back on top of the system unit again.
;-)
A for effort but there seems to be something missing…. where does the battery go? I can see the XT60 connector but nowhere for the battery to sit.
On a high power LED related theme, I built a 50watt LED setup that quickly & easily attaches under my CX-20 quadcopter, and built a microcontroller+mosfet circuit to switch on/off the light via the gimbal output so turning one of the aux knobs on the controller turns it on/off.
It’s quite amazing to put it 50-100 feet up and turn on the light – you get a big circle lit up on the ground, I tried to take footage but my sportcams suck a night.
Still, here’s some pics of the rig: https://www.rcgroups.com/forums/showpost.php?p=35525692&postcount=65701
If we start getting UFO reports from your neighborhood, we’ll know what’s up. Nicely done!
The light has a battery mounting plate that can hold different type of batteries. You can see the battery in the new pictures i just uploaded to the instructable. Did you use the standard “100w” led driver or did you make a boosting circuit yourself? Would be awesome to put one of these on the front of my 250 racer.
The new picture shows the battery placement nicely, I couldn’t quite see where it fit on the other pictures.
For my 50 watt LED I used a cheap Chinese DC-DC booster module, adjusting the voltage until the total current draw was around 50 watts, meaning the LED is receiving a little less due to the DC conversion efficiency.
I have thought about putting a 50 watt LED on my ebike for when going along unlit roads & cycle paths at night, which would also give me the ability to high-beam cars who don’t dip their lights, but my current light rig I made works well enough – 360 3mm LEDs, normally running with just 60 on for roads and switches & a high-beam button to turn on the rest, and that only uses about 10-12 watts with all of them lit.
A large array of 3mm LEDs were chosen because they have a nice smooth beamspread compared to higher wattage LEDs with collinators.
Here’s a nice design I saw… using batteries the designer already had for other uses: http://www.thingiverse.com/thing:841948
:| …. It reminds me of the Matrix of Leadership from Transformers. :D