High-Power LED + 3D Printer = Mega Flashlight

If you remember old computer magazines (or browse them today), you’ll see that back in the late 1970s and early 1980s, you weren’t always sure what you were going to do with a computer. Games were a staple, but they weren’t very exciting. Visionaries talked about storing recipes, writing Christmas letters (to send via snail mail), and keeping home inventories. You probably don’t do any of those things with your computer today, unless you count e-mailing instead of sending Christmas cards. We think sometimes 3D printers fall into that category today. Sure, you want one. But what are you really going to do with it? Print keychains?

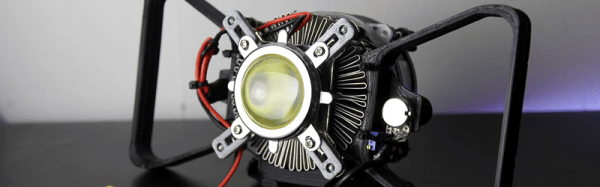
That’s why we always like seeing practical designs for 3D printed items. Like this 100W flashlight. The electronics part of the build is simple enough: a 100W LED module, an off-the-shelf driver board, plus an old PC cooler and some batteries. But the 3D printed parts makes it all come together and it looks great!

Continue reading “High-Power LED + 3D Printer = Mega Flashlight”

Breadboard Tetris Is Wire Artwork

RGB-module-breadboard-tetris

Look closely at the colored pixels on this pair of 8×8 RGB LED modules and you’ll be able to pick out some of the familiar shapes of Tetris pieces. It’s impressive that [Jianan Li] built his own color Tetris including the theme music, but look at this breadboard! The layout of his circuit is as equally impressive as the code he wrote to get the game up and running. It takes a fair amount of planning to get a circuit of this complexity to fit in the space he used, right?

There are two microcontrollers at work, each running the Arduino bootloader. The main chip is an ATmega328 which is responsible for monitoring the buttons and controlling game play. The other is an ATmega85. The eight pin chip listens to it’s bigger brother, playing the theme song when the game starts, and pausing or resuming to match the user input So is the next stop for this project playing Tetris on the side of a building?

Don’t miss the demo video after the break. We’ve also rolled in a video of his Arduino-based piano. It’s built on a breadboard that’s nearly as impressive as this. But what delights us is his skill at playing Pokemon themes on the two-octave tactile switch keyboard. Obviously those piano lessons his parents shelled out for really paid off!

Continue reading “Breadboard Tetris Is Wire Artwork”

Another Way To Look At Charlieplexing

Charlieplexing is a technique that allows you to drive a larger number of LEDs than wouldn’t be possible with the same number of I/O pins on a traditional multiplexed matrix. If we lost you there just think of it as lots of blinky lights connected to a small number of pins. It works by leveraging the one-way nature of a diode. Current will only flow through an LED in one direction so if you hook up your display in a clever way you can drive multiple LEDs from one I/O by switching the polarity of that pin between voltage and ground. [M.Rule] recently looked at using Charlieplexing with LED modules. His conceptual approach to the problem is different from those we remember seeing before and it’s worth a look.

Instead of just using the formula to calculate how many LEDs he can drive [M.Rule] is using a table of I/O pins to establish how many and in what order these displays can be connected. Each colored set of blocks represents an LED module. The graphic above shows how 18-pin can be utilized. He even filled in the unused pin combinations with input buttons.