If you are an electronics enthusiast who has a tendency to hoard junk because it Might Be Useful Someday, you may well have a significant experience when it comes to desoldering. Why order that component, when you’ve got one on this old board?
So we’ve become experts in removing old components from dead PCBs, so when it comes to desoldering techniques you might think we’ve seen it all, there’s nothing new to learn. Then along comes [fede.tft], with a tip of a desoldering tool that’s new to us. The video below the break from [MSylvain59] demonstrates the needles in action, what do you think? Have any of you used a desoldering needle?
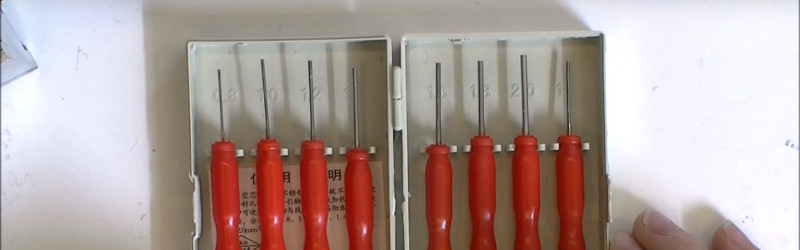
This is a set of tools you might use to desolder a through-hole component with a wire-end poking out beneath the board. The idea is that as stainless steel needles the solder won’t adhere to them, so you can select the appropriate size and use it to push out the lead from below.
We remain to be convinced, as it seems to be a slightly more fiddly way to do what we’ve used a small screwdriver for to lever from above the board for years, but it’s always worth talking about a tool that could be a useful new weapon in our armoury.
If you have an interest in desoldering, there’s only one place we can send you. Our own [Bil Herd] gave something of a masterclass on the subject in 2014.


Finally somebody said this; desoldering needles are one of those things that are irreplaceable in certain types of rework. For example, there are LCD monitor inverter boards with transformers, and those are often large components with small amount of through-hole pins – typically around 8, four on each side. Those transformers break, so you get new ones from somewhere and replace them. However, hot air is not feasible for such area of work as pins are evenly spaced on the transformer’s perimeter, solder pumps suck in a bad way (as usual) and aren’t usable here either, and copper wick is useless since it’s through-hole – but desoldering needles work wonders.
Advice – buy more than one set. They’re, like, 1$ per pack, and they break if you press on them too hard. Also, I wish there were more in-between diameters of them so I could better desolder pin headers. Say, you want to desolder a 40-pin header from a Raspberry Pi? Your best bet is breaking the plastic and pulling out pins one-by-one. If those headers are connecting two boards, however, you’re out of luck – unless you have just the right diameter of desoldering needles, and then it’s more or less a breeze.
Question from someone who’s never used them before; how would they help you desolder pin headers from between boards? That’s an awful task to do and if you have a better method I’d be very happy to learn!
Pick one side with the header’s through-hole pads exposed, heat up one of the pins with soldering iron, insert needle into the hole (it’s hollow and goes between the through-hole plating and the header pin). Then, you’re physically dividing the through-plated hole and the header with the needle and they’re no longer connected with solder. Repeat for all pins, then, when all pins are detached, just take one of the boards off. Realistically, some of pins don’t get fully free, but it’s easy to fix – either use the needle once again, or just heat up those stubborn pins when dividing the boards – it’s easier to heat up one or two than it’s to heat up all 40, anyway.
OOOOh. They’re hollow! I was scratching my head wondering what the point of them was until you said that.
The thing is, a needle and a tube are two different things.
So if they call a tube a needle it is they who screwed up. So don’t blame yourself.
A hypodermic needle is a tube.
This was my AH HAH! moment as well – I couldn’t figure out how shoving a solid pin through the hole would help!
A hypodermic needle has a sharp point, and that is what makes it a needle, that it also has a hollow feed is not why it’s called a needle.
Chip Quik is another choice for when you need desolder multiple pins at once. It lowers the melting point of the solder dramatically so you can heat all of the pins and have time to pull out the component while the solder is still molten. It is marketed for desoldering SMD’s but it’s great for desoldering components with large or non-circular pins like PCB-mounted DC power jacks when desoldering needles won’t fit.
Yah, second on Chip Quik. I personally have used it to replace 128 pin SMD devices. But on topic; we had a repair tech at a place I worked who was a total maladroit at soldering. Was constantly lifting pads on expensive test equipment. Got him using ChipQuik to replace all parts and he never lost another pad. Good stuff but pricey (but not as pricey as a damaged board I had to fix!)
I’ve used solder wick on DIY through hole PCBs plenty of times, is there a reason why it won’t work on mass production PCBs?
Yup. The holes on mass-produced board are metallised on the inside. Solder sticks there and becomes pretty difficult to remove.
And it gets worse if the pad is connected to (inner) ground planes that suck away all the heat.
looks worth keeping some around for when the sucker does not do a good enough job
You know, if you didn’t neg on the intern like that all the time then just maybe….. oh right.
Heh, been doing this with plated paperclips for years never knew a real tool existed LOL.
You can even get it done sometimes with a dental pick, holding that and the iron like chopsticks.
Mental image: Whilst wiping the sweat from you left eye-brow with your right bid toe.
There’s a related video showing it done with a filed down hypodermic needle.. when it wears out you could bring it to a needle exchange?
And the wonder about your veins, that they blunt the needle so badly. :-) But “unfortunately” I do not know where the next needle exchange would be. The pharmacy is at the corner and I bought there already some needles (for building a SMD vacuum pipette), they were quite cheap, something like 20ct.
I don’t have any problems with a solder pump. Granted I use the desoldering station type and I maintain the pump filter and spring so they are always really clean and lubed with silicon grease and I can desolder pretty much any through hole device. Granted, I will sometimes destroy the pcb trace at a pin, but oh well, I’m just scavenging. The needle would be REALLY useful for removing components on a PCB you would want to leave in tact. I’ll have to check that out.
The key to solder pumps is don’t buy one, build one!
When I was a young whippersnapper and couldn’t afford one, my father and I built one. We started with one of those desoldering irons with the rubber bulb. Connected that with a hose to a filter made with a baby food jar with some steel wool in it, and an aquarium aerator stone. Next thru a solenoid valve actuated with foot switch, and then into a small propane tank as a vacuum storage chamber. The chamber is kept at high vacuum by a continuously running small but strong vacuum pump scrounged from something(?). The whole assembly is huge and heavy (the steel box we put it all into doesn’t help) but it is super powerful and blows away (pun) any commercial solder pump I have ever used. It was over 30 years ago we built this thing, and I’m still using it to this day. Miss you dad!
You mean sucked away, right?
…..I’ll see myself out.
I could say your pump really sucked. I’m too lazy to build one. Soldapult was my friend for 20 years but it had problems with through hole on old PCB’s that used a certain formulation of solder. No more problems for me.
I might give these a go.
I have been repairing lead free solar inverters. The designers make the through hole diameters very close to the pin diameters to minimize the heating of the solder joints as lead free solder has a much higher resistance than tin/lead solder. This is important for the high current components.
The designers tend to do the same with *all* the through hole even if it’s not high current.
These are especially hard to desolder.
Perhaps ChipQuik would be the solution here. If the holes are so wide, that I could use suche needle, the solder sucker (electric) will also do an easy job.
Yes, are irreplaceable, some times used “other tools” but solder adheres to it. Are pretty cheap, like USD $1.50 for 8 pieces http://s.click.aliexpress.com/e/Nf2z7ay
looks like its more trouble than its worth. for the parts removed in the video id have just used my hot air rework station and a small pair of needle nose pliers. parts like electrolytic capacitors i just heat with an iron and pull out with my fingers. im sure there might be some rare situations where this would be useful, but they are few and far between.
Wrap a small heating wire coil around the tube and you don’t even need the soldering iron? Just heat, insert, and cool while twisting back and forth. Then there is the option of just finding those stainless steel tubes and doing that with but also having suction on the back end of the tube, then you have an all in one “heated sucker needle” AKA the “Solder Troll”.
Somewhere, in the deepest shadows of the night, a “young entrepreneur’s” howling is heard: “OOOHHH, THIS IS IT! MY NEW KICKSTARTER… OOH, MY PRECIOUS…” as he looks this post above.
Nope!
I momentarily thought that was a great idea but… NOPE!
The problem is you want the solder to solidify before you pull the tube out. That way it doesn’t just re-attach itself.
I know.. you are picturing the two-leaded devices he removed in the video and thinking you would just pull the lead out first. You could do that without the needle! What happens though when you have something with a bunch of short leads to remove like an IC in a dip package or a multi-conductor connector? If the part isn’t flexible you can’t start pulling leads out until you are have the last one melted.
Just heat, insert, and cool while twisting back and forth
“The idea is that as stainless steel needles the solder won’t adhere to them, so you can select the appropriate size and use it to push out the lead from below.”
No. The idea is to melt the solder then push the hollow cylinder over the lead to isolate it from the plated through hole.
It’s a problem when the lead is a tight fit in the hole, but when there’s plenty of clearance, these things are great.
Oh neat these are real? I sometimes used just a piece of copper wire but it was always messy
“Needle” poor choice of word descriptor. I thought punch was right till I read that they are hollow and must be very thin walled at that. Hollow punch. Can’t see em working on flat “pins” on most IC’s, they’re a loose friction fit when new.
This is a cool idea. Thanks.
I’ve had a scavenging addiction, so much so that I’ve got four big parts trays with sorted components, and maybe 3kg of sorted hardware – I won’t use a 20th of this stuff before I’m fertilizer. But it’s fun, good soldering/desoldering practice, and I find it therapeutic to take stuff apart, then try to figure out a use for the salvaged bits.
My most recent trick is to use one of those miniature butane pencil torches with the flame spreader. If I’m careful I can pull out entire multipin connectors, ICs, relays, etc in one go. Sometimes the board gets scorched to heck but the part usually comes out clean and not overheated.
Once I used just a butane soldering torch (plumbers size :-) )for this. But a hot air gun works much better.
I struggled to remove through hole parts (especially >2 leads) until I bought a Hakko 808 desoldering gun. It was around $200 if I remember correctly but well worth the investment. Clearing out the average through hole only takes a few seconds once you get the hang of it
Stainless steel cannot be soldered?
Oh my…. I must be doing it wrong then.
I’ve soldered by using the tin and/or silver solders to:
Brass,
bronze,
steel,
chrome (Used on so called stainless steel),
a few exotic alloys,
copper (Duh, a PCB is usually copper+Resin+glass composite isn’t it???!!!???)
lead (Ok a block of it, not a sheet. it melts into the metal but the flux is from the tin+alloy mixes).
Still haven’t successfully soldered aluminium yet… It can be done apparently.
There are a lot of grades (types) of “stainless steel” that have different chemistries. A magnet will stick to some and fall off others so it is really a broad range.
https://en.wikipedia.org/wiki/Stainless_steel#Grades
For aluminium, you can get the ‘aluminum brazing rods’ that join copper and aluminum great. Or a small blob of it and then you can solder to that.
Use it to make antennas and while normal solder joins look good, they fail after a few days/months.. Where this method lasts until corrosion eats through it years and years later.
Autoparts stores may also have aluminum solder as a paste for radiator repair.
Aluminum is pretty easy. I learned to solder up to it when working on guitars which typically have pots made out of aluminum that require grounding the casing to filter out audible noise. The trick is to rough it up first, I always used either a fine file or a piece of steel wool. There seems to be some coating on aluminum parts that once you get through it you notice the change from dull silver to shiny silver color. Really doesn’t take any more effort than roughing a surface for glue.
That coating could be aluminum oxide. Yeah, aluminum is pretty easy – I encounter it on 3.5mm or DC jacks (those you solder on wire) all the time. I just use a good flux (not rosin, but something that’s embedded into solder I use), sometimes I crank up the temps, and then I can also brush the surface I’m soldering with the tip of the soldering iron. Once there’s a spot that solder has bonded with, the job is basically done.
Stainless can be silver brazed but not soldered. Usually machines that deal with molten solder are made from stainless or titanium because normal solders do not wet it.
Aluminum can be soldered with a specific solder/flux combo. Harris sells a kit.
Glass can be soldered to metal and other things using indium.
Oh my god why didn’t I come across it before? This is soooo useful! (e.g. Flyback transformers that required me to break the PCB, big ol’ transistors and caps that required replacing on power supplies…)
I’m ordering one set now!
Order more than one, they break sometimes =)
This does not look fun…
I saw recently a proper demonstration of how to use these needles http://easyelectronics.ru/demontazhnye-igolki.html
To address the author’s comment, there are two scenarios where this offers a major advantage over using a small screwdriver as a lever.
The first is that you don’t have fulcrum with this method, and as a result you’re not potentially damaging other components.
The second is that you’re not bending the leads on the desoldered component, which is useful if you’re either re-using the component or replacing it after accessing something underneath it.
I never knew, they exist. So I usesd medical needles in the fitting gauge. They are doing well but have no handle.They are of stainless steel. I heat the solder, then push out the solder with the needle.
That’s awesome, I need a set of these!
Jenny scores again!
Hypodermic tubing is readily available in lots of sizes. I researched it as a guide tube for 0.003″ music wire.
I wonder if the larger ones might work for pin extractors for some connectors.
I ordered a set to see if that might work. A lot cheaper than $20 or more for a pin extractor.
Used them and loved-hated them because of their fragility. At least the Chinese crapware I bought off Ebay were hollow for their entire length which made them not so sturdy; they’re very useful anyway.
Also use sewing needles for this.
I did find that for some jobs you need solid ones, also use a homemade variant of CQK that melts at a higher temperature but holds the heat for longer.
IIRC the formula for lead free is different to tin/lead as it has bismuth in it already so you must adjust the formula accordingly and make sure that any lead contamination is removed prior to reworking or the part can desolder under load due to formation of the 95C alloy BiSnPb
Awesome post, great reading!
When I was a kid, I was desoldering DIP ICs using a syringe needle shortened with a perpendicular file cut. The external diameter of the needle was small enough to fit through a PCB hole, while the internal diameter of the needle was big enough to fit an IC’s pin. I still use them sometimes.