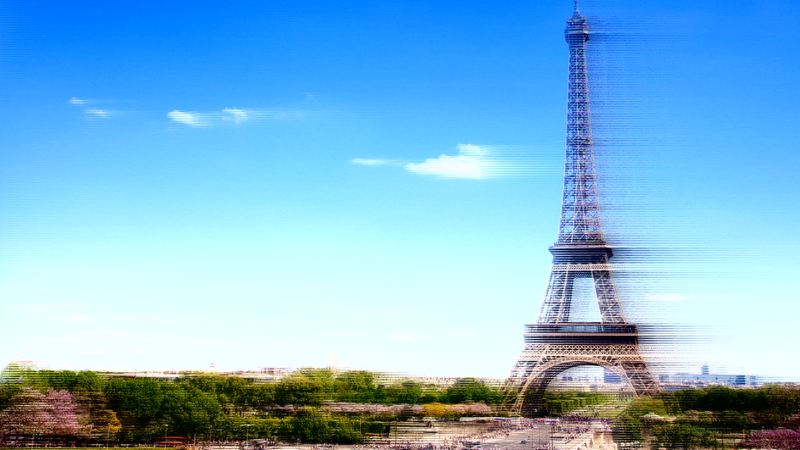
Ever wonder what those snapshots you took of your trip to Paris would look like if you ran them through a Proco RAT or a Boss Overdrive? How about a BF-3 flanger? [Robert Foss] wrote in with this nifty little script (GitHub) that processes images as if they were audio files so that you can try it out without investing in a rack of analog pedals. Test your audio/visual DSP intuition and see if you can name the images without looking at the effects.
If you know your Linux command-line utilities, there’s really not much to it — scroll down to the very bottom of the script to see how it’s done. ffmpeg converts the images to YUV format, which works much better than RGB for audio processing, and then sox adds the audio effects. Another trip through ffmpeg gets you back to an image or video.
OK, it’s cheating because it’s applying the audio effects inside the computer, but nothing’s stopping you from actually taking the audio out and running it through that dusty Small Stone. Of course, once you’ve got audio outside of the computer, the world is your oyster. Relive the glorious 70’s when video artists made works using souped-up audio synthesizers. If you haven’t seen the Sandin Image Processor or the Scanimate in action, you’ve got some YouTubing to do.


Reminds me of a time long, long ago when someone convinced a MP3 encoder to compress some pictures and then display the results after decompression.
I think I found it, http://keyj.emphy.de/mp3-for-image-compression/
I remember there being a lot more images than that, even in color although that faded quickly as the compression went up. It does illustrate well how MP3 “smears” the sound especially when overused.
Not quite, you are comparing apples and pears. MP3 compression affects mainly the audio frequencies that human ear is not so sensitive to. If you force images to appear as audio and pass them through the mp3 algorithm the compression will affect some “frequencies” of the image more than the others, whatever the “frequencies” in the image may mean. You can expect the artefacts to be very bad as wrong parts of the image were compressed.
Compress the audio with high enough bitrate and you won’t hear any “smearing”. On the other hand compress the image a lot and it will look bad.
No it wouldn’t illustrate anything useful at all. First the vision system isn’t the same as the audio system, they both have quirks not found in the other but that are useful for compression, second mapping a picture so that the vision system can detect compression flaws that the audio system can would be very complicated and not a quick hack.
If anything smearing of images compressed with MP3 just illustrates that MP3 isn’t designed for image processing.
The smearing comes from the fact that the auditory system is insensitive to sounds above 16 kHz and filtering out the high frequency components looks the same as applying horizontal motion blur on the image.
MP3 has a time component. What would really be interesting is applying the algorithms closer to how they are meant to be, which is temporally. Seeing these audio effects and the degradation of mp3 visually in a video would be much more interesting to me.
The artist picks an x axis distortion scale that’s totally arbitrary. This bugs me and I don’t know why. Audio distortions are a change over time, my eyes want to see that exact same change to a picture over time, rather than left to right in a static image.
Now, can one compress audio with jpeg? How would it sound like?
It works ok, but you really need to use a space-filling curve (hilbert curve or another) in order to avoid adding problematic artifacts from JPEG block edges. (I’ve done it with just a plain rasterized image, hence how I know).
JPEG even has a 12-bit variant, but it’s rare, and required an entirely separate build of the library up until the most recent release.
I did the same with ADPCM and the picture looked quite reasonably for 4 bpp. I used RAW mode in IrfanView.
Wonder if someone could recreate this with Vorbis, Opus, AAC, GSM FR/EFR/HR and… LPC-10 ;)
It appears the filters work on 1-D signals like analog TV. It would be interesting to see them as “native 2-D”.
I agree this method seems quite limited in one dimension. Perhaps dividing it into 16×16 blocks like JPEG does and then performing a filter?
Consider the 1-dimensionality a feature :p
Using 16×16 or any block strategy would likely create some pretty rough/square artifacts.
What you can do is to use the “reverse” effect and have your effect be applied backwards, which adds a little bit more fun to this process.
This has been possible for a long time, by converting images to RAW in photoshop or GIMP, then putting them through audacity (file -> import raw data), before exporting the resulting sound (as RAW again) and importing back into the image editor.
Yes, I have used accessibility tools for the blind that do similar things. There used to be some really good ones that converted the image to sound based on the variables you chose. Still wouldn’t mind seeing what my TurboRat has to say about things though :)
Neat, you could also go the other way (sound file -> import RAW image -> Unsharp Mask -> export RAW -> sound file)
This is a road to allow “artistic style” to apply to non-artistic things like sound-streams. I wonder if the artistic style NN, can use this approach and be applied to things like music.
Sorry for the “double” but the “scan rate” might impact how the feature detection works. I’m hoping that the CNN is using a 2d fft or similar for the convolution, and zero-buffering of the edges in order to make features “2d-translation invariant”.
That’s actually where I started this journey. Using nerual-style for images, which was fun. But the results are somewhat hard to control.
There are a few dozen “hidden” dials on Neural Artistic style. It is unsurprising that they are hard to control. I would be more interested in exploring than “engineering” when starting out. If I can rapidly iterate and try 100 possibly things and get 2-5 cool things then it is a winnable situation.
Well… https://github.com/SonifyIt/sonification
Been there – done that – save the sound as a BMP and run it through Audacity (remembering to skip the header bytes)
https://marquisdegeek.com/rnd_audacity
ISTR one of the Amiga magazines doing that back in the day, but using image filters on sound files. At a guess, Amiga Format or Amiga computing. Probably find it on the internet archive these days.
Hey, it’s been a few years, but do you have a link for that?