OpenSCAD is a great way to create objects for 3D printing (or other purposes), especially if you are already used to programming. For things like front panels, it is great because you can easily make modifications and — if you wrote your code correctly–everything will just adjust itself to new positions.
 However, what if you have a general-purpose piece of code, and you want people to have the ability to customize it? For example, consider this code:
$fn=100;
difference()
{
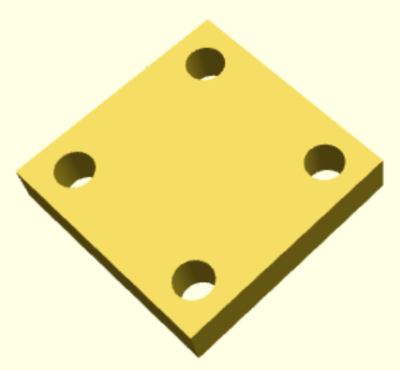
cube([25,25,5]);
translate([4,4,-1]) cylinder(h=7,r=2);
translate([25-4,4,-1]) cylinder(h=7,r=2);
translate([4,25-4,-1]) cylinder(h=7,r=2);
translate([25-4,25-4,-1]) cylinder(h=7,r=2);
}
That creates the plate with four drill holes you see on the right.
Custom 101
It should be pretty obvious that you could use variables and if the end user had a copy of OpenSCAD, they could change things (click the link if you want to run OpenSCAD in your browser) without worrying about the math:
$fn=100;

w=25;   // size of square
thick=5;  // thickness
drillhole_r=2;  // radius of drill hole
drilloff=2;   // offset from edge of drill hole


difference()
{
  cube([w,w,thick]);
  translate([drilloff+drillhole_r,drilloff+drillhole_r,-1]) cylinder(h=thick+2,r=drillhole_r);
  translate([w-(drilloff+drillhole_r),drilloff+drillhole_r,-1]) cylinder(h=thick+2,r=drillhole_r);
  translate([drilloff+drillhole_r,w-(drilloff+drillhole_r),-1]) cylinder(h=thick+2,r=drillhole_r);
  translate([w-(drilloff+drillhole_r),w-(drilloff+drillhole_r),-1]) cylinder(h=thick+2,r=drillhole_r);
}
You can easily change the variables at the top and get different size plates without having to manually readjust everything. If you are using the Web version, press F4 to see your changes. For a local copy, F5 would do the trick.
Not Good Enough
This isn’t good enough, though. Sure, people like us can fire up a copy of OpenSCAD and make changes to a program, but it might confuse some people. However, if you host your design on Thingiverse (and I’ll sidestep the political problems that always crop up) you have another option. Thingiverse offers a customizer option that allows you to build a simple GUI to change variables. It is really the same as the first case, but the application picks up simple comments to describe variables and other comments to set options. In addition, the variables have to be set by a constant.
In general, if you turn on Customizer, every variable that is set to a constant will show up in the GUI. I’ll show you how to avoid this in a bit, but for now, let’s just plug the simple example in and see how it does. Since there are no special comments, you get this:
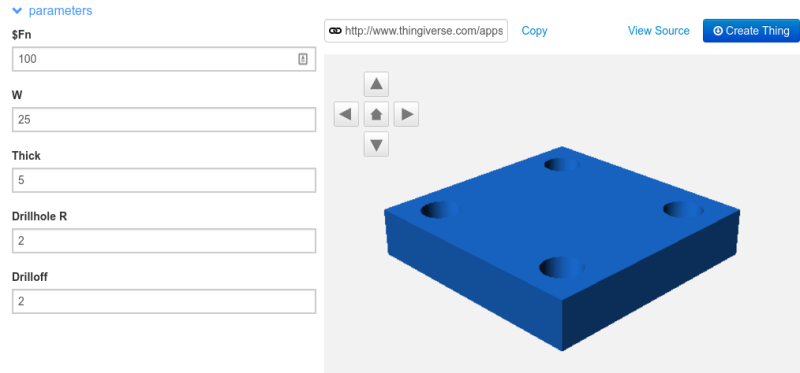
This is actually not bad (Thingiverse login required). Each variable (even $fn) gets a text box where you can type in a different number. Underscores in the variable name turn into spaces and each one gets capitalized. So even that simple setup is usable, especially if you pick nice variable names (which, perhaps, I didn’t).
It is easy to make this nicer, though. You can put a descriptive title on a comment just before the variable. For example:
// Width and height of plate (mm)

w=25;
That will give you a more descriptive name. You can also put a comment right after the variable to get different effects. For example, this will give you a slider:
// Width and height of plate (mm)

w=25; // [10:100]
Or you can provide a list of values:
// Bolt size (radius, mm)

drillholl_r=2; // [2,4,8,10]
If you want a simple way to get rid of the $fn entry, you can just do this:
$fn=100+0;
However, there are more advanced features available.
Advanced
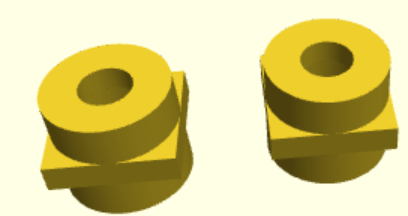 I won’t cover the methods you can use to upload an image or get a drawing canvas. You can check out the official documentation for that. However, The following code demonstrates a more substantial setup. The first comment defines a tab and you can use the tabs to organize sets of variables to make the GUI less confusing. In addition, you can define a [Hidden] tab to hide variables you don’t want to show. There’s also a [Global] tab that is always visible no matter what other tab is showing.
Otherwise, the example shows the basic text entry, sliders, and drop downs with a few extra features (for example, a step size on the slider). You can see the resulting objects to the left.
/* [Main Dimensions] */
// Outside diameter (mm)
out_dia=50;
// Height (mm)
height=45;
// Cut diameter (mm)
cut_dia=30;

/* [Inner Dimensions] */
// Inner diameter (mm)
in_dia=21;
// Depth (mm)
in_depth=10; // [5,10,15,20,25]
/* [Options] */
// Line segments for circles (3 for triangles, 6 for hex, etc.)
FN=100; // [3:1:25]
// Override line segement count (any positive value)
OFN=0;

$fn=OFN?OFN:FN;

/* [Hidden] */
Num_copies=2;
// Num_copies=1+0; // stop customizer from picking this up

for (i=[1:Num_copies])
  translate([(i-1)*out_dia*3,0,0])
    difference()
    {
      union()
      {
      cylinder(center=false,r=out_dia/2, h=height);
      translate([-out_dia/2,-out_dia/2,height/2-height/8])
      cube([out_dia,out_dia,height/4]);
     }
  translate([0,0,-1])
  cylinder(center=false,r=cut_dia/2,h=1+height-in_depth);
  translate([0,0,,height-in_depth])
  cylinder(center=false,r=in_dia/2,h=1+in_depth);
  }
And Next Up…
We’ve always been surprised someone hasn’t come up with a standalone version of this that you could host on your own web site. The syntax is simple enough and we bet a few lines of Python and OpenSCAD would do the trick easily. That would let you host custom applications outside of Thingiverse and offer them for sale or let them send the completed files to a service bureau.
We find we rarely write any OpenSCAD anymore that we don’t enable for customizer. Almost anything is reusable if you do it right and sometimes the reuse opportunities can be surprising.


I am sure a plug-in for the 3D viewer will be added soon:
http://plugins.octoprint.org/
“We’ve always been surprised someone hasn’t come up with a standalone version of this that you could host on your own web site.”
I’m guessing people might be worried about resources. Imagine a popular site full of people rendering openscad server-side.
Of course.. most sites never actually get popular. But if you think like that the next question becomes “why bother”.
Using webgl it’s possible to do the rendering client side. It’s not trivial to make but certainly possible. I’m sure if 3D objects come into the mainstream it will see some CMS plugins pop up.
OpenSCAD + JavaScript = OpenJSCAD, edit locally or remote online, preview in browser direct via WebGL. https://openjscad.org/
Programming reminds me a bit like Povray.
Yes, it does remind me of POVRay as well. I don’t know that I would have found it nearly as intuitive had some long forgotten corner of my brain not been already been steeped in the ways of hierarchical text-based CSG specification.
Check out OpenJSCAD: https://en.wikibooks.org/wiki/OpenJSCAD_User_Guide#Interactive_Parametric_Models
https://hackaday.com/2015/09/03/learn-3d-modeling-in-your-browser/ covers that and a lot of other web-based tools, by the way.
Take a look at Solvespace. It is well suited for constraint-based 3D drawing. Sligtly strange workflow, but it’s the fastest thing to draw 3D parts I used before.
Wonder if it can port to Unreal?
C-CSG is better. More stable, faster and more powerful. It uses C for both the object description and the processing, and is somewhat reminiscent of Povray’s modeling language.
but no minkowski op. Does it have hull()
After past scandals surrounding thingiverse (like stealing open designs and patenting them) isn’t a tutorial for thingiverse the very worst thing you could do to unexperidenced makers that doesn’t know what for an evil company makerbot is?
Please hackaday, bury makerbot and thingiverse and never mention them ever again. They are an bad apple.
Apple is a bad apple as well.
I believe it was mentioned before on Hackaday but in case any one missed it there is a version of OpenSCAD that includes customizer support. (link here https://amarjeetkapoor1.wordpress.com/category/gsoc/ for those interested) I have been making great use of this recently for quickly mocking up objects then filling in actual dimensions later when I have them.
You can find the link for the OpenSCAD that includes the customizer here:
https://amarjeetkapoor1.wordpress.com/2016/08/17/user-interface-for-customizing-models-part-3/
The customizer has been part of OpenSCAD proper for a while. Grab a recent development snapshot from http://www.openscad.org/downloads.html. This was implemented by Amarjeet as a Google Summer of Code project last summer and has since been merged to our master branch.
AAAAARGH!!!!! Dummkopf! Why didn’t I try out the dev versions before! This is fantastic!!!
this is something that i have found intriguing. i have been looking for a customizable plate like this. is there any other functions that can allow for more holes than just on the corners? im looking to make rows of holes the same distance apart and the same size. kinda like a pegboard but smaller holes and smaller diameter of hole. how would i customize that?
any advice, tips, and help would be excellent.
the.netman@gmail.com