An Enchanted Rose For A Beauty

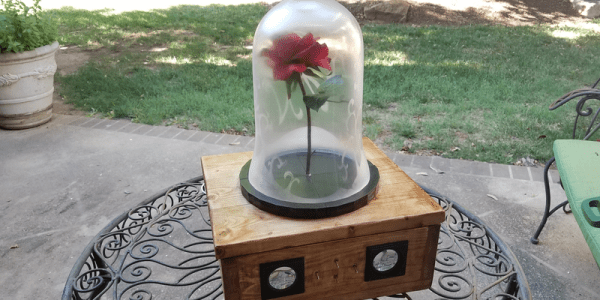
Being a maker opens up so many doors in terms of ways to romance one’s partner through passion projects. If their passion is Disney films, then you may handily make them the enchanted rose from Beauty and the Beast for their birthday. Easy-peasy.

In addition to the love and care that went into this build, redditor [Vonblackhawk2811] has included a set of LEDs, salvaged from cheap flashlights and electronic candles, which are controlled by four toggle switches and offer multiple lighting selections — candlelight, soft white, colour cycling, and bright white — to appropriately set the mood. As if that wasn’t enough to romance his sweetheart, he’s also included an aux cord input and a pair of speakers so they may be serenaded by a tune or two as they dance the night away.

Liberal use of hot glue and duct tape are keeping the electronics secured, preventing any shorts. After all — what would it say if this gift went up in flames? An inspired stencil design — hand drawn and cut out — was used to apply a spray-on frosted glass finish to the cloche, and a romantic phrase was burned into the base, completing this heartfelt gift. The only quibble we have is that now we all have to step up our game in the courtship department.

That is, unless one is sporting the Romance Pants.

[via /r/DIY]

Machine Learning IDE In Alpha

Machine is an IDE for building machine learning systems using TensorFlow. You can sign up for the alpha, but first, have a look at the video below to see what it is all about.

You’ll see in the video, that you can import data for a model and then do training (in this case, to find a mustache in an image). You’ll see the IDE invites an iterative approach to development since you can alter parameters, run experiments, and see the results.

The IDE syncs with “the cloud” so you can work on it from multiple computers and roll back to previous results easily. We don’t know when the IDE will leave alpha status (or beta, for that matter), but the team’s goal is to release a free version of Machine to encourage widespread adoption.

If you want to learn more about TensorFlow, you are in the right place. We’ve also covered a bare-bones project if you’d rather get started that way. You can also find some good background material going all the way back to the early perceptron-based neural networks.

Dual-Purpose DIY Spot Welder Built With Safety In Mind

Ho-hum, another microwave oven transformer spot welder, right? Nope, not this one — [Kerry Wong]’s entry in the MOT spot welder arms race was built with safety in mind and has value-added features.

As [Kerry] points out, most MOT spot welder builds use a momentary switch of some sort to power the primary side of the transformer. Given that this means putting mains voltage dangerously close to your finger, [Kerry] chose to distance himself from the angry pixies and switch the primary with a triac. Not only that, he optically coupled the triac’s trigger to a small one-shot timer built around the venerable 555 chip. Pulse duration control results in the ability to weld different materials of varied thickness rather than burning out thin stock and getting weak welds on the thicker stuff. And a nice addition is a separate probe designed specifically for battery tab welding — bring on the 18650s.

Kudos to [Kerry] for building in some safety, but he may want to think about taking off or covering up that ring when working around high current sources. If you’re not quite so safety minded, this spot welder may or may not kill you.

Continue reading “Dual-Purpose DIY Spot Welder Built With Safety In Mind”

An Hour To Surface Mount

Most of us have made the transition from through hole parts to surface mount. There are lots of scattered tutorials, but if you want to learn some techniques or compare your technique to someone else’s, you might enjoy [Moto Geek’s] hour-long video on how he does surface mount with reflow soldering. You can see the video below.

What makes the video interesting is that it is an hour long and covers the gamut from where to get cheap PCBs, to a homebrew pick and place pencil. [Moto Geek] uses a stencil with solder paste, and he provides links to the materials he uses. Continue reading “An Hour To Surface Mount”

Hackaday Prize Entry: A Tiva Shaped Like An Arduino

Texas Instruments’ Tiva C LaunchPad showcases TI’s ARM Cortex-M4F, a 32-bit, 80Mhz microcontroller based on the TM4C123GH6PM. The Tiva series of LaunchPads serve as TI’s equivalent of the Arduino Uno, and hovers at about the same price point, except with more processing power and a sane geometry for the GPIO pins.

The Tiva’s processor runs five times faster than standard ATMega328P, and it sports 40 multipurpose GPIO pins and multiple serial ports. Just like the Arduino has shields, the Tiva has Booster Packs, and TI offers a decent number of options—but nothing like the Arduino’s ecosystem.

[Jacob]’s Arduino-Tiva project, an entry in the Hackaday Prize, aims to reformat the Tiva by building a TM4C123GH6PM-based board using the same form 2″x 3″ factor as the Arduino, allowing the use of all those shields. Of course, an Arduino shield only uses two rows of pins, so [Jacob]’s board would position the spare pins at the end of the board and the shield would seat on the expected ones.

The finished project could be flashed by either the Arduino IDE or TI’s Energia platform, making it an easy next step for those who’ve already mastered Arduinos but are looking for more power.

A Crash Course In Thingiverse Customizer

OpenSCAD is a great way to create objects for 3D printing (or other purposes), especially if you are already used to programming. For things like front panels, it is great because you can easily make modifications and — if you wrote your code correctly–everything will just adjust itself to new positions.

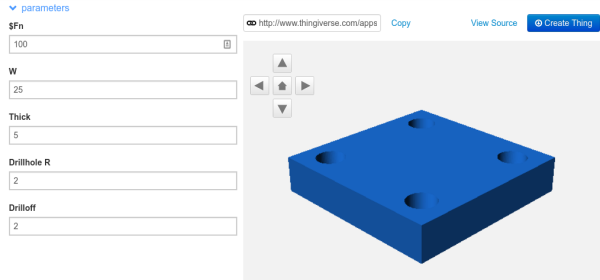
However, what if you have a general-purpose piece of code, and you want people to have the ability to customize it? For example, consider this code:

$fn=100;
difference()
{
  cube([25,25,5]);
  translate([4,4,-1]) cylinder(h=7,r=2);
  translate([25-4,4,-1]) cylinder(h=7,r=2);
  translate([4,25-4,-1]) cylinder(h=7,r=2);
  translate([25-4,25-4,-1]) cylinder(h=7,r=2);
}

That creates the plate with four drill holes you see on the right.

Continue reading “A Crash Course In Thingiverse Customizer”

The Computer Of Yesterday, Today

There are a handful of computers that have become true museum pieces. The Altair, of course, is tucked away in the Smithsonian’s warehouse waiting for some time in the future when Apple’s legacy fades or until there’s a remake of War Games. Likewise, the French Micral and American SCELBI are important historical artifacts, and even a modern component-accurate reproduction of an Apple I could fetch a decent amount of cash at the right auction.

There’s something special about these old kit computers – even though the instructions for these machines provided volumes of documentation, no one is building these machines anymore. You just can’t buy the PCBs, and sourcing period-correct components is hard. [Brad] is an exception. He found original, untouched PCBs for the cover story of the July, 1974 edition of Radio-Electronics. It’s an unbuilt Mark-8 minicomputer. Now [Brad] is in a position no one else has been in since the 1970s: he can build a vintage minicomputer, with a TV Typewriter, from scratch. He’s documenting the whole thing.

Since this is the first opportunity this century anyone has had to build a truly retro minicomputer, [Brad] is going all-in with this project. For an interface, he’s building [Don Lancaster]’s TV Typewriter, a device introduced in the September 1973 issue Radio-Electronics. When combined with an old CRT TV, the TV Typewriter becomes a serial terminal. While today something like this could be built around a single microcontroller, constructing the TV Typewriter is no small feat: it’s spread across four boards, uses character generator ROMs, and is currently housed in a beautiful red oak case.

Just because [Brad] is building an ancient computer using ancient parts doesn’t mean he can’t get a little help from modern technology. He’s applying white silk screen to his custom TV Typewriter boards using the toner transfer process. Yes, apparently you can get toner cartridges filled with white (and neon!) toner, and this works well enough to replicate the look of professionally silk screened boards.

This is one of the greatest retrocomputing projects we’ve seen in a very long time. This is a true retrocomputer, complete with custom transformers and gigantic linear power supplies. When this project is complete, [Brad] will have a museum piece, all thanks to a lucky find of an eBay auction and a lot of hard work.