Most of us have made the transition from through hole parts to surface mount. There are lots of scattered tutorials, but if you want to learn some techniques or compare your technique to someone else’s, you might enjoy [Moto Geek’s] hour-long video on how he does surface mount with reflow soldering. You can see the video below.
What makes the video interesting is that it is an hour long and covers the gamut from where to get cheap PCBs, to a homebrew pick and place pencil. [Moto Geek] uses a stencil with solder paste, and he provides links to the materials he uses.
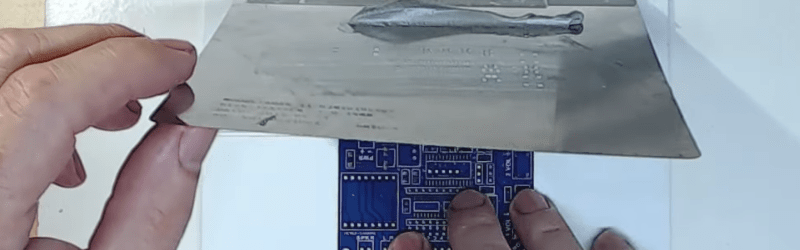
Instead of a conventional squeegee, [Moto Geek] uses an old driver’s license which is a bit more flexible than a typical credit card. There are a few other tips and tricks you can garner from the video.
For the reflow oven, [Moto Geek] uses a modified toaster oven. However, you can get cheap reflow ovens that are made for that purpose. In the end, the results look good. This is one of those rare videos where you feel like you are in the shop looking over his shoulder while he builds his boards.
If you don’t have an oven, you can always try a blowtorch. If you’d rather 3D print your pick and place tool, we’ve seen it done before.


I’m still at twisting wires together :P
I’m sure the electrons don’t mind one bit! :-)
I don’t have room for such fancy appliances :( I just use the hot air gun on my Yihua 898D hot air/soldering iron station. One has to be a bit careful so as not to blow the parts around with the stream of air and the temperature isn’t nearly as controlled as in a proper oven, but it has worked so far for the few small projects I’ve made as I am still honing my skills.
Ditto – I’m using the same 898D station (love it). I mount some pretty tiny parts but they stick well to the Chinese eBAY solder paste dots that I apply with the tiniest syringe tip.
Yeah, it’s not a bad station for the price and so far I’m very happy with it. I’ve seen some people disparage it, but… Well, maybe it’s not professional-quality stuff, but it’s good enough for a beginner, and it being digital makes it easy to control temperatures much more precisely than the analog stations.
1 its electrocution/fire hazard. Have you opened yours yet to check if fuse is on correct wire? have you checked if hotair metal part is grounded? or maybe connected to live wall voltage? Those are all well documented factory defects/design fails of this station.
2 >being digital makes it easy to control temperatures much more precisely than the analog stations
haha NO, lets start by saying what number you set on this hotair gun has very little to do with actual temperature, and being digital lets them LIE to you easier. Analog design will actually show you the readout of the thermocouple, however misleading that is, Digital on the other hand shows real readings up to a point and then magically snaps into SET temperature, because Chinese philosophy says its better to lie and appear good, than to be honest and somewhat average. Try it, Set your 898D to any temperature and watch it reach it, it will get about 5-10 points close to it and magically jump to the set number, whats more it will stay there instead of showing real readings (+-5-10 fluctuations).
If you really want a hotair station that can be set to precise temperature you need to go upmarket above 4 $figures. 898D is good at pretending to be good, and at low thermal mass soldering (wires, hobby double sided pcb etc). Its ok for the price, as long as you know its faults and limitations(and fix life threatening factory defects).
This sort of information is much appreciated as I am trying to map out an accelerated STEM learning pathway for my kids. All the little pieces fit together. YouTube and the web in general is such a powerful learning resource if you don’t let yourself get distracted by all the rubbish, therefore any help to curate the quality content out there is very useful.
Poor kids
I have all the smd stuff to soldering or heat gun the components ,if you don’t have the eyes for this it hard ,I been soldering for forty years ,and this is a advanced skill ,don’t let anyone tell you it’s not and you need special equipment ,and should by some smd practice boards ,to young beginners ,you may want to start with through hole kits
Buy a smd microscope I been doing this for too many years to count. I remember in the 70s getting samples of SMD devices. It was like wtf how can a person see them let alone rework them. I make a lot of boards i can assemble them using a magnifying glass with a ring light then once reflowed in my Chinese reflow oven i inspect the parts with the microscope. Its the only way to fly these days,
You have an innovative way to place your commas. I came here to say that it is greatly annoying.
Some people are not native speakers of English. Give them a pass !
(You see what I did? A space before the the exclamation point, that usually means Spanish-speaker.)
Not being a native speaker doesn’t prevent one making a minimal effort.
Or French-speaking, eh ?
What is the point of nick-picking about commas? Why do so many HaD posters “shoot” at each other so often over the pettiest things? Why do people who aren’t perfect EXPECT others to be perfect for them?
I’ve been reading HaD posts for several years now and on some of these posts, I wonder what myriad of childhood emotional traumas makes some people have such sensitive, unbalanced and deflated egos that they need to put some one else down in order to feel better about themselves… Ever wonder why there is so much hate, anger and abuse in this world?? Duh?!?
Folks posting on HaD are all obviously intelligent to some degree. So why do they insist on acting like children and being part of the problem. :(
On “nor’s” use of commas; I think it is creative the way (s)he is using them. Being creative is better than being destructive, yes?
Signed,
One concerned about the global state of huMANity.
I’ve mostly seen space-comma from Chinese writers of English.
bigmessowiress had/s tons of trouble doing home surface mount with small pitch parts, he has a nice writeup of things that didnt work, he is at 6 fails so far ;-)
https://www.bigmessowires.com/2017/05/01/reflow-soldering-re-re-re-revisited/
I’ve never had a problem with stainless steel stencils. The keys aren’t too hard to master:
1. Make sure the stencil is flat against the board. Use other boards to surround your board, and tape the stencil down on one side like a hinge.
2. Use good-quality solder paste that is at room temperature. Kester EP256 is good quality.
3. Use a plastic card to squeegee the solder, in one direction only. Press firmly so that you don’t squeeze solder under the stencil. Make sure you don’t lift the stencil while this is happening. If you have to put more on, then do it, but don’t let the stencil stick to your sweaty hands and lift up.
4. Hinge the stencil up in one smooth motion.
Using OSH Stencils, I have had perfect solder paste registration and amount every single time, and no bridges.
To be fair, I’ve learned how to do this by doing maybe 5 boards, so every single time is valid for T>5 :)
This is one of the better SMD videos on YouTube and I have seen them all I think. I have finally been inspired enough to take the plunge into surface mount parts and reflowing. To actually see it done from start to finish gives me confidence that I can do this at home. Now, I just need to learn how to design the boards to get them made. It looks like Kicad is free, so thats where I’m going to start. Any other suggestions for pcb software for beginners?????
I have been impressed with easyeda if you don’t mind working in the cloud.
Kicad is good although I usually use eagle.
Benchoff has a series on many different PCB tools. I will find a link and reply.
http://hackaday.com/2016/09/22/making-a-pcb-eagle-part-1/
Look at the bottom and you’ll find links to all of them
Just KiCad. Why?
Some lesser, maybe even web based tool might be more beginner friendly. But… learning PCB software is still going to be a significant task. Why start with something you intend to eventually graduate from and have to go through that work twice?
Same argument could be made for starting with Eagle but… KiCad has been seeing some very heavy and exciting development. If there is still something you want in Eagle that isn’t in KiCad just wait a little while. But.. while the future licensing model of Eagle is entirely in the hands of Eagle’s owners KiCad will always be free. Even if the developers try to close future versions it will just fork. Even if computers advance to a point where it no longer makes sense to develop KiCad’s code base but instead start fresh the new tool will no doubt have perfect KiCad import capability early on.
This means that what you develop today in KiCad you are almost guaranteed to always be able to re-open and use. In practice some closed software has managed to survive for decades making things designed long ago using them still accessible however no closed software can come as close to guaranteeing this for the future as open software can.
“Most of us have made the transition from through hole parts to surface mount.”
Is this a troll? Oh well, might as well feed it.
I still do almost exclusive through-hole.
I did assemble an SMD board a couple years back that was part of a kit. I must admit, even with just a soldering iron it was significantly faster and more convenient than soldering the same number of through-hole pins. It was a very pleasant experience. I can definitely see more SMD in my future but… two problems I have with SMD…
1 – Prototyping. I just can’t get excited about a development process that requires me to send away to a board house and wait for a PCB for every iteration. I would think such a thing would strongly discourage experimentation and innovation. Also.. since I am only a hobbyist making things in a quantity of one for myself… the final prototype and the finished product are one and the same. It’s not like I am going to prototype with easier to rework through-hole components and then design a PCB to build the final version. If it works the way I want it to then it’s time to slap it into a case and call it done!
2 – All those through-hole parts you guys got rid of when you switched to SMD… I have them! Ok, obviously not all of them but I have a pretty large collection. A switch to SMD would transform years of collected treasure into trash. It would set me back to a point where I can’t build anything without first ordering and paying for every single part. My goal has always been to be able to go from idea to device in a weekend without leaving the house or draining the bank account. I’m not about to go back to square one just to change soldering techniques!
That being said, some form of Ugly or Manhattan construction which technically is a form of surface mount al-be-it with through-hole components and tools is looking pretty good!
Prototyping is better in surface-mount! You just gotta tone up your skills a little bit.
0.5 mm-pitch parts are a stretch, but doable, for home toner-transfer, but is a cinch for any of the photo methods. 0.65 mm and up should be doable with just an hour or two of experimenting. And think of the time saved not drilling holes.
http://i.imgur.com/zjJ0vxK.jpg
Left to right: big chunky ICs and 1206 components are just about as big as your through-hole anyway. Small packages? Build adapters. On top are bits of copper cut with a knife. You can do this, and your Ugly skills will come in handy.
On the bottom is a PCB drawn with a Sharpie by hand, and on the right is just me showing off, but you can do tight pitches at home with practice.
As for the stash of through-hole parts, I hear ya. Nothing says you can’t mix and match, though. Especially if you’re doing Ugly construction or boards without etch resist. Just solder ’em on where you need ’em.
But once you get used to e.g. 1206 SMD resistors, you’ll be sad every time you have to drill two more holes. And think of how much closet space you’ll save! Come over to the dark side. :)
What do you do about IC’s that are not available in through-hole packages?
I too have lots of through-hole components collected. Many are no longer available, for good reason. SMD does make for a smaller PCB (w/ double-sided comps) but you do have to have the proper tools to (re)work them. I will mix through-hole and SMD on some PCB’s. The Z80-AVR project is one of them. https://z80avrproject.wordpress.com/
To that end (SMD), I’ve had to acquire an assortment of 0603 resistors/capacitors and some bipolar transistors. I prefer working with MOSFETs, so I have some of them as well. The overall cost was not too high. Maybe less than US$20.
As for equipment, lighted magnifying glass, 7x Loupe, USB “microscope”, home-made reflow oven. (https://smdreflowoven.wordpress.com), WELLER EC2002C soldering station and I recently added a hot-air station “858D+” type. It takes some skills … and some patience BUT its can be well worth it once the finished product manifests.
I’m still ordering PCB’s and having to wait 3 weeks for them to arrive but the quality of the PCB’s is good so far. I have looked at acquiring a milling machine but I need something with a deeper Z-axis than 2 inches, which increases the price, so I’m still looking.
Peace and blessings.
Oh, and a good set of fine-tipped tweezers! LOL