Casting metal parts from 3D-printed plastic or Styrofoam models is all the rage these days, and for good reason — casting is a way to turn one-offs into mass-produced parts. Seems like most of the metal casting projects we feature are aluminum in sand molds, though, so it’s refreshing to see a casting project using silicone molds to cast low-melting point metals.
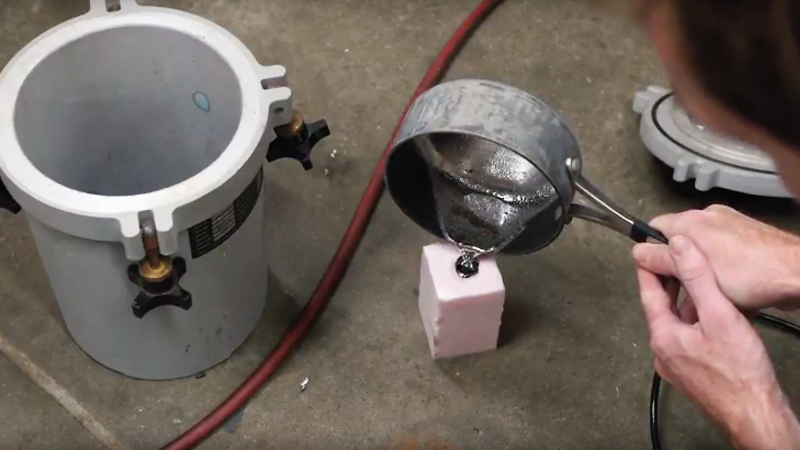
Don’t get us wrong — sand-cast aluminum is a great method that can even be used to build a lathe from scratch. But not everyone wants to build a foundry and learn the sometimes fussy craft of creating sand molds. [Chris Deprisco] wanted to explore low-melting point bismuth alloys and set about making silicone rubber molds of a 3D-printed Maltese falcon. The bismuth-tin alloy, sold as a substitute for casting lead fishing weights, melts on at 281°F (138°C) and is cool enough for the mold to handle. Initial problems with bubbles in the cast led to a pressure vessel fix, and a dull, grainy surface was fixed by warming the mold before the pour. And unlike sand molds, silicone molds are reusable.
Of course if aluminum is still your material of choice, there’s no need for a complicated foundry. A tuna can, a loaf of bread, and a handful of play sand is all you need to make custom parts.


How did he not burn his hand 0_o
Neither bismuth nor silicone conduct heat particularly well.
I own several silicone potholders. I have no idea whether they insulate better than the old cloth ones, but if boiling whatever splashes on my hand, it won’t soak through, and that’s a plus.
I was amazed he never spilled any on himself. If it were me, I’d have had 3 severe burns trying that, and then dropped it onto the floor
Of course, low melting point metal casting is nothing new, that’s what Pewter is. Tin+Bismuth is one variant of a lead-free pewter recipe.
Depending on the alloy, pewter melts around 350 to 450F though, which is starting to get past silicone’s working temperature range.
yes but depending on the silicone only just starting.
mold max 60 has a max working temp of 560F or roughly 300C.
Back in the early 1980s there was a surge in cast pewter sculptures for sales – a result of the recently developed silicone rubber compounds that could handle the temperature. The surge was soon wiped out because just about anyone could do these castings and the profits disappeared as knock-offs flowed in. One guy I know does/did bronze castings. His business was completely unaffected because there is no process that just about anyone can use to cast bronze.
except you can build a makeshift foundry to cast small bronzes by using a 50 gal drum, sand and a strong blow torch. Using a silicone dust and ceramic mix to make the mold of a wax model–“lost wax” casting. Not easy, but you don’t need to spend thousands either. I did everything but pour the bronze on one of my own sculptures. Still have it, amazing experience. I may makeshift my own foundry one day.
Don’t forget to paint it black :)
I HATE youtube videos without any text based information in a comment or a separate webpage.
For example in this video the information about the metal and the silicon, what the exact recepies and where to get it is so much easier if text based instead of sound in a video!!!
It’s in the youtube video comment…
It’s pretty straight forward tho…
All silicone have a pretty hight temperature range.
Pewter is kinda below that range, so it should work with almost any silicone.
Just look for 2K dental silicone on eBay.
Curing silicone takes quite some time if you use the DIY sealing silicones. Add corn starch to it (yes, corn starch) and it will cure much faster. On a ratio of 1:1 even within an hour! Starch holds a lot of water molecules, needed for curing silicone. So hack that mold and make your own experiments with silicone and starch in various ratios.
I don’t know what it will do to the heatresistance of the end product…
Notably, that’s only for moisture cure silicones. Not two part types.
Quite a lot of silicones need oxygen to cure…
The starch hack would however be useful even for 2-part silicones, as it acts like a cheap filler, lowering the amount of silicone needed and thus making the mold cheaper :D
Once silicon and starch are mixed it takes only 20 minutes to cure.This stuff holds itself much better that with silicone alone, allowing heavier casting.
The dental silicone I buy here in Germany off eBay cures so fast that you have to hurry.
And that’s the 6 minute stuff – they also sell 3 minute :-)
It’s great for small parts though and casting the 2nd layer for complex forms can be done after 10 minutes max.
So after 45 minutes you are “go!” for making a first casting with epoxy.
I noticed that it keeps shrinking for some days – left some in a mini (1cm^3) cube ice cube tray and after a week you clearly saw the distortion in the tray. Also removing the silicone became really hard – even though the tray is silicone too.
I tried 100% silicone caulk for casting lead about 5 years ago. Molds hold up just fine, tube of caulk is under $5 most any hardware store, even Walmart. You can thin it some with mineral spirits, but only a little. Doesn’t seem to get any thinner, regardless of how much you add.
[youtube https://www.youtube.com/watch?v=92OLGmu3hws&w=640&h=360%5D
I let the mold set for a couple of weeks, before trying it out, some to let it cure, but mostly didn’t have time for casting. Never tried a two part mold, but should work.
And in addition to the Maltese Falcon, he could make a Tequila Mockingbird!
http://getsmart.wikia.com/wiki/File:Tequila-mockingbird-drawing.JPG
Bismuth is fun stuff!
Wonderful work. Going to try this out for this Christmas. I used to make clay toys; but this looks awesome!
I would like to purchase one of these small miniature tin Maltese falcon’s how can I contact the creator of this mold?
The little bubbles he is getting on the surface is the hot metal burning out the oils in the silicone surface.
One way to reduce this is to dust the mold with talk before casting. Usually the bubbles vanish after a few pours without the need for a pressure vessel.
I discovered this when using pinkysil i suspect its the same as dental silicone.
I know I’m super late to the game but I was wondering if someone can answer this question for me.
Does Bismuth-Tin Alloy oxidize the same way as pure Bismuth? If he took a torch or some heat source to the falcon would it start to have the “oil” look to it?