The hardware badge Mike Harrison designed for this year’s Hackaday Superconference is begging to be hacked. Today, I wanted to help get you up and running quickly.
The Hacker Village atmosphere of Supercon is starting up a day early this year. On Friday, November 10th badge pick-up starts at noon and badge hacking continues throughout the afternoon, followed by a party at Supplyframe HQ that evening. Plan to get to town on Friday and join in the fun. Of course, you need to grab a Supercon ticket if you haven’t already.
Check out the 2017 Superconference Badge project page for full documentation that Mike has put together during his development process.
Hardware Hacking

What to Note: prototyping area, 2×6 expansion header, ISP Header, TTL232 Header
Verbose Hardware Hacking Details: Project log
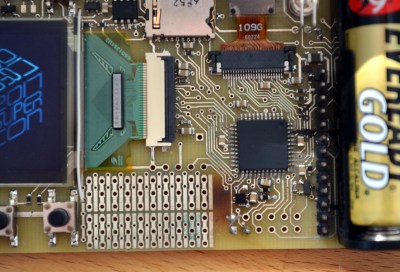
Those who want to spin a board, look to the expansion header. It breaks out the I2C lines, plus serial lines for RX1/TX1, and four additional GPIO lines. This header is through-hole 2×6 with 0.1″ space. These badge headers are unpopulated but can be soldered in the badge hacking area at the Superconference.
If you’re hardcore you can use the prototyping area on the board to solder your components. Just above this header you’ll find a row of pads providing I2C and power.
The badge will have two populated headers that may be of interest whether you’re hacking hardware or software. Next to the battery holder, you can see 0.1″ SIL pins with the ISP Header (program using a PICkit instead of copy to SD card and using the bootloader) at the top and a TTL232 header below which is helpful for monitoring debugging info.
Mike has included some helper functions in the firmware to control the pins on the breakout header. Check out the hardware hacking section linked above for more on that.
Software Hacking

What to Note: You need to install the free MPLAB-X IDE and the XC32 compiler on your computer. Compiled HEX code can be copied to the badge micro SD card and flashed with the bootloader, or using a programmer (ie: PICkit3).
Verbose Software Hacking Details: Project log
Mike has written a fantastic software framework that makes getting started with the badge quite easy. His code tends all of the hardware and provides an apptemplate.c file that can be used as the start of each of your hacks. He even has a simple way for you to add each of your hacks to the badge menu for easy display.
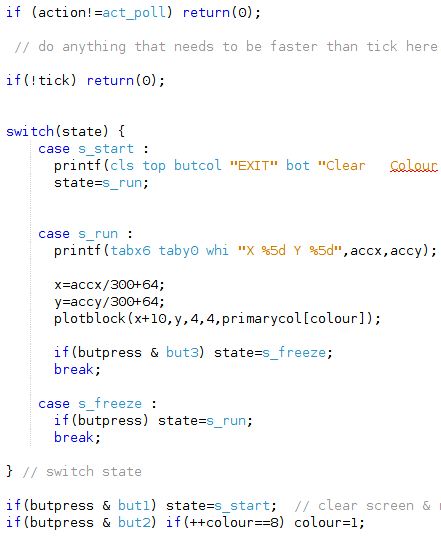
The app template includes a state machine which will run some setup code (s_ start) when your program is launched, then a different block of code runs in a loop (s_run). There is a tick flag set every 20 ms which makes for easy timing.
User inputs include 6 buttons, an accelerometer, and the camera and outputs include a 128×128 color OLED screen and one white LED (the camera “flash”) plus the data buses described in the hardware section above. The processor is very fast and there is a lot of flash and RAM available.
Get Started and Consider Teaming Up!
A great idea is always the hardest part of any hack. Start throwing around some ideas on the Superconference Chat.


thanks for the excellent documentation. really cool to see the original prototype picture as well. can’t wait to see how the finished boards look!
AS always an incredible job! I can’t stop myself to read the documentation with his voice :O
Great badge, but please, MPLAB? The proprietary tools were a bit of a buzzkill for the other PIC-based HaD badge. PIC32 is a good move compared to the previous PIC18 but there are a zillion other MCUs out there with toolchains that are open and easier to get going with on Win/Mac/Linux. At least on PIC32, GCC for MIPS is now an option, but will the badge s/w depend on proprietary Microchip libs/headers?
ARM Cortex-M FTW! The STM32 chips are so popular that they even have a branded knockoff, the GD32 lines by GigaDevice.
I don’t disagree. I’d love to see something based around libopencm3 and a beefy ST core of some kind (F7? H7?). But MC did sponsor the microcontrollers, and Mike is quite comfortable in the PIC world, so this probably made the most sense.
What’s the problem ? It’s available on 3 platforms, you install it, load the project and it just works, and integrates with Microchip’s programmers out of the box.
I can’t see how anything else could be easier to get started with, especially for anyone who’d not used it before.
Unfortunately Microchip’s online MPLAB Xpress tool seems to have been left to rot – it would have been an alternative that didn’t require anything to be installed, but doesn’t seem cpapble of producing a .hex file
My thought is that there is a general dislike of proprietary tools, unfamiliar environments, and 600+ MB IDEs. If other commenters are at all like me, the second issue is the real problem, while the first ends up being the one that gets the most attention (although it’s still a big deal IMHO). I loaded a project in MPLABX for the first time today and it seems insanely complicated, but I understand the same could be said of any other development environment, integrated or not.
For what it’s worth, once I got the compiler installed everything seemed to build right once I made one change — in /MDD_File_System/SD-SPI.c I had to flip the slashes on the first two #include statements so Make could find the files in Linux. Otherwise the whole thing was a 10 minute process start-to-finish, which to your point is the most important part — getting folks up and running quickly and painlessly.
MPLABX is big but disks are cheap, There is a lot in it, but you don’t have to use it all.
I did change some of the “\”s for Linux but looks like I missed a couple.