[Jan Mrázek] is a pro when it comes to rolling his own PCBs. He can crank out a 6/6 mil double-sided PCB in 45 minutes flat. As a challenge to his prowess, he decided to experiment with plating through-hole PCBs at home, because sometimes you just can’t wait for China to deliver the goods.
The key here is to make a non-conductive surface—the walls of holes drilled in a sheet of copper clad–conductive. While there are some established ways of doing this at home, the chemicals are difficult to source. When his local supplier started stocking colloidal graphite paint, which is used to prevent ESD and fix non-working remote control buttons, he decided to try it.
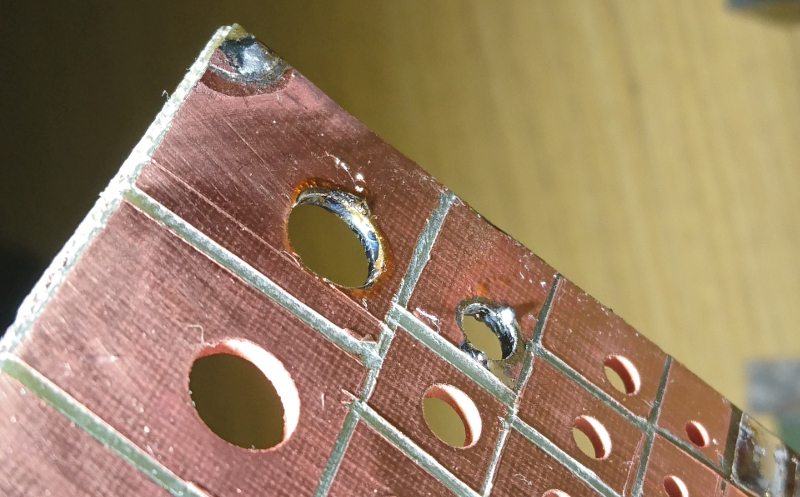
[Jan] drilled up a board with holes ranging from 0.1mm up to 8mm, polished it, and gave it an acetone bath. He sprayed each side with graphite and cured it at 100 °C for 20 minutes. At this point, wall hole resistance measured 21 Ω. [Jan] wet-sanded away the graphite and set up an electroplating bath. Right away, he could see a layer of copper forming on the holes. After 90 minutes, he polished the board again and separated the vias to prepare for the real test: solder. This time, every hole except the smallest size reported a resistance of 0.1 Ω. But they all sucked solder through the vias, making this experiment a success.
[Jan] concluded that this is a simple and effective process, but is rarely worth the effort. We wonder how the simplicity of this method compares to drilling wells instead of holes, filling them with conductive ink, and then drilling the rest of the via.
Via [Dangerous Prototypes]


Test all your pencils, you’ll find some quite conductive ones, scribble round holes with those.
Or buy carbon gouge rods? If you have to use pencils get the good ones from an art store.
Actually, last time I needed conductive pencil, the Staples brand HB won, and there was a Conte I think it was 2B artists pencil that was barely registering. So “good” not necessarily conductive.
Spray graphite used for lubrication of locks.
Awesome! And here I was using those darn eyelets to make conductive through holes.
That’s got to be faster than his method.
Maybe some thin walled copper tube would make better rivets
I use special copper rivets from Bungard
Me too. They’re sold by the inner diameter, and the outer diameter is 0.2 mm bigger. 0.8 mm is a tight, but possible, fit for pin headers, and you have to drill out at 1 mm, and the flange is at least 1.2 mm.
The sell a press for a bazillion dollars that goes along with the rivets, but I haven’t ever needed it. I just solder on both sides and trim the waste. I suppose with the press, I could skip the soldering altogether…
i just used an ice pick to flare the tube end, then use a pair of welders pliers to flatten them out. then just solder over it.
For interested US parties, there seems to be an eBay source for PCB rivets:
https://www.ebay.com/itm/222698825174
(Other sizes available.)
I use brass “head pins”, sold for jewelry making:
https://img0.etsystatic.com/000/0/5263822/il_340x270.124334446.jpg
It’s helpful to design in an annular ring at least the diameter of the head, so you don’t risk overlapping adjacent traces. But they work great.
How about Pop-Rivets?
Good Lord. Seriously? Aluminum rivets to copper board?
How about stainless steel pop rivets? I live in Germany and here you can buy copper ones as well.
i started doing that and i rather like the results.
I always just put in some wire and soldered from both sides. Ugly, yet effective…
I have learned: lace up the whole board with a single piece of wire, through all the vias, solder both sides, then clip the wire. It really, really beats trying to stick little snippets of wire into each hole and then having half of them drop out when you’re trying to solder the other side and you melt the solder on the side you just finished.
Bluetack on the back.
graphite powder mixed with acrylic paint works a treat for this. I use it regularly for plaiting 3D printed ABS parts.
I find you do have to experiment a little with the emulsion depending on the supplier of the graphite and how fine it is but the best stuff I have found is the stuff used to lubricate locks.
Oh and just for kicks I used an acetone/ABS/grphite mix and found that works really well however its not easy to spray on the surface as it tends to dry in the airbrush and clog it.
Try MEK instead of acetone.
MEK is so hard to get state side now, at least in my area UT, which is a shame it was a pretty good option if you wanted something a bit stronger than just alcohol.
Too bad you can’t get GRAPHIT 33 in the USA. :-/
Tsssk.. or they’ll gind out about POSITIV.
This is the way! Having played with graphite before, I found that Nickel paint is even nicer ( MG Chemicals 841AR ) as the initial resistance is lower so more copper settles on the holes faster. Not sure if the particle size is larger; I haven’t tried that on super-tiny holes, just like 0.7mm.
As for coating, I just put little droplets on the vias, then suck them through with a vacuum cleaner on the other side which typically covers the hole-walls nicely (repeat from other side for good measure).
FWIW, unless he was measuring with a 4 wire meter there chances of him measuring resistance accurately in the .1 ohm range are slim to none. I am willing to bet the resistance was way less than that.
I was curious about this one as well.
I say in the article that “the multimeter shows 0.1 Ohms, which is the same value it shows when the leads are short-circuit”. I am aware that I am not able to measure miliohm range without 4 wires.
I’m willing to declare it irrelevant if it soaks solder through the hole.
Yup, pretty much that’s what is really important.
its not a very difficult process … IF you can drill your holes before you etch
Exactly. This is what essentially separates a homemade production from owning a small pcb production line. Though if you always have a CNC drill ready, why not use it for pre-drilling.
You really need a CNC drill to do it though, as all the tracks need to be connected to do the electroplating. At a pinch you could maybe print a drill guide and stick it on to drill but it’s going to be a fiddly process
Great tips in the comments on this one!
If you want cheap, readily-available conductive ink, many India inks are conductive. I use Speedball Super Black for this exact purpose — available pretty much anywhere art supplies are sold.
Talking of vias, did you people see the ifixit teardown of the iphone X?