Building A Monster Floodlight Out Of Scrap

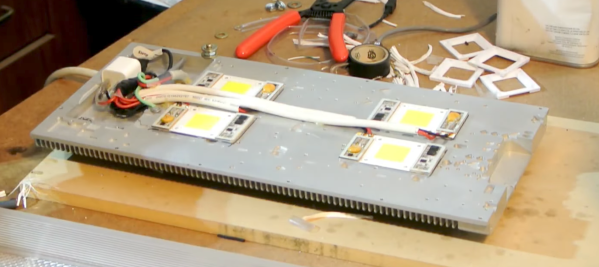
When the apocalypse comes, we want [Justin] on our team! He made a hefty 400 W work light out of four 100 W LEDs mounted to a giant, aluminum slab-like heat sink he had lying around. He manufactured a diffuser for the LEDs by cutting down what appeared to be a old broken fluorescent light fixture’s cover, with side plates bolted into place for good measure. [Justin] does a lot of metalwork in his projects, and you can see it the precision with which he bolts the various parts together into a rather slick assembly.

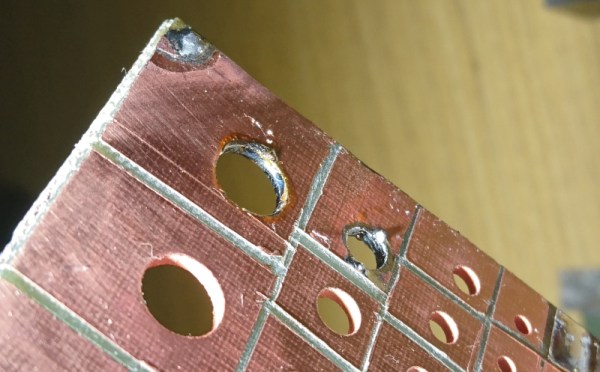
The LEDs run off 110 V, and [Justin] soldered one of those white iPhone USB chargers in to power four small fans that are mounted on the heat sink fins backing up the LEDs. Then he mounted a ball joint onto the underside so the thing could be pointed wherever, with the other end of the joint attached to what might be the tripod from a standing work light.

Now all he needs is a control system, like this arcade button workshop light or this fully controllable workshop lighting rig.

Continue reading “Building A Monster Floodlight Out Of Scrap”

Creating Modular Storage Out Of Used Filament Spools

[Alec Richter] had a good idea on how he could convert the leftover filament spindles from his 3D printer into multi-compartment storage. An empty spindle is fitted with several trays that rotate out from the circle for easy access. With multiple spools rotating on a central axle, you can really see how a bunch of parts could be organized in a column, though not being able to see through the sides probably limits its use somewhat — most of the modular component storage we’ve seen has clear trays.

He has designed drawer bases with removable compartment trays, along with alignment jigs to help you get the drawer installed perfectly the first time. You can download the designs (14 files!) but you need to sign up for an account first. Also, [Alex]s designs fit very specific spindles so be sure of your measurements, etc.

Hackaday is awash in posts about modular storage, like this computer tower turned storage shelf and this technique for using peanut butter jars for storage.

[mucho apreciado for the tip, George!]

Why Wait? Just Plate Your Own PCB Vias

[Jan Mrázek] is a pro when it comes to rolling his own PCBs. He can crank out a 6/6 mil double-sided PCB in 45 minutes flat. As a challenge to his prowess, he decided to experiment with plating through-hole PCBs at home, because sometimes you just can’t wait for China to deliver the goods.

The key here is to make a non-conductive surface—the walls of holes drilled in a sheet of copper clad–conductive. While there are some established ways of doing this at home, the chemicals are difficult to source. When his local supplier started stocking colloidal graphite paint, which is used to prevent ESD and fix non-working remote control buttons, he decided to try it.

[Jan] drilled up a board with holes ranging from 0.1mm up to 8mm, polished it, and gave it an acetone bath. He sprayed each side with graphite and cured it at 100 °C for 20 minutes. At this point, wall hole resistance measured 21 Ω. [Jan] wet-sanded away the graphite and set up an electroplating bath. Right away, he could see a layer of copper forming on the holes. After 90 minutes, he polished the board again and separated the vias to prepare for the real test: solder. This time, every hole except the smallest size reported a resistance of 0.1 Ω. But they all sucked solder through the vias, making this experiment a success.

[Jan] concluded that this is a simple and effective process, but is rarely worth the effort. We wonder how the simplicity of this method compares to drilling wells instead of holes, filling them with conductive ink, and then drilling the rest of the via.

Via [Dangerous Prototypes]

Eavesdropping With An ESP8266

In the old days, spies eavesdropped on each other using analog radio bugs. These days, everything’s in the cloud. [Sebastian] from [Hacking Beaver]  wondered if he could make a WiFi bug that was small and cheap besides. Enter the ESP8266 and some programming wizardry.

[Sebastian] is using a NodeMCU but suggests that it could be pared down to any ESP8266 board — with similar cuts made to the rest of the electronics — but has this working as a proof of concept. A PIC 18 MCU samples the audio data from a microphone at 10 kHz with an 8-bit resolution, dumping it into a 512-byte buffer. Once that fills, a GPIO pin is pulled down and the ESP8266 sends the data to a waiting TCP server over the WiFi which either records or plays the audio in real-time.

[Sebastian] has calculated that he needs at least 51.2 ms to transfer the data which this setup easily handles, but there are occasional two to three second glitches that come out of the blue. To address this and other hangups, [Sebastian] has the ESP8266 control the PIC’s reset pin so that the two are always in sync.

Continue reading “Eavesdropping With An ESP8266”

Hackaday Prize Entry: Open Bike Shoe

Shoes are some of the most complex pieces of equipment you can buy. There’s multiple materials ranging from foam to weird polyesters in a simple sneaker, and if you dig into shoes for biking, you’ll find some carbon fiber. All these layers are glued together, stitched, and assembled into a functional piece of exercise equipment, with multiple SKUs for each size. It’s really amazing.

Accordingly, [marcs] created N+ Open Bike Shoe Platform, the purpose of which is to create open source,  customizable, and repairable shoe platform based on 3D printing, though with other techniques like rubber molding and sewing fabric uppers are included as well.

The project breaks down its signature shoe into all its various parts: heel, toe tread, insole, upper, and so on. With each part individually customizable, the shoe can be tailored to suit each individual, all while part of a cradle-to-grave lifecycle that allows shoe parts to be replaced, repaired, or recycled.

What Is Entropy And How Do I Get More Of It?

Let’s start off with one of my favorite quotes from John von Neumann: “Any one who considers arithmetical methods of producing random digits is, of course, in a state of sin. For, as has been pointed out several times, there is no such thing as a random number — there are only methods to produce random numbers, and a strict arithmetic procedure of course is not such a method.”

What von Neumann is getting at is that the “pseudo” in pseudorandom number generator (PRNG) is really a synonym for “not at all”. Granted, if you come in the middle of a good PRNG sequence, guessing the next number is nearly impossible. But if you know, or can guess, the seed that started the PRNG off, you know all past and future values nearly instantly; it’s a purely deterministic mathematical function. This shouldn’t be taken as a rant against PRNGs, but merely as a reminder that when you use one, the un-guessability of the numbers that it spits out is only as un-guessable as the seed. And while “un-guessability” isn’t a well-defined mathematical concept, or even a real word, entropy is.

That’s why entropy matters to you. Almost anything that your computer wants to keep secret will require the generation of a secret random number at some point, and any series of “random” numbers that a computer generates will have only as much entropy, and thus un-guessability, as the seed used. So how does a computer, a deterministic machine, harvest entropy for that seed in the first place? And how can you make sure you’ve got enough? And did you know that your Raspberry Pi can be turned into a heavy-duty source of entropy? Read on!

Continue reading “What Is Entropy And How Do I Get More Of It?”

DIY Pyrography Power Supply

Ever wanted to try your hand at wood burning? If you already threw away your first soldering iron—you know the one: plugged straight in to the wall, no temperature control, came with a thick piece of tin foil to rest it on—don’t despair. Pyrography pens don’t cost that much. The variable power supply they plug into, though: that’s another story. Those cost more than they probably should.

[td0g] took the plunge into pyrography a while back, and wanted to build his own controller from an old ATX power supply. Why not? It should be more than capable of doing the job. Even the most heavy-duty pyrography pens only draw 10A, and the 3.3V line showed to be rated for 30A. All [td0g] had to do was add a PWM with a MOSFET and a ‘Tiny85.

The project nearly became Fail of the Week fodder after [td0g] saw huge voltage spikes across the MOSFET. A 47kΩ resistor took care of those, and a heat sink salvaged from the junk bin will prolong the transistor’s life. [td0g] added a push button that cycles through five heat settings, and an LED to show the status. After that, all he had to do was add a male RCA input to connect the pens he already has.

Okay, so you wouldn’t be caught dead dropping money on some fancy power supply for this new hobby. Don’t want to buy pens, either? Roll your own from a plasma arc lighter.