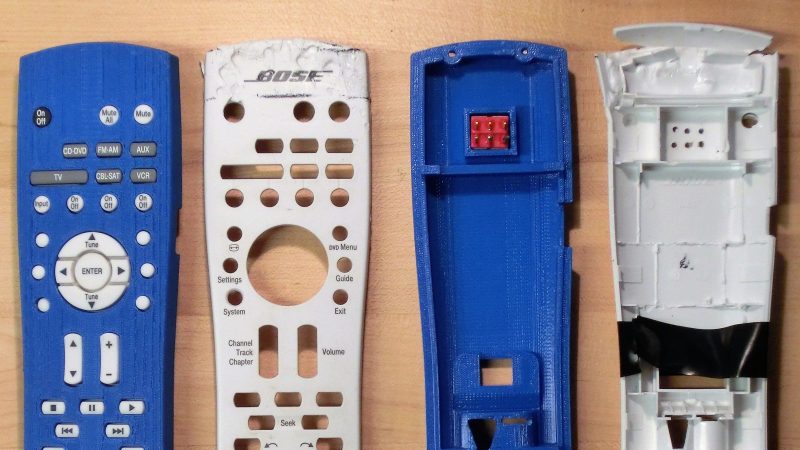
What is it about remote controls? They’re like some vortex of household chaos, burrowing into couch cushions while accusations fly about who used it last. Or they land in just the right spot on the floor to be stepped on during a trip to the bathroom. And don’t get us started about the fragility of their battery case covers; it’s a rare remote in a house with kids whose batteries aren’t held in by strips of packing tape.
But [Alex Rich]’s Bose radio remote discovered another failure mode: imitating a dog chew toy. Rather than fork out $90 for a replacement, [Alex] undertook a 3D-printed case to repair the chewed remote. He put an impressive amount of reverse engineering into the replacement case, probably expending much more than $90 worth of effort. But it’s the principle of the thing, plus he wanted to support some special modifications to the stock remote. One was a hardware power switch to disconnect the batteries entirely, hidden in the bottom shell of the case. The second was the addition of a link to his thermostat to adjust the volume automatically when the AC comes on. That required a Trinket inside the remote and a few mods to make room for it.
Yes, this project dates from a few years back, but [Alex] only just brought it to our attention for the Repairs You Can Print contest. Got some special unobtanium part that you were able to print to get out of a jam? Enter and win prizes to add to the glory of fixing something yourself.


$90 for a replacement remote from Bose? Remind me to never ever buy anything from them, Man if the batteries dies what would they want for a set of replacement AAA cells? $25? I hate places that charge way too much the for the initial product and than try and cash in again if you need a little part for it. I call it the see how much you can extort before the poor customer will scrap the thing mentality. Pieces not based on any measure of manufacturing cost but a carefully crafted number that amounts to what most people will begrudgingly pay. I hope the stl files for the case are uploaded someplace so Bose looses a lot of sales on $90 replacement remotes.
I wish it was easier to unify the various remotes connected to our entertainment center.
I know it’s possible to unite (most of?) them, but it usually involves finding/printing/downloading some manual and then trying the various possible codes for that particular unit, and hopefully getting it entered before the “universal” remote decides you’ve left the room and resets itself.
Logitech’s Harmony system is really good for uniting a large variety of remotes, and it can learn from existing remotes, I currently use it alongside Google Home and it’s a great solution for an entertainment center/Home Theatre
Yeah they probably won’t lose many sales, files are there though.
Google “Bose lifestyle remote” – this one is more going for $40 but there are some other flavors selling for $150 even $200.
As much as I hate those screws that hold the battery compartments closed in children’s toys. Remote controls need them too! (for the same reason)
I like his idea of adding extra functionality (esp. the hidden power switch)!
At least the dog left the rubber keypad alone,
My daughter ripped the keys out, one-by-one, from two of our remotes…
My son gnawed a rubber key off the keypad of a calculator and swallowed it when he was a baby. The deed was done before my wife had even realized he had the calculator. We had to “monitor his output” for a few days before the key made a reappearance.
Good times.
Thanks for the write up on my project Dan!
Thanks it wasn’t lithium batteries, those things are baby killers, literally.
You mean like this?
http://tinypic.com/r/scatjo/9
you are welcome ;-D
Haha that’s great
1++
It would look way better if the upper side had been printed flat instead of trying to 1:1 copy the original. The only things that have to be identical keypad holes and the battery compartment. Maybe even adding some extra design elements :-)
I would probably put the upper side on a scanner instead of taking a photo since there is this little projection distortion of the lens. Still it’s a nice inspiration for restoration projects.
I like to embrace the 3D printed look with stair steps on those gradual curves! It’s a feature.
Nice feat of CAD designing. For a more smoother and cleaner for long term use, a surface treatment (sanding and acetone) would greatly help.
This is an good example the power of 3D printing, where a drill press cannot compete.
Most interesting part of this project is that apparently the remote was printed on a Stratasys printer! Either it’s a very old model, or Stratasys has really dropped the ball in recent years. Looking at it, I would have assumed that was printed out on a China-special.
Not knocking the creator’s work though, he did hell of a job designing it up. Very impressive.
Yeah good point, I have had a bunch of comments about the finish. I thought the print came out nice, it’s just not very small layer height. I used a uPrint SE Plus that I have access to at work and Stratasys limits layer height to a min of 0.010″ in their software (I hate that I can’t use Cura or other slicer). Prints do come out near perfect (ie: no layer separation or lifting from platform) every time in ABS because of the heated build chamber and soluble support, but the layers are big.