Repetitive motion injuries are no joke, often attended by crippling pain and the possibility of expensive surgery with a lengthy recovery. Early detection and treatment is the key, and for many wrist and hand injuries such as [ktchn_creations] case of “Blackberry thumb,” that includes immobilization with a rigid brace.
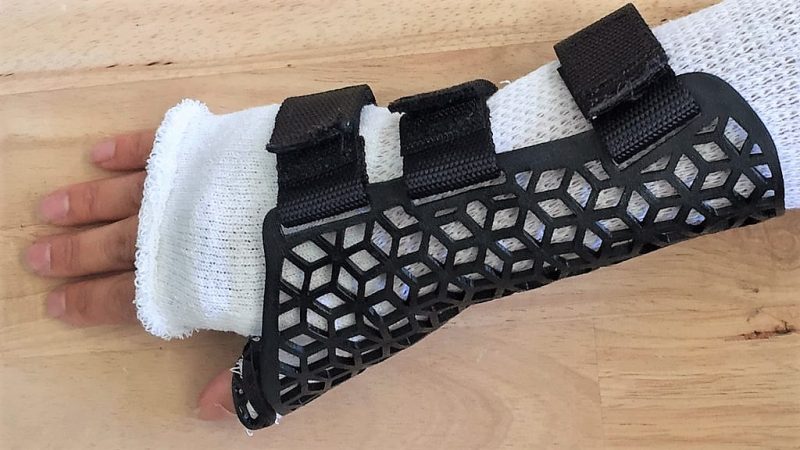
Sadly, the fiberglass brace her doctor left her with was somewhat lacking in the style department, and rather than being left with something unappealing to wear for half a year, she 3D-printed a stylish and functional wrist immobilizer. Starting in Autocad, she designed the outline of the brace, essentially an unwrapped version of the splint she started with. For breathability as well as aesthetics, a pattern of tessellated hexagons was used. The drawing was then exported to Fusion 360 for modeling and printing in black PLA. We were surprised to see that the brace was printed flat and later heat formed around her wrist, but that makes more sense than printing it in its final wrapped state. With a few velcro straps, the thermoformed brace was ready for service on the long road to recovery.
While [ktchn_creations] stipulates that looks were the motivator here, we’re not unaware that a 3D-printed brace might be more affordable than something dispensed by a doctor. But if you do build your own DIY appliance, whether for bracing your wrist, your knee, or your wayward teeth, you’ll want to run it past your health care provider, of course.


That makes more sense than printing it in its final wrapped state because of modelling or printer limitations?
I guess it’s hard to get the shape right as you have to model around your arm. Directly adjusting it on your arm is certainly easier.
Scan your arm, adjust model to your arm, print? I guess easy 3D scanning still remains somewhat elusive and difficult to do though one would think that software has advanced enough to make it such that a series of raster images can be converted into a good enough 3D model at this point?
I’ve been doing exactly this. Kinect camera + Skanect + NVidia GPU (for CUDA acceleration). Then modify the model in Blender. Unfortunately printer issues have significantly delayed the development. But the current iteration conforms to my wrist nicely. Once the printer is back up in a few days I should (hopefully) have a functional version printed.
tips@hackaday.com when you post something up?
I cant imagine a way to FDM print this in curved form without wasting half a kg of filament on support.
Were it not for the pattern I would have bought a sheet of thermoplastic like used in leg braces and prosthetics and just used that.
Once you have been doing the 3D printing fo a while you realize that you need to have a stock of generic building material like threaded rod and plastic pipe and only print the stuff you can’t just make with commodity cut and use stock.
This is why a laser cutter is right up with and compliments 3D printing for prototyping, it has the clean lines of CAD design but it can cut big commodity stuff if you have a big enough machine.
Thermoplastic? Eww…
if you’re doing it the old fashioned way, might as well go with something fancy, like woven carbon fiber… if you take your time to sand it smooth, do a a glossy finish and then polish it, you get all the bling for not so much money ;-)
There are sheets of low temperature thermoplastic made for orthotic and therapeutic use. It comes in two basic styles, solid and perforated. Pieces are cut to size and shape with shears. Then they’re immersed in a not quite boiling water bath to soften so they can be formed around the body part to be braced or supported. Another property of the plastic used is that at the softening temperature its surface becomes self bonding. Loops for attaching straps, hooks for rubber bands or cords and other fixtures can simply be hand formed to shape then pressed onto the other parts where they become permanently fused.
Some time ago I wanted to get some of the perforated sheets to form a custom back support to mount a homebrew steadicam arm*. But the stuff is bloody expensive so I didn’t buy any. Typical of just about anything used for anything related to medical, cost is high just because insurance companies will pay, nevermind the true manufacturing cost.
*Didn’t build the arm either due to video cameras quickly reducing in size and weight.
I believe that some cosplayers use this or a very similar material to create some of their projects. My impression is that it is rather expensive overall but most likely significantly less so than medical grades of the same raw material.
Does anyone have a name for this low temperature thermoplastic?
This could help me out on a project I am working on.
Polycaprolactone (PCL) AKA ShapeLock AKA Smart Plastic (and various other brands)
I know that you can immerse Sintra in boiling water and bend it just like the stuff they use at the orthopaedist’s. Probably would also work with a hot-air gun, etc.
Sintra is very cheap.
My RSI problem is thumb joints – the internal one that attaches the thumb bones to the wrist and mainly the middle one, but not the one near the end. The physical therapy people have made me a couple of braces using that thermoplastic, and they worked pretty well, but they only last about 6 months or a year before they start cracking and I usually use cloth ones or don’t bother. But while Techshop was around, I decided to try making a couple of sheet metal ones. Got them to about the right shape with metal cutters and a hammer, used a grinder to smooth out the sharp edges, put a couple of 1/4″ holes in them to attach a strap, decided that the strap wasn’t that useful but made a bunch more holes in it because they looked good. It does a slightly better job of immobilizing the joint than the medical ones do, in return for being a lot clunkier. (Plus there was the extra surprise of finding out that the laptop I had at the time had a big speaker magnet about where I usually rested my hand, so it really wasn’t practical to wear when typing, which was sort of the point of the whole things.)
If you need it, half a Kg in support material is cheap…
I can’t help but think that a lot of these “Repair with 3D” things could be done much simpler by just hand-shaping a clot of Plastimake. No 3D modeling, no support structure, no thrown-away prototypes. Granted, the end result _might_ not be quite as polished, although I have seen and made some fine-looking things.
(https://www.plastimake.com/examples)
If utility is the main goal … it doesn’t _have_ to be 3D printed.
Sugru!
True, but the advantage to 3d printing comes when you need more than one of them.
If you mold it by hand, if it breaks or you need a second one, you have to do the whole process over again. When you know it’s a one off – you’ll never need a second one, your friends aren’t going to want one, and you aren’t going to break or lose it – then sure hand molding it works great.
If you model it and 3d print it, you might go through a few revisions until you get a model that comes out exactly the way you want it. But once that is done if you need a second one you just hit print again. And if you want to change it a bit, or make it larger or smaller, it only takes a couple minutes to alter the model vs starting at the beginning again.
This is as wrong as saying that we favor Raspberry Pi or Arduino or some brand of soldering iron that you’ve noticed a lot of hackers using.
People use the tools they use, and we write up the projects that we think are interesting.
We categorically do not do covert advertising, sponsored content, or product placement.
“We categorically do not do covert …”
If not “categorically” how about “specifically”? B^)
If not “covert”, how about “blatant”? B^) B^)
Blatant, we do. :) What Brian B. likes to call “superliminal advertising” you’ll find in the banners. Those things that look like ads? Those are the ads.
We’re amazingly fortunate to be able to remain independent, and because of how rare it is these days, we understand the skepticism. And if you’d seen some of the “deals” that we’ve turned down to maintain our independence, you’d probably question our sanity…
Hackaday is in it for the love, for the long run, and we’re in it for y’all.
Uh – I think nino was being sarcastic. Probably? I read it that way.
I don’t think so. And frankly, I share his skepticism. But we’re not that.
Fusion 360 is very popular and pushed by a number of 3D printer manufacturers. Not that HAD can control what people are using to create their own projects, not sure how you think they manage that part of this “advertising” sceme.
Now, the bot that’s pushing Plastimake further down the comments is another story…
Not to rain on her parade, but an exceptionally similar design (down to the idea of printing flat and heating before fitting) has been on Thingiverse since 2014. It looks like it was even a featured model at one point.
https://www.thingiverse.com/thing:403001
Not to claim she is trying to rip off anyone’s ideas, but just a reminder that you should check around a bit online before launching into a project just to make sure it hasn’t already been done. Unless she just wanted to do it herself as an academic exercise, nothing wrong with that.
> wanted to do it herself as an academic exercise
Or to support her own wrist instead of someone else’s…
That’s not how it works. You form brace to your wrist when heated and bent, the print isn’t different for each person.
I used this one about 2 months ago and it worked great.
Yesterday, today and tomorrow, I will eat bagel to my coffee while doing parts in SW.Where is my money from local bakery, Tchibo and Dassault I ask myself…
Okay, I’m going to play an “ergonomics specialist” on the Internet, even though I’m not one IRL.
Just warning that isolating/bracing a sore joint caused by repetitive stress, often moves the injury to another joint, if the original cause is not addressed.
This does absolutely nothing for the underlying cause. I would start off by checking for adequate overall hydration before reading up on the actual efficacy of surgical options for RSI injuries. It’s not anywhere near as efficacious as one might expect.
I found it ironic that once she was diagnosed with RSI, she spent time on the computer – “Starting in Autocad, she designed the outline of the brace”. Wouldn’t doing stressful activities to design a brace you need because of stressful activities seem, I don’t know, odd? counter productive?
It’s a nice project and well executed though. Hopefully she didn’t make her problem worse with the mouse, or maybe she did it left handed?
Yeah 3d modeling requires a crapload of clicking, click-and-hold, and cetner click. Lotsa index finger strain. I have workarounds for most programs but unfortunately Blender and Fusion360 don’t play nicely with Luamacro’s input swallowing.
Noooo dont uncover the maker/rapid prototyping illuminati these paid posts are how I make my living