The problem with hanging on to old consumer products is that the original batteries no longer hold a charge. To make matters worse, replacement batteries ordered online have likely been sitting on a warehouse shelf for years and are no better. [Larry G] faced this issue with his old Nintendo DS Lite. Luckily he remembered a hack from his youth where a friend’s Dad had duct-taped a massive alkaline D-cell battery pack to the back of a Gameboy to give it a longer life. And so [Larry] gave new life to his Nintendo DS Lite by designing and 3D printing a case for a battery with an even larger capacity than the original.
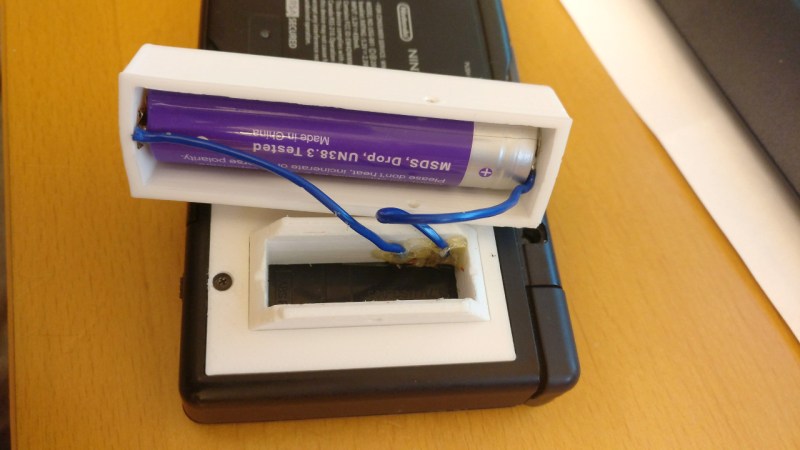
He first obtained a 2400 mAh 18650 lithium-ion cell, one with over voltage and under voltage protection. With that as a guide, he designed and 3D printed a case for it made up of four printed parts. The case was needed because the 18650 doesn’t fit in the NDS Lite’s battery compartment. Instead, one of the parts, which he calls the fake battery, fits in the compartment and has copper strips glued to it for connecting to the NDS Lite. From there, wires go to another part wherein sits the 18650. The remaining parts secure it all in place. Charging is done using the NDS Lite’s built-in charger. Even though the new case adds significant bulk, it actually fits well in the hand.
No doubt many of you have your own old NDS Lite sitting around that can benefit from this repair. The project details and STL files can be found on his Hackaday.io page using the above link.
This is also [Larry]’s entry for our Repairs You Can Print contest which puts him in the running for one of two Prusa i3 Mk3s plus the multi-material upgrade.


Where’s the BMS. D cell to lithium with original built in charger? This has nothing to do with 3D printing of course. Just safety.
Cool idea for battery expansion, are the little bits that hold it on up to it sticking out and weighing more? Some battery doors come off and get lost others are a real pain to open. I am sticking a lithium cell with silicone onto a 2xAAA powered headphone radio. Ugly but workable when carried in a belt case. I will only need to charge it with a single cell lithium charger once a month.
Is that a 18650 cell in your battery cavity or are you just happy to see me?
Few things I would change, although this is a good idea…great really.
1) Make the battery on both sides on the bottom. So you have handles. 2×3.8v Longer batter life.
2) No wires from the cell on the battery side to the connector… make them tabs.
3) No wires to each cell itself, make them tabs.
4) only wires are from Cell 1 – Cell 2 to use them in parallel Which can be hidden with the slide in ability.
5) The slide in ability of the pack utilizes the pen slot to hold itself, the screw holds in the other side.
6) Can still make a pen slot via the 3d printer itself with tolerances needed.
Only reason why I know this is possible is because I have done it already. BUT I did it manually vs a 3d printer, since I have NO 3d printer. No money for it, but it is possible, and can be done…wish i could do it, but still possible with no 3d printer, and super glue and 2 18650 holders, and the old battery compartment, old battery(terminal utilization), and tabs and time.
3d printing this would have been so much eaiser and a much cleaner look!.
Heck then, one could sell these on Ebay or there of, and make a decent $$ if they wanted to go that route.
Make a small charging circuit in the middle with 1 small less than postage size part $.60 worth, and man oh man… you got a rechargeable pack that can make life so much easier and better. Man oh man.
Costs of the parts:
2 18650’s Dollarstore Packs, 1$ for the backups 1-2S. 1-2$ (usually includes tabs as well or the metal tabs for 2+S
1 Li ion charger circuit $.60
Wire .01 if that.
Solder .01 if that.
Filiment $.40-1.00 Depending on what is used and the quality of the print.
4$ For all parts rougly?
2$ without batteries?
Time is the only factor(including assembly) that is an issue. Unless you take out assembly leave that to the customer… So I say 3-5$ for everything Not including shipping?
Not Bad really….could make a decent profit really if one was looking into that aspect.
I did a similar thing with my old SRM cycle power meter computer, instead of the standard 100mAh or so battery, designed and printed a new back for the computer case to take an 18650. I now get many months of use instead of a few weeks. It’s on Thingiverse to download.